Game Development Tips
This article introduces tips for creating games with Siv3D for participants of the Siv3D Game Jam . You may find tips that help with high-quality and unique game development. We plan to prepare as many tips as there are participants in the game jam.
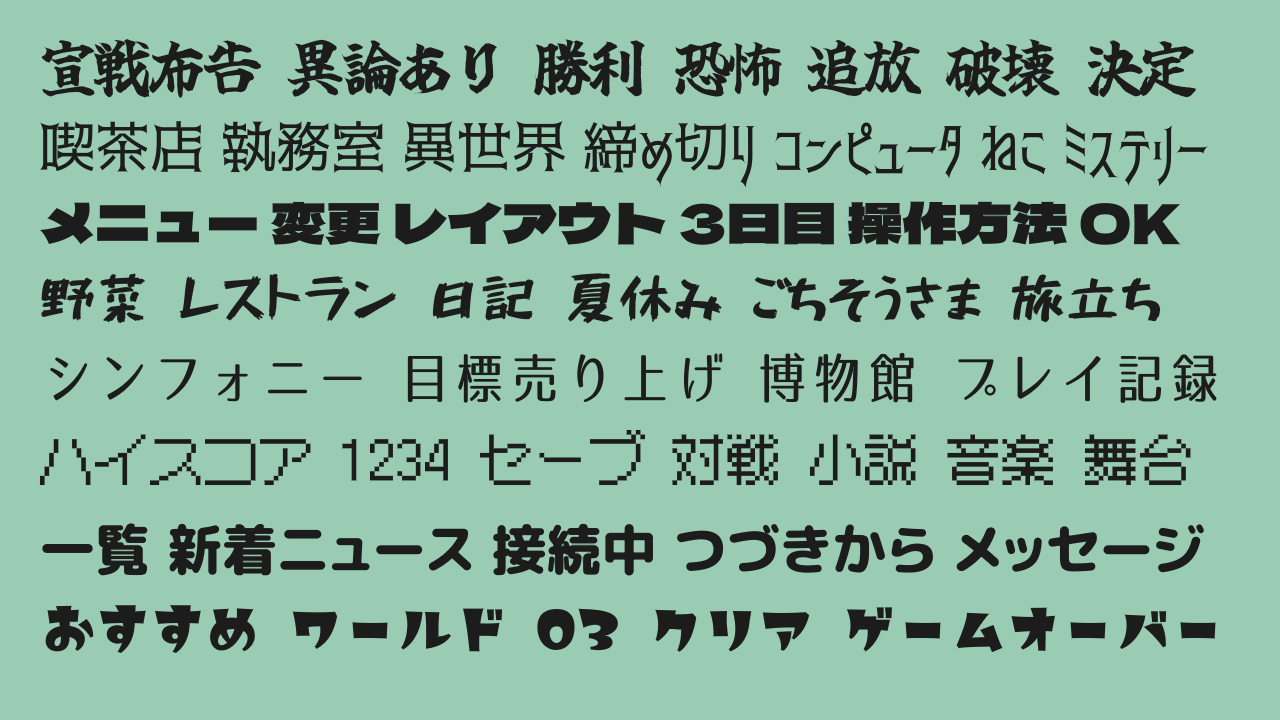
1. Choose fonts that match your game's image
From Siv3D v0.6.12, MSDF format fonts can also render complex character shapes beautifully. Here, we introduce several unique fonts that can be used for game development.
| Font Name | License |
|---|---|
| Tamanegi Kaisho Free v7 Kai | Custom License |
| Akabara Cinderella | Custom License |
| Dela Gothic One | SIL Open Font License |
| 851 ChikaraDzuyoku-kanaA | Custom License |
| 07 LogoTypeGothic Condense | M+ FONT LICENSE |
| x12y12pxMaruMinya | Custom License |
| Rounded-X Mgen+ 1pp heavy | SIL Open Font License |
| Memoir-shikaku | Custom License |
Code
# include <Siv3D.hpp>

void Main()
{
	Window::Resize(1280, 720);
	Scene::SetBackground(ColorF{ 0.6, 0.8, 0.7 });

	// Tamanegi Kaisho Free v7 Kai
	const Font font01{ FontMethod::MSDF, 48, U"fonts/tamanegi-kaisho-free-v7-kai.ttf" };

	// Akabara Cinderella
	const Font font02{ FontMethod::MSDF, 48, U"fonts/akabara-cinderella.ttf" };

	// Dela Gothic One
	const Font font03{ FontMethod::MSDF, 48, U"fonts/DelaGothicOne-Regular.ttf" };

	// 851 ChikaraDzuyoku-kanaA
	const Font font04{ FontMethod::MSDF, 48, U"fonts/851CHIKARA-DZUYOKU_kanaA_004.ttf" };

	// 07 LogoTypeGothic Condense
	const Font font05{ FontMethod::MSDF, 48, U"fonts/logotype-gothic-condense.otf" };

	// x12y12pxMaruMinya
	const Font font06{ FontMethod::MSDF, 48, U"fonts/x12y12pxMaruMinya.ttf" };

	// Rounded-X Mgen+ 1pp heavy
	const Font font07{ FontMethod::MSDF, 48, U"fonts/rounded-x-mgenplus-1pp-heavy.ttf" };

	// Memoir-shikaku
	const Font font08{ FontMethod::MSDF, 48, U"fonts/memoir-square.otf" };

	while (System::Update())
	{
		font01(U"Declaration Victory Fear Exile Destruction Decision").draw(55, Vec2{ 40, 40 }, ColorF{ 0.11 });
		font02(U"Cafe Office Otherworld Deadline Computer Cat Mystery").draw(55, Vec2{ 40, 120 }, ColorF{ 0.11 });
		font03(U"Menu Change Layout Day 3 Controls OK").draw(55, Vec2{ 40, 180 }, ColorF{ 0.11 });
		font04(U"Vegetables Restaurant Diary Summer Vacation Thanks Journey").draw(55, Vec2{ 40, 270 }, ColorF{ 0.11 });
		font05(U"Symphony Sales Target Museum Play Record").draw(55, Vec2{ 40, 350 }, ColorF{ 0.11 });
		font06(U"High Score 1234 Save Battle Novel Music Stage").draw(55, Vec2{ 40, 430 }, ColorF{ 0.11 });
		font07(U"List Breaking News Connecting Continue Message").draw(55, Vec2{ 40, 510 }, ColorF{ 0.11 });
		font08(U"Recommended World 03 Clear Game Over").draw(55, Vec2{ 40, 600 }, ColorF{ 0.11 });
	}
}
2. Change the window size
While Siv3D's default window size is 800 x 600, changing to special sizes can create unique constraints and lead to innovative games.
| Example | Window Size |
|---|---|
 |
800 x 160 |
 |
400 x 600 |
 |
600 x 600 |
3. Add a touch to the background
Instead of a solid color background, adding gradients or patterns can better enhance the atmosphere of your game.
Gradient

Code
# include <Siv3D.hpp>

/// @brief Draws a vertical gradient background.
/// @param topColor Top color
/// @param bottomColor Bottom color
void DrawVerticalGradientBackground(const ColorF& topColor, const ColorF& bottomColor)
{
	Scene::Rect()
		.draw(Arg::top = topColor, Arg::bottom = bottomColor);
}

void Main()
{
	while (System::Update())
	{
		DrawVerticalGradientBackground(ColorF{ 0.2, 0.5, 1.0 }, ColorF{ 0.5, 0.8, 1.0 });
	}
}
Radial gradient

Code
# include <Siv3D.hpp>

/// @brief Draws a radial gradient background.
/// @param centerColor Center color
/// @param outerColor Outer color
void DrawRadialGradientBackground(const ColorF& centerColor, const ColorF& outerColor)
{
	Circle{ Scene::Center(), (Scene::Size().length() * 0.5) }
		.draw(centerColor, outerColor);
}

void Main()
{
	while (System::Update())
	{
		DrawRadialGradientBackground(ColorF{ 0.98, 0.95, 0.92 }, ColorF{ 0.8, 0.77, 0.74 });
	}
}
Checkerboard pattern
Code
# include <Siv3D.hpp>

// @brief Draws a checkerboard pattern background.
// @param cellSize Cell size
// @param cellColor Cell color
void DrawCheckerboardBackground(int32 cellSize, const ColorF& cellColor)
{
	for (int32 y = 0; y < (Scene::Height() / cellSize); ++y)
	{
		for (int32 x = 0; x < (Scene::Width() / cellSize); ++x)
		{
			if (IsEven(x + y))
			{
				Rect{ (Point{ x, y } *cellSize), cellSize }.draw(cellColor);
			}
		}
	}
}

void Main()
{
	Scene::SetBackground(ColorF{ 0.4 });

	while (System::Update())
	{
		DrawCheckerboardBackground(40, ColorF{ 0.45 });
	}
}
Polka dot pattern

Code
# include <Siv3D.hpp>

/// @brief Draws a polka dot pattern background.
/// @param cellSize Cell size
/// @param circleScale Circle scale
/// @param color Color
void DrawPolkaDotBackground(int32 cellSize, double circleScale, const ColorF& color)
{
	for (int32 y = 0; y < (Scene::Height() / cellSize); ++y)
	{
		for (int32 x = 0; x < (Scene::Width() / cellSize); ++x)
		{
			if (IsEven(x + y))
			{
				Circle{ (Vec2{ (x + 0.5), (y + 0.5) } *cellSize), (cellSize * circleScale) }.draw(color);
			}
		}
	}
}

void Main()
{
	Scene::SetBackground(ColorF{ 0.82, 0.9, 0.98 });

	while (System::Update())
	{
		DrawPolkaDotBackground(40, 0.2, ColorF{ 0.98 });
	}
}
Diagonal stripes

Code
# include <Siv3D.hpp>

/// @brief Draws a diagonal striped background.
/// @param width Stripe width
/// @param angle Stripe angle
/// @param color Stripe color
void DrawStripedBackground(int32 width, double angle, const ColorF& color)
{
	for (int32 x = -Scene::Height(); x < (Scene::Width() + Scene::Height()); x += (width * 2))
	{
		Rect{ x, 0, width, Scene::Height() }.skewedX(angle).draw(color);
	}
}

void Main()
{
	Scene::SetBackground(ColorF{ 0.88 });

	while (System::Update())
	{
		DrawStripedBackground(40, 45_deg, ColorF{ 0.84 });
	}
}
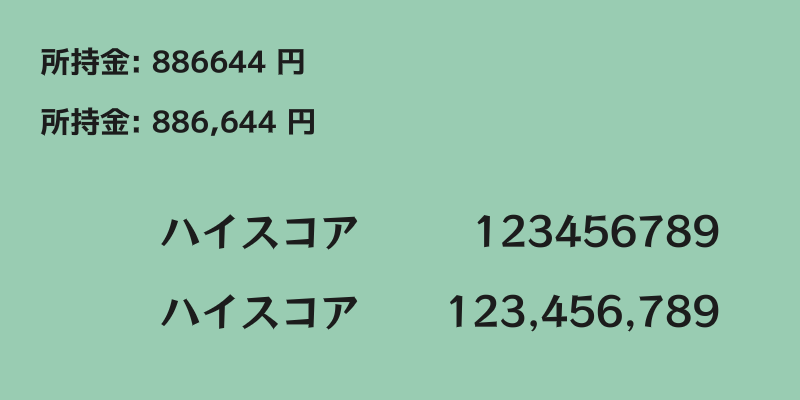
4. Display large numbers with thousands separators
When displaying numbers with many digits, adding thousands separators makes them more readable. ThousandsSeparate(x) returns a string with thousands separators for the number x.
Code
# include <Siv3D.hpp>

void Main()
{
	Scene::SetBackground(ColorF{ 0.6, 0.8, 0.7 });

	const Font font1{ FontMethod::MSDF, 48, Typeface::Bold };
	const Font font2{ FontMethod::MSDF, 48, U"example/font/RocknRoll/RocknRollOne-Regular.ttf"};

	int32 money = 886644;
	int32 highScore = 123456789;

	while (System::Update())
	{
		font1(U"Money: {} coins"_fmt(money)).draw(30, Vec2{ 40, 40 }, ColorF{ 0.11 });
		font1(U"Money: {} coins"_fmt(ThousandsSeparate(money))).draw(30, Vec2{ 40, 100 }, ColorF{ 0.11 });

		font2(U"High Score").draw(40, Vec2{ 160, 200 }, ColorF{ 0.11 });
		font2(highScore).draw(40, Arg::topRight(720, 200), ColorF{ 0.11 });

		font2(U"High Score").draw(40, Vec2{ 160, 280 }, ColorF{ 0.11 });
		font2(ThousandsSeparate(highScore)).draw(40, Arg::topRight(720, 280), ColorF{ 0.11 });
	}
}
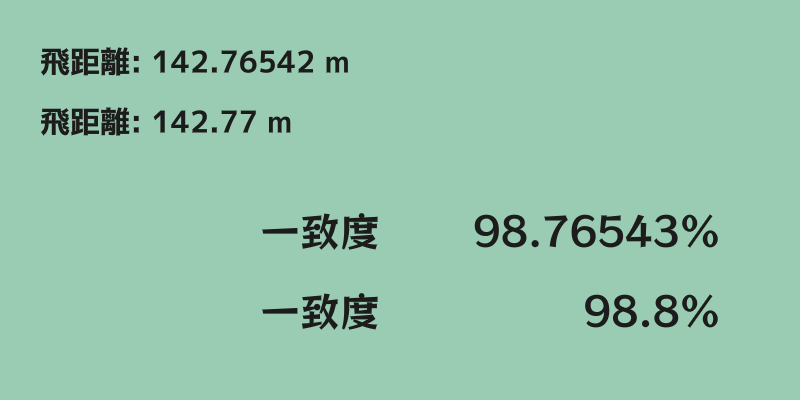
5. Control decimal places
Using the format specifier {:.Nf} in _fmt() sets the number of decimal places to N for floating-point values like double.
Code
# include <Siv3D.hpp>

void Main()
{
	Scene::SetBackground(ColorF{ 0.6, 0.8, 0.7 });

	const Font font1{ FontMethod::MSDF, 48, Typeface::Bold };
	const Font font2{ FontMethod::MSDF, 48, U"example/font/RocknRoll/RocknRollOne-Regular.ttf" };

	double distance = 142.76542;
	double similarity = 0.9876543;

	while (System::Update())
	{
		font1(U"Distance: {} m"_fmt(distance)).draw(30, Vec2{ 40, 40 }, ColorF{ 0.11 });
		font1(U"Distance: {:.2f} m"_fmt(distance)).draw(30, Vec2{ 40, 100 }, ColorF{ 0.11 });

		font2(U"Similarity").draw(40, Vec2{ 260, 200 }, ColorF{ 0.11 });
		font2(U"{}%"_fmt(similarity * 100)).draw(40, Arg::topRight(720, 200), ColorF{0.11});

		font2(U"Similarity").draw(40, Vec2{ 260, 280 }, ColorF{ 0.11 });
		font2(U"{:.1f}%"_fmt(similarity * 100)).draw(40, Arg::topRight(720, 280), ColorF{ 0.11 });
	}
}
6. Ensure adequate padding around text
Bigger text isn't always better in games. To create a readable and refined impression, it's important to ensure adequate padding around text.

Code
# include <Siv3D.hpp>

void Main()
{
	Scene::SetBackground(ColorF{ 0.6, 0.8, 0.7 });
	const Font font{ FontMethod::MSDF, 48, Typeface::Bold };

	const String s1 = U"Start";
	const String s2 = U"Siv3D is an open-source framework that allows you to easily and enjoyably program games and apps using sounds, images, and AI with modern C++ code.";

	const Rect rect1{ 40, 60, 200, 50 };
	const Rect rect2{ 40, 160, 350, 250 };

	const Rect rect3{ 420, 60, 200, 50 };
	const Rect rect4{ 420, 160, 350, 250 };

	while (System::Update())
	{
		rect1.rounded(10).draw(ColorF{ 0.8, 0.9, 1.0 }).drawFrame(1, 0, ColorF{ 0.98 });
		font(s1).drawAt(45, rect1.center(), ColorF{ 0.11 });

		rect2.rounded(10).draw(ColorF{ 0.8, 0.9, 1.0 }).drawFrame(1, 0, ColorF{ 0.98 });
		font(s2).draw(24, rect2, ColorF{ 0.11 });

		rect3.rounded(10).draw(ColorF{ 0.8, 0.9, 1.0 }).drawFrame(1, 0, ColorF{ 0.98 });
		font(s1).drawAt(30, rect3.center(), ColorF{ 0.11 });

		rect4.rounded(10).draw(ColorF{ 0.8, 0.9, 1.0 }).drawFrame(1, 0, ColorF{ 0.98 });
		font(s2).draw(21, rect4.stretched(-20), ColorF{ 0.11 });
	}
}
7. Deploy visual effects with time delays
Deploying visual effects consisting of multiple elements (like explosions or damage) with time delays creates dynamic presentations.
In the following video, the left attack deploys effects at the same timing, while the right attack deploys effects with time delays. The right one better emphasizes the multi-hit effect.
Code
# include <Siv3D.hpp>

// @brief Draws a checkerboard pattern background.
// @param cellSize Cell size
// @param cellColor Cell color
void DrawCheckerboardBackground(int32 cellSize, const ColorF& cellColor)
{
	for (int32 y = 0; y < (Scene::Height() / cellSize); ++y)
	{
		for (int32 x = 0; x < (Scene::Width() / cellSize); ++x)
		{
			if (IsEven(x + y))
			{
				Rect{ (Point{ x, y } *cellSize), cellSize }.draw(cellColor);
			}
		}
	}
}

struct DamageNumbers : IEffect
{
	struct Number
	{
		int32 damage;
		Vec2 offset;
		double startTime;
		ColorF color;
	};

	Vec2 m_pos;

	Font m_font;

	Array<Number> m_numbers;

	static constexpr double MaxDelayTime = 0.25;

	DamageNumbers(const Font& font, const Vec2& pos, const Array<int32>& damages, double hue, bool delay = true)
		: m_pos{ pos }
		, m_font{ font }
	{
		double angle = 0_deg;

		for (const auto& damage : damages)
		{
			Number number{
				.damage = damage,
				.offset = Vec2{ Random(30.0, 80.0), 0.0 }.rotate(angle),
				.startTime = (delay ? Random(-MaxDelayTime, 0.0) : 0.0), // Time delay for appearance
				.color = HSV{ hue, 0.4, 1.0 }
			};

			m_numbers << number;

			angle += (360_deg / damages.size());
		}
	}

	bool update(double t) override
	{
		constexpr double EffectFadeInDuration = 0.3;
		constexpr double EffectFadeOutDuration = 0.25;
		constexpr double EffectDuration = (EffectFadeInDuration + EffectFadeOutDuration);

		for (const auto& number : m_numbers)
		{
			const double t2 = (number.startTime + t);

			if (t2 < 0.0)
			{
				continue;
			}
			else if (t2 < EffectFadeInDuration)
			{
				const double e = EaseOutExpo(t2 / EffectFadeInDuration);
				const Vec2 pos = (m_pos + number.offset + (Vec2{ 0, (40 - 60 * e) }));
				const double alpha = e;
				const double fontSize = (10 + 50 * e);
				m_font(number.damage).drawAt(TextStyle::Outline(0.1, ColorF{ 0.11, alpha }), fontSize, pos, ColorF{ number.color, alpha });
			}
			else if (t2 < EffectDuration)
			{
				const double t3 = (t2 - (EffectDuration - EffectFadeInDuration));
				const double e = EaseInExpo(t3 / EffectFadeOutDuration);
				const Vec2 pos = (m_pos + number.offset + (Vec2{ 0, (40 - 60 - 24 * e) }));
				const double alpha = (1.0 - e);
				m_font(number.damage).drawAt(TextStyle::Outline(0.1, ColorF{ 0.11, alpha }), 60, pos, ColorF{ number.color, alpha });
			}
			else
			{
				continue;
			}
		}

		return (t < (EffectDuration + MaxDelayTime));
	}
};

struct BubbleEffect : IEffect
{
	struct Bubble
	{
		Vec2 offset;
		double startTime;
		double scale;
		ColorF color;
	};

	Vec2 m_pos;

	Array<Bubble> m_bubbles;

	static constexpr double MaxDelayTime = 0.25;

	BubbleEffect(const Vec2& pos, double baseHue, bool delay = true)
		: m_pos{ pos }
	{
		for (int32 i = 0; i < 8; ++i)
		{
			Bubble bubble{
				.offset = RandomVec2(Circle{ 60 }),
				.startTime = (delay ? Random(-MaxDelayTime, 0.0) : 0.0), // Time delay for appearance
				.scale = Random(0.1, 1.2),
				.color = HSV{ baseHue + Random(-30.0, 30.0) }
			};
			m_bubbles << bubble;
		}
	}

	bool update(double t) override
	{
		constexpr double EffectDuration = 0.5;

		for (const auto& bubble : m_bubbles)
		{
			const double t2 = (bubble.startTime + t);

			if (not InRange(t2, 0.0, EffectDuration))
			{
				continue;
			}

			const double e = EaseOutExpo(t2 / EffectDuration);

			Circle{ (m_pos + bubble.offset), (e * 40 * bubble.scale) }
				.draw(ColorF{ bubble.color, 0.15 })
				.drawFrame((30.0 * (1.0 - e) * bubble.scale), bubble.color);
		}

		return (t < (EffectDuration + MaxDelayTime));
	}
};

void Main()
{
	Scene::SetBackground(ColorF{ 0.4 });

	const Texture texture{ U"🦖"_emoji };
	const Font font{ FontMethod::MSDF, 48, Typeface::Heavy, FontStyle::Italic };

	const Vec2 enemy1Pos{ 250, 250 };
	const Vec2 enemy2Pos{ 550, 250 };

	Effect effect1;
	Effect effect2;

	// Variables for enemy shake
	double shake = 0.0, shakeVelocity = 0.0;

	while (System::Update())
	{
		DrawCheckerboardBackground(40, ColorF{ 0.45 });

		shake = Math::SmoothDamp(shake, 0.0, shakeVelocity, 0.2);
		const Vec2 offset = (InRange(shake, 0.0, 1.0) ? RandomVec2(Circle{ shake * 12.0 }) : Vec2::Zero());

		texture.scaled(1.2).drawAt(enemy1Pos + offset);
		texture.scaled(1.2).drawAt(enemy2Pos + offset);

		if (SimpleGUI::Button(U"Attack", Vec2{ 350, 440 }, 100))
		{
			const Array<int32> damages{ 15, 12, 13, 15, 14 };
			effect1.add<BubbleEffect>(enemy1Pos, 40, false);
			effect1.add<BubbleEffect>(enemy2Pos, 40);
			effect2.add<DamageNumbers>(font, enemy1Pos, damages, 40, false);
			effect2.add<DamageNumbers>(font, enemy2Pos, damages, 40);
			shake = 1.3;
		}

		{
			const ScopedRenderStates2D blend{ BlendState::Additive };
			effect1.update();
		}

		effect2.update();
	}
}
8. Set a window title
Siv3D's default window title is Siv3D App, but you can change it to your game's title using Window::SetTitle(). Displaying version numbers together makes it easier for developers and users to check versions.
Note that on Windows, you can easily switch to fullscreen by pressing Alt+Enter. Since window title content can't be checked in fullscreen mode, avoid displaying game progress information in the title.

Code
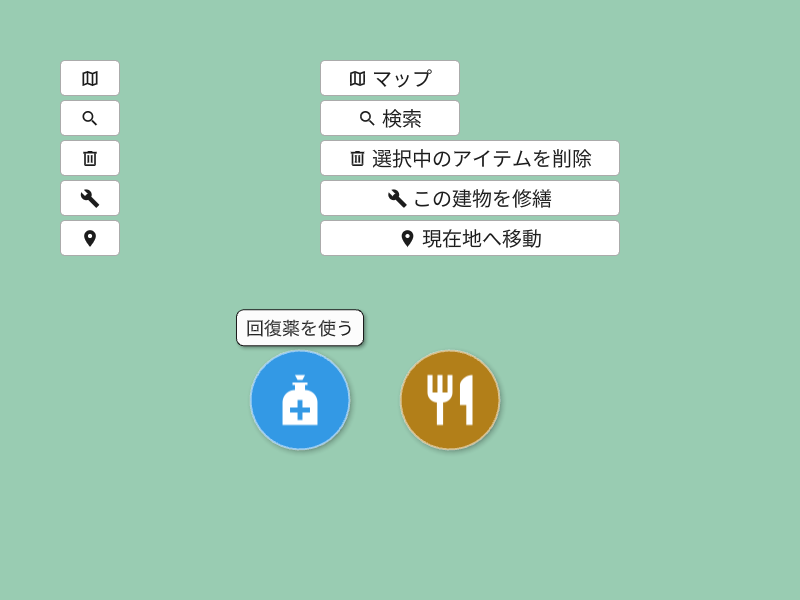
9. Avoid icon-only buttons
Icon-only buttons make it difficult for players to understand their meaning and can cause unintended operations. To clarify button functions, display text in addition to icons.
If design constraints make it impossible to display text, show tooltips on mouse hover.
Code
# include <Siv3D.hpp>

void CircleButtonWithTooltip(const Circle& circle, const Texture& icon, const String& text, const ColorF& color)
{
	circle.drawShadow(Vec2{ 2, 2 }, 12).draw(color).drawFrame(1.5, 0.5, ColorF{ 1.0, 0.5 });
	icon.drawAt(circle.center);

	if (circle.mouseOver())
	{
		Cursor::RequestStyle(CursorStyle::Hand);

		constexpr double FontSize = 18;
		const Font& font = SimpleGUI::GetFont();
		const SizeF size = (font(text).region(FontSize).size + SizeF{ 20, 10 });

		const RoundRect rect{ Arg::center = circle.center.movedBy(0, -circle.r - size.y * 0.6), size, 8 };
		rect.drawShadow(Vec2{ 2, 2 }, 8).draw(ColorF{ 0.99 }).drawFrame(1, 0, ColorF{ 0.11 });
		font(text).drawAt(FontSize, rect.center().movedBy(0, -1), ColorF{ 0.11 });
	}
}

void Main()
{
	Scene::SetBackground(ColorF{ 0.6, 0.8, 0.7 });
	const Texture icon1{ 0xF1130_icon, 60 };
	const Texture icon2{ 0xF0A70_icon, 60 };

	const Circle circle1{ 300, 400, 50 };
	const Circle circle2{ 450, 400, 50 };

	while (System::Update())
	{
		SimpleGUI::Button(U"\U000F0982", Vec2{ 60, 60 }, 60);
		SimpleGUI::Button(U"\U000F0349", Vec2{ 60, 100 }, 60);
		SimpleGUI::Button(U"\U000F0A7A", Vec2{ 60, 140 }, 60);
		SimpleGUI::Button(U"\U000F05B7", Vec2{ 60, 180 }, 60);
		SimpleGUI::Button(U"\U000F034E", Vec2{ 60, 220 }, 60);

		SimpleGUI::Button(U"\U000F0982 Map", Vec2{ 320, 60 }, 140);
		SimpleGUI::Button(U"\U000F0349 Search", Vec2{ 320, 100 }, 140);
		SimpleGUI::Button(U"\U000F0A7A Delete Selected Item", Vec2{ 320, 140 }, 300);
		SimpleGUI::Button(U"\U000F05B7 Repair This Building", Vec2{ 320, 180 }, 300);
		SimpleGUI::Button(U"\U000F034E Move to Current Location", Vec2{ 320, 220 }, 300);

		CircleButtonWithTooltip(circle1, icon1, U"Use Health Potion", ColorF{ 0.2, 0.6, 0.9 });
		CircleButtonWithTooltip(circle2, icon2, U"Cook Food", ColorF{ 0.7, 0.5, 0.1 });
	}
}
10. Support multiple input methods
In Siv3D, you can group various input methods like keyboard, mouse, and gamepad using InputGroup.
For example, in the following code, jumpInput.down() returns true when any of mouse left button, W, Up, Space, or XInput controller B button is pressed, making it easy to support multiple input methods.
Code
11. Adjust diagonal movement amounts
In simple code where pressing Up moves you up by 1 and pressing Right moves you right by 1, pressing Up and Right simultaneously results in moving √2 (about 1.41) diagonally, making the movement amount larger. This behavior may be undesirable in some games. You can adjust diagonal movement amounts with code like the following.
Code
# include <Siv3D.hpp>

Vec2 GetMove(bool adjust)
{
	Vec2 move{ 0, 0 };

	if (KeyUp.pressed())
	{
		move.y -= 1;
	}
	else if (KeyDown.pressed())
	{
		move.y += 1;
	}

	if (KeyLeft.pressed())
	{
		move.x -= 1;
	}
	else if (KeyRight.pressed())
	{
		move.x += 1;
	}

	if (adjust)
	{
		// Set vector length to 1. Do nothing for zero vector
		move.setLength(1.0);
	}

	return move;
}

void Main()
{
	Scene::SetBackground(ColorF{ 0.6, 0.8, 0.7 });

	const Font font{ FontMethod::MSDF, 48, Typeface::Bold };

	// Whether to adjust diagonal movement amounts
	bool adjust = true;

	Circle circle{ 400, 300, 20 };

	while (System::Update())
	{
		const double deltaTime = Scene::DeltaTime();

		const Vec2 baseMove = GetMove(adjust);

		circle.moveBy(baseMove * 200 * deltaTime);

		circle.draw(ColorF{ 0.25 });

		SimpleGUI::CheckBox(adjust, U"Adjust diagonal movement amount", Vec2{ 40, 40 });

		font(U"Base movement vector length: {:.2f}"_fmt(baseMove.length())).draw(24, Vec2{ 360, 40 });
	}
}
12. Learn methods for random placement without overlap
When randomly placing elements on screen, using RandomVec2(sceneRect) can cause elements to overlap or create uneven distribution.
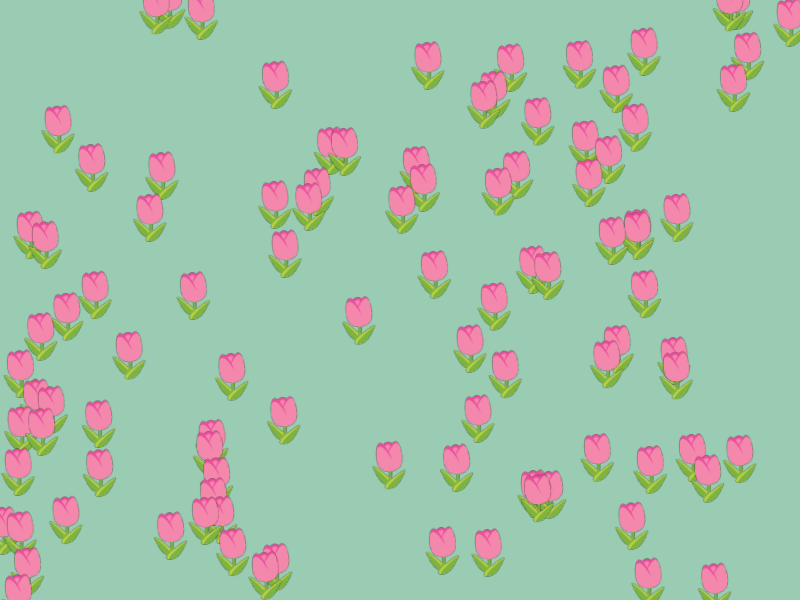
Code
# include <Siv3D.hpp>

Array<Vec2> GenerateRandomPoints(const Rect& rect, int32 count)
{
	Array<Vec2> points;

	for (int32 i = 0; i < count; ++i)
	{
		points.push_back(RandomVec2(rect));
	}

	return points;
}

bool SortByY(const Vec2& a, const Vec2& b)
{
	return (a.y < b.y);
}

void Main()
{
	Scene::SetBackground(ColorF{ 0.6, 0.8, 0.7 });
	constexpr Rect SceneRect{ 0, 0, 800, 600 };
	const Texture texture{ U"🌷"_emoji };

	Array<Vec2> positions = GenerateRandomPoints(SceneRect, 100)
		.sorted_by(SortByY); // Sort so front emoji are drawn after back emoji

	while (System::Update())
	{
		if (MouseL.down())
		{
			positions = GenerateRandomPoints(SceneRect, 100).sorted_by(SortByY);
		}

		for (const auto& pos : positions)
		{
			texture.scaled(0.4).drawAt(pos);
		}
	}
}
Using the PoissonDisk2D class, you can generate point sets with reasonable spacing that don't overlap.
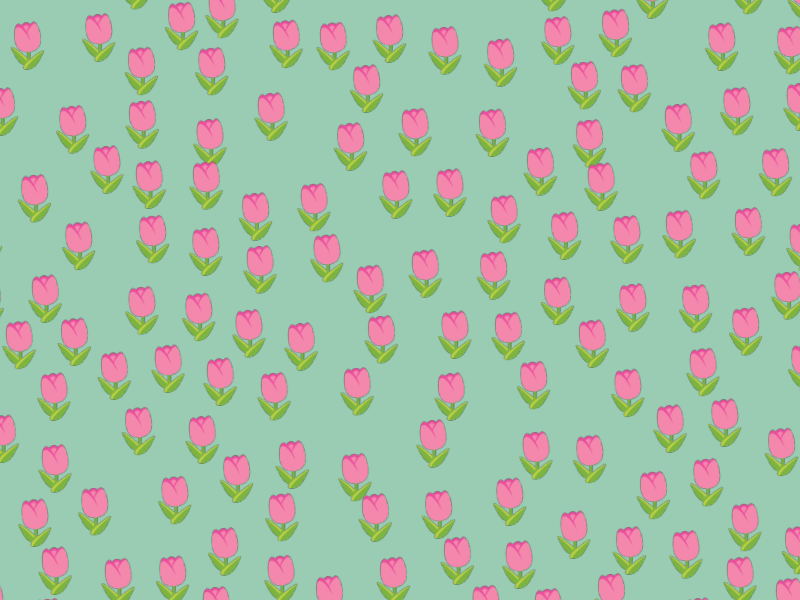
Code
# include <Siv3D.hpp>

/// @brief Generates point sets with reasonable spacing that don't overlap.
/// @param rect Area to generate points in
/// @param radius Minimum distance between points (approximate)
/// @param clip If true, clips points outside the area.
/// @return Generated point set
Array<Vec2> GenerateRandomPoints(const Rect& rect, double radius, bool clip = false)
{
	Array<Vec2> points;
	PoissonDisk2D pd{ rect.size, radius };

	for (const auto& point : pd.getPoints())
	{
		const Vec2 pos = (point + rect.pos);

		if (clip && (not rect.contains(pos)))
		{
			continue;
		}

		points << pos;
	}

	return points;
}

bool SortByY(const Vec2& a, const Vec2& b)
{
	return (a.y < b.y);
}

void Main()
{
	Scene::SetBackground(ColorF{ 0.6, 0.8, 0.7 });
	constexpr Rect SceneRect{ 0, 0, 800, 600 };
	const Texture texture{ U"🌷"_emoji };

	Array<Vec2> positions = GenerateRandomPoints(SceneRect, 52.0)
		.sorted_by(SortByY); // Sort so front emoji are drawn after back emoji

	while (System::Update())
	{
		if (MouseL.down())
		{
			positions = GenerateRandomPoints(SceneRect, 52.0).sorted_by(SortByY);
		}

		for (const auto& pos : positions)
		{
			texture.scaled(0.4).drawAt(pos);
		}
	}
}
13. Hide the mouse cursor for games that don't use mouse
The simplest way to tell players to use keyboard controls is to hide the mouse cursor. When the mouse cursor is visible, players will try to operate with the mouse. Consider hiding the mouse cursor for games that don't use the mouse at all.
You can hide the mouse cursor by calling Cursor::RequestStyle(CursorStyle::Hidden) every frame.
Code
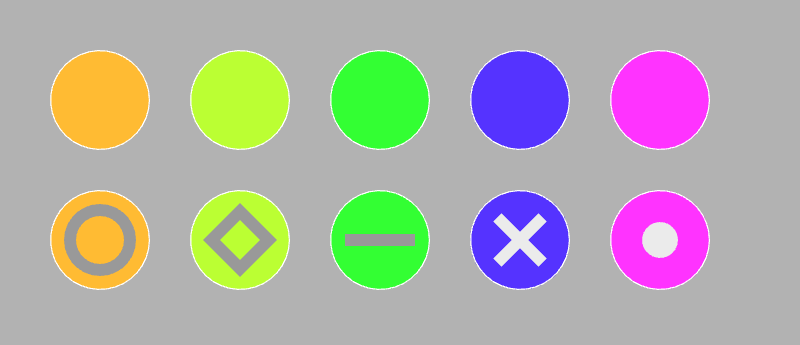
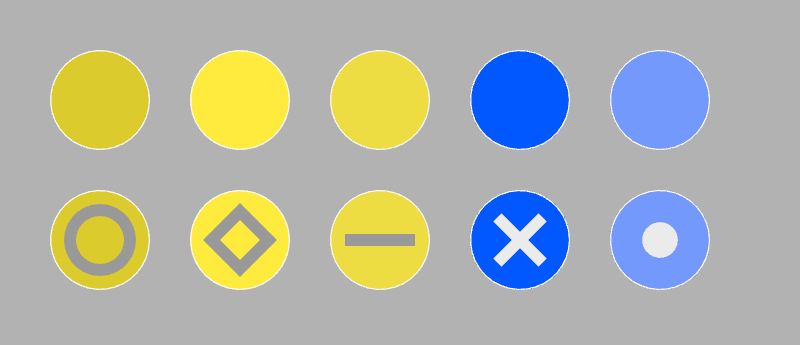
14. Avoid UI that distinguishes by color alone
UI that distinguishes elements by color alone can be difficult to operate for people with P-type or D-type color vision characteristics , depending on color combinations. Making distinctions possible through non-color elements (like shapes or text) or changing color combinations can create UI that's easier to operate for people with color vision characteristics.
# include <Siv3D.hpp>

void DrawItem(const Vec2& pos, const ColorF& color)
{
	Circle{ pos, 50 }.draw(color)
		.drawFrame(1.2, 0, ColorF{ 1.0 });
}

void Main()
{
	Scene::SetBackground(ColorF{ 0.7 });

	while (System::Update())
	{
		DrawItem(Vec2{ 100, 100 }, HSV{ 40, 0.8, 1.0 });
		DrawItem(Vec2{ 240, 100 }, HSV{ 80, 0.8, 1.0 });
		DrawItem(Vec2{ 380, 100 }, HSV{ 120, 0.8, 1.0 });
		DrawItem(Vec2{ 520, 100 }, HSV{ 250, 0.8, 1.0 });
		DrawItem(Vec2{ 660, 100 }, HSV{ 300, 0.8, 1.0 });

		DrawItem(Vec2{ 100, 240 }, HSV{ 40, 0.8, 1.0 });
		Circle{ 100, 240, 30 }.drawFrame(12, ColorF{ 0.6 });

		DrawItem(Vec2{ 240, 240 }, HSV{ 80, 0.8, 1.0 });
		RectF{ Arg::center(240, 240), 40 }.rotated(45_deg).drawFrame(12, ColorF{ 0.6 });

		DrawItem(Vec2{ 380, 240 }, HSV{ 120, 0.8, 1.0 });
		RectF{ Arg::center(380, 240), 70, 12 }.draw(ColorF{ 0.6 });

		DrawItem(Vec2{ 520, 240 }, HSV{ 250, 0.8, 1.0 });
		Shape2D::Cross(32, 12, Vec2{ 520, 240 }).draw(ColorF{ 0.92 });

		DrawItem(Vec2{ 660, 240 }, HSV{ 300, 0.8, 1.0 });
		Circle{ 660, 240, 18 }.draw(ColorF{ 0.92 });
	}
}
15. Use Grid for two-dimensional arrays
Siv3D has a dedicated Grid<Type> class for two-dimensional arrays. Compared to Array<Array<Type>>, Grid<Type> uses less memory and provides faster access. Like Array, Grid can be easily traversed with for loops.
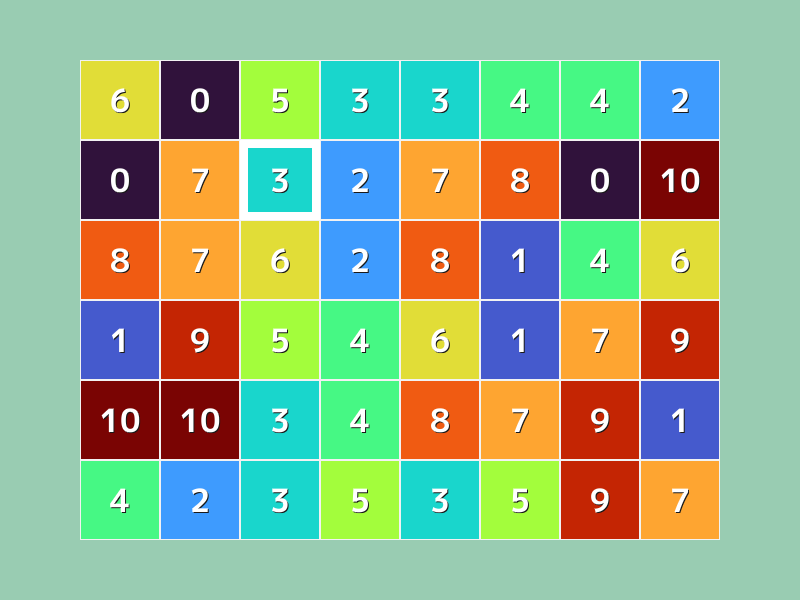
Code
# include <Siv3D.hpp>

void Main()
{
	Scene::SetBackground(ColorF{ 0.6, 0.8, 0.7 });
	const Font font{ FontMethod::MSDF, 48, Typeface::Bold };
	constexpr Point Offset{ 80, 60 };

	// Two-dimensional array with width 8, height 6
	Grid<int32> grid(Size{ 8, 6 });

	for (auto& element : grid)
	{
		element = Random(10);
	}

	while (System::Update())
	{
		for (int32 y = 0; y < grid.height(); ++y)
		{
			for (int32 x = 0; x < grid.width(); ++x)
			{
				const Rect rect{ (Point{ (x * 80), (y * 80) } + Offset), 80 };
				const int32 value = grid[y][x];
				rect.draw(Colormap01F(value / 10.0));
				rect.drawFrame(1, 0, ColorF{ 0.95 });
				font(value).drawAt(TextStyle::Shadow(Vec2{ 1.5, 1.5 }, ColorF{ 0.1 }), 32, rect.center());
			}
		}

		for (int32 y = 0; y < grid.height(); ++y)
		{
			for (int32 x = 0; x < grid.width(); ++x)
			{
				const Rect rect{ (Point{ (x * 80), (y * 80) } + Offset), 80 };

				if (rect.mouseOver())
				{
					rect.drawFrame(8, 0);
				}
			}
		}
	}
}