75. Multiplayer
This explains the basic steps to create multiplayer games using the Photon SDK.
75.1 Photon SDK Setup
75.1.1 Downloading Photon SDK
- Download the Photon Realtime SDK (compressed in 7z format) for your development environment. The SDK version verified with Siv3D v0.6.16 is
v5.0.12 - Extract the downloaded file and place it in an appropriate location (you'll set include/library paths to this folder path in the following steps, so don't move it afterward)
75.1.2 Preparing Siv3D Project
- Create a Siv3D application project as usual
- Copy three files
Multiplayer_Photon.hpp,Multiplayer_Photon.cpp,PHOTON_APP_ID.SECRETfrom theAddon/Multiplayer_Photonfolder within the Siv3D SDK folder* to the folder containing Main.cpp in your project - To use the Multiplayer_Photon library in your project, add the copied
Multiplayer_Photon.hppandMultiplayer_Photon.cppto your project and include them in the build target. However, this will fail to build as include/library paths to the Photon SDK are not set yet - (For Windows) In project settings, add the downloaded Photon SDK folder path (e.g.,
C:/Users/siv3d/Desktop/libs/Photon-Windows-Sdk_v5-0-12-0s) to both Include Directories and Library Directories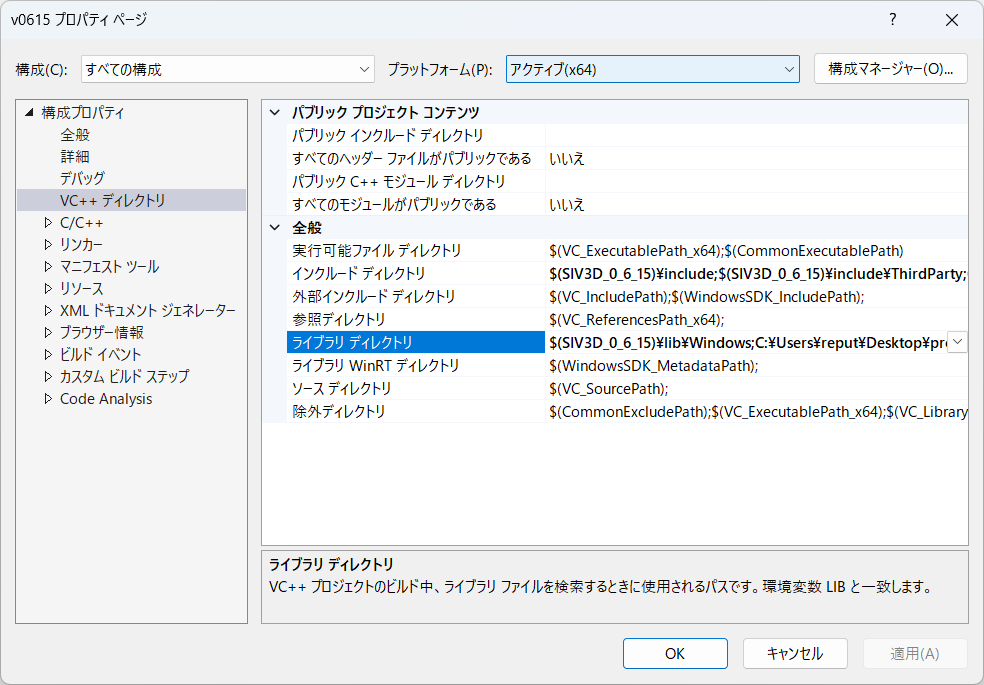
- (For macOS) In project settings, add the downloaded Photon SDK folder path to Header Search Paths in Build Settings, add 4 paths
●●●/Common-cpp/lib,●●●/LoadBalancing-cpp/lib,●●●/Photon-cpp/lib,●●●/3rdparty/lib/appleto Library Search Paths (●●● is the Photon SDK folder path), then add 4 fileslibCommon-cpp_release_macosx.a,libLoadBalancing-cpp_release_macosx.a,libPhoton-cpp_release_macosx.a,libcrypto_release_macosx.afrom those folders to Link Binary With Libraries in Build Phases - If you can build successfully, project setup is complete
Siv3D SDK Folder
- This is the folder created when you install Siv3D
- For macOS, this is the downloaded Siv3D SDK itself
- For Windows, it's created by default in the Documents folder with the name
OpenSiv3D_0.6.*
75.1.3 Setting Photon App ID
- After logging into the Photon website, open the dashboard screen
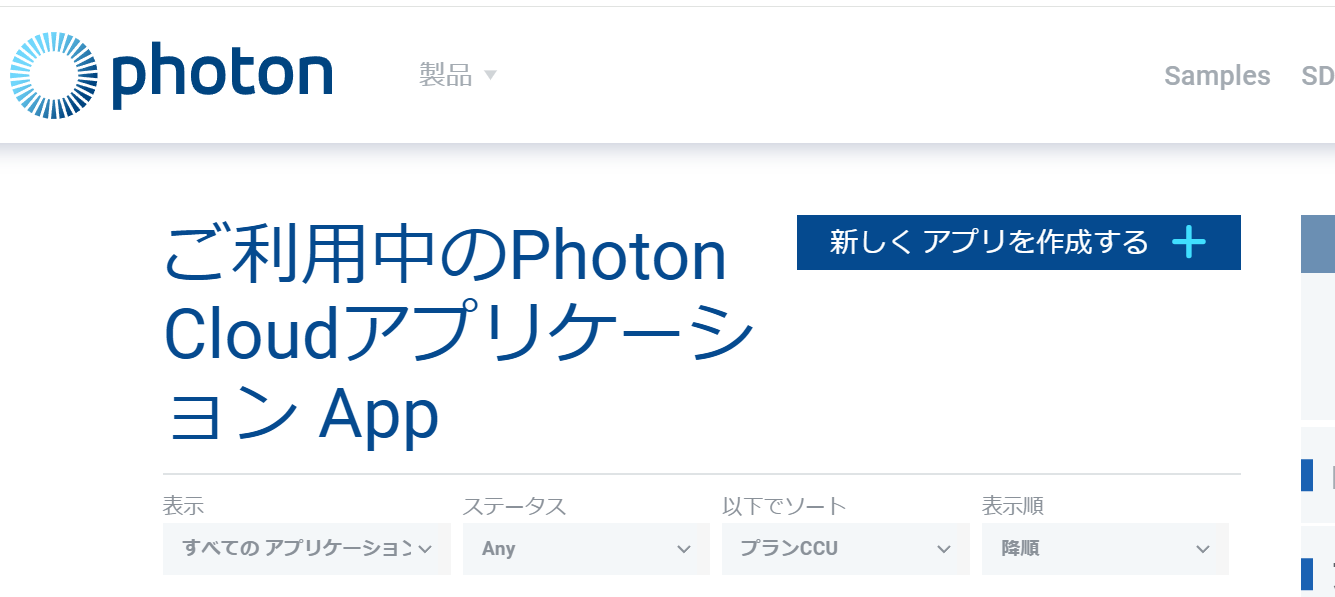
- Press CREATE A NEW APP on the dashboard screen, enter the information, and press CREATE to issue a new Photon App ID. Select Realtime for Photon Type. Other input items are optional
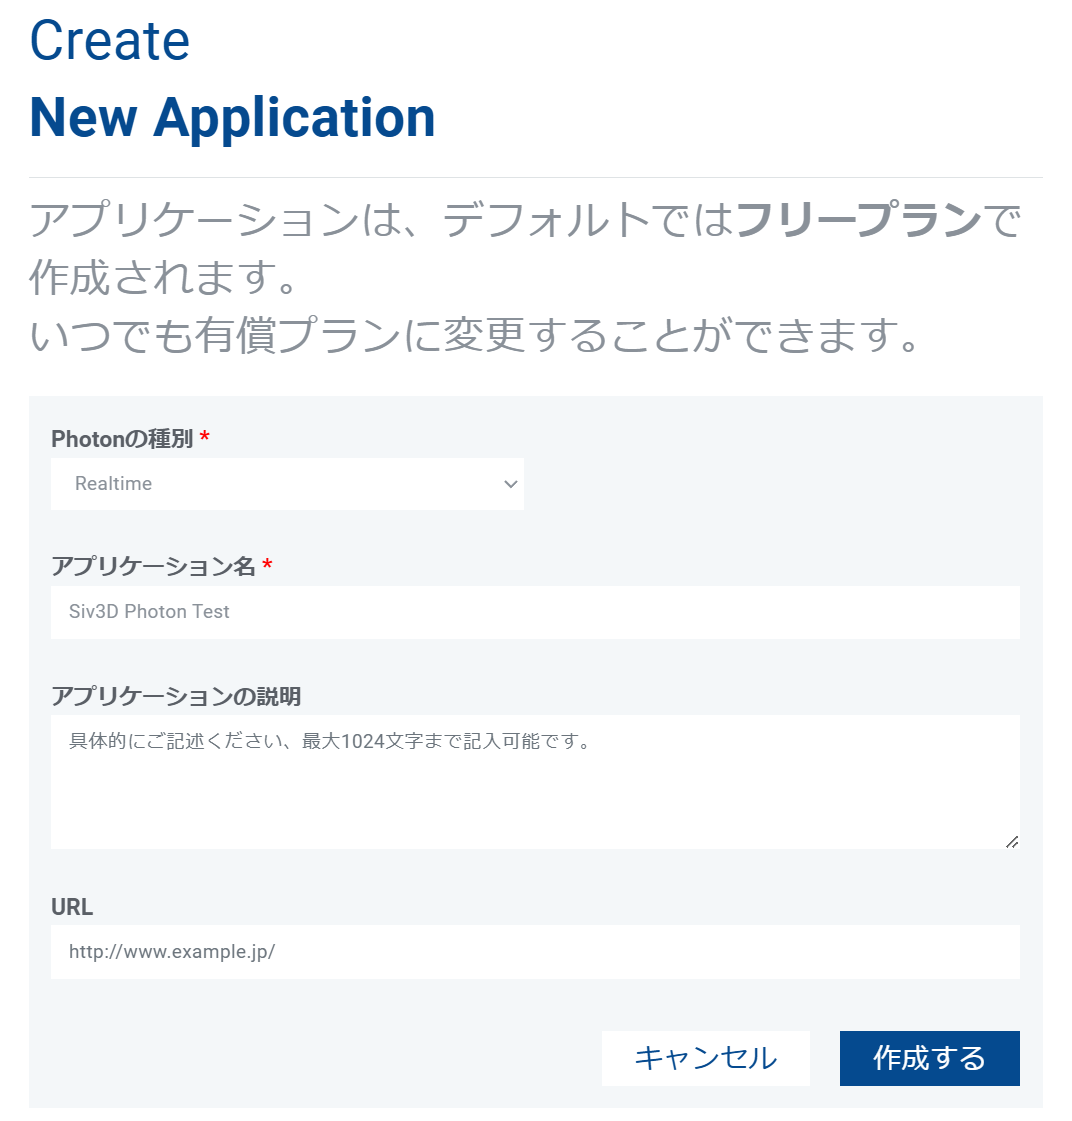
- The issued Photon App ID is a random alphanumeric string like
"xxxxxxxx-xxxx-xxxx-xxxx-xxxxxxxxxxxx" - Replace the placeholder App ID
"00000000-0000-0000-0000-000000000000"written inPHOTON_APP_ID.SECRETadded to your project in 75.1.2 with the issued Photon App ID - (If managing the project with git) This Photon App ID must not be known by third parties. Use
.gitignoreto excludePHOTON_APP_ID.SECRETfrom management
75.2 First Program
Include
- Include
"Multiplayer_Photon.hpp"and"PHOTON_APP_ID.SECRET"after<Siv3D.hpp>.
Inheriting Multiplayer_Photon
- Create a class
MyNetwork(name is arbitrary) that inherits fromMultiplayer_Photon, and inheritMultiplayer_Photon's constructor withusing Multiplayer_Photon::Multiplayer_Photon;.
Storing Photon App ID
- Use
const std::string secretAppID{ SIV3D_OBFUSCATE(PHOTON_APP_ID) };to store the Photon App ID insecretAppIDat runtime - Directly using
const std::string secretAppID{ PHOTON_APP_ID };would expose the Photon App ID as-is when analyzing the binary of the built executable, but wrapping it withSIV3D_OBFUSCATE()provides some obfuscation
Creating MyNetwork
- Create a
MyNetworkobject. Pass three parameters to the constructor: Photon App ID, application version, and whether to enable detailed debug display - Even with the same Photon App ID, programs with different application versions cannot communicate. This prevents communication between old and new versions after game version updates
- Enabling detailed debug display (
Verbose::Yes) sets the protected member variablem_verboseof theMultiplayer_Photonclass totrue, and when various callback functions ofMultiplayer_Photonare called, detailed information is output viaPrint- This is useful for debugging during development. Choose
Verbose::Nofor release to turn off output
- This is useful for debugging during development. Choose
# include <Siv3D.hpp>
# include "Multiplayer_Photon.hpp"
# include "PHOTON_APP_ID.SECRET"

// Class inheriting from Multiplayer_Photon
class MyNetwork : public Multiplayer_Photon
{
public:

	// Inherit Multiplayer_Photon constructor
	using Multiplayer_Photon::Multiplayer_Photon;
};

void Main()
{
	// Resize window to 1280x720
	Window::Resize(1280, 720);

	// Photon App ID
	// Wrap with SIV3D_OBFUSCATE() so App ID is not directly embedded in executable
	const std::string secretAppID{ SIV3D_OBFUSCATE(PHOTON_APP_ID) };

	// Class for communicating with server
	// - Photon App ID
	// - Version of this application (cannot communicate with programs with different versions)
	// - Whether to enable debug output via Print
	MyNetwork network{ secretAppID, U"1.0", Verbose::Yes };

	while (System::Update())
	{

	}
}
75.3 Connecting to Server
Connecting to Server
- Connect to the server with
MyNetwork's.connect() - Set your own name (username) as an argument
- After this, a string combining the username with random numbers is automatically assigned as the user ID
Synchronizing with Server
- After calling
.connect(),.isActive()returnstrue - During this time, you need to call
.update()at 60 FPS frequency to continue synchronizing with the server - If
.update()is not called for several seconds, you may be disconnected from the server - Calling
.update()when not connected to the server does nothing - The "functions called when ~" mentioned in later sections are basically called at the timing of
.update()
Disconnecting from Server
- The
MyNetworkdestructor automatically handles disconnection from the server, so explicit.disconnect()is not necessary
Code
# include <Siv3D.hpp>
# include "Multiplayer_Photon.hpp"
# include "PHOTON_APP_ID.SECRET"

class MyNetwork : public Multiplayer_Photon
{
public:

	using Multiplayer_Photon::Multiplayer_Photon;
};

void Main()
{
	Window::Resize(1280, 720);
	const std::string secretAppID{ SIV3D_OBFUSCATE(PHOTON_APP_ID) };
	MyNetwork network{ secretAppID, U"1.0", Verbose::Yes };

	while (System::Update())
	{
		// Synchronize with server if connected
		network.update();

		// Button to connect to server
		if (SimpleGUI::Button(U"Connect", Vec2{ 1000, 20 }, 160, (not network.isActive())))
		{
			// Username
			const String userName = U"Siv";

			// Connect to server
			network.connect(userName);
		}
	}

	// Disconnect from server
	// Automatically disconnected by Multiplayer_Photon destructor, so no need to call explicitly
	// network.disconnect();
}
75.4 Customizing Function to Handle Server Connection Results
Overriding connectReturn()
Multiplayer_Photon::connectReturn()is a function that handles the result of attempting to connect to the server- You can customize the processing by overriding this.
Code
# include <Siv3D.hpp>
# include "Multiplayer_Photon.hpp"
# include "PHOTON_APP_ID.SECRET"

class MyNetwork : public Multiplayer_Photon
{
public:

	using Multiplayer_Photon::Multiplayer_Photon;

private:

	// Override and customize the function that handles server connection attempt results
	void connectReturn([[maybe_unused]] const int32 errorCode, const String& errorString, const String& region, [[maybe_unused]] const String& cluster) override
	{
		if (m_verbose)
		{
			Print << U"MyNetwork::connectReturn() [Handle server connection attempt result]";
		}

		if (errorCode) // If server connection failed, errorCode is non-zero
		{
			if (m_verbose)
			{
				Print << U"[Server connection failed] " << errorString;
			}

			return;
		}

		if (m_verbose)
		{
			Print << U"[Server connection successful]";
			Print << U"[region: {}]"_fmt(region);
			Print << U"[Username: {}]"_fmt(getUserName());
			Print << U"[User ID: {}]"_fmt(getUserID());
		}

		// Set background color to blue
		Scene::SetBackground(ColorF{ 0.4, 0.5, 0.6 });
	}
};

void Main()
{
	Window::Resize(1280, 720);
	const std::string secretAppID{ SIV3D_OBFUSCATE(PHOTON_APP_ID) };
	MyNetwork network{ secretAppID, U"1.0", Verbose::Yes };

	while (System::Update())
	{
		network.update();

		if (SimpleGUI::Button(U"Connect", Vec2{ 1000, 20 }, 160, (not network.isActive())))
		{
			const String userName = U"Siv";
			network.connect(userName);
		}
	}
}
[Note: This is a shortened version of the multiplayer tutorial covering the basic setup and connection. The full tutorial contains additional sections on rooms, messaging, and complete multiplayer game examples.]