52. レンダーテクスチャ
図形・テクスチャ・フォントの描画先を、シーンの代わりにテクスチャに変更する方法と、その応用を学びます。
52.1 レンダーテクスチャ
52.1.1 概要
- 図形・テクスチャ・フォントの描画は、デフォルトではシーンに対して行われます
- 一方、プログラムで用意した、描画先として設定可能なテクスチャ(レンダーテクスチャ)を描画先にすることもできます
- そうして何かが描かれたレンダーテクスチャを、別の描画に再利用することで、高度で複雑なグラフィックス表現を実現できます
- 図形・テクスチャ・フォントの
.draw()による描画は、チュートリアル 63 で学ぶImageへの書き込み (.paint()や.overwrite()) と異なり、GPU 上で高速に実行されます - レンダーステートも適用されるため、レンダーテクスチャへの描画は、通常のシーンへの描画と同様の効果が得られます
52.1.2 レンダーテクスチャの使い方
RenderTextureを作成し、ScopedRenderTarget2Dオブジェクトのコンストラクタにレンダーテクスチャを渡すと、ScopedRenderTarget2Dオブジェクトが有効な間、すべての 2D 描画の描画先(レンダーターゲット)が、指定したレンダーテクスチャになります- これを レンダーターゲットの変更 といいます
- レンダーテクスチャは、
ScopedRenderTarget2Dオブジェクトのスコープ終了によって レンダーターゲットから解除されたあと、通常のテクスチャのように自身をシーンや別のレンダーターゲットに描画できます RenderTextureは、Textureと同じ描画関数や操作関数を持っています.draw(),.drawAt(),.scaled()など
52.1.3 レンダーテクスチャの作成とクリア
RenderTextureの作成にはコストがかかるため、毎フレーム新しく作成するのではなく、事前に作成したものを使いまわしてくださいRenderTextureは.clear(color)によって、その内容を指定した色にクリアできます- クリアしない場合は、それまでに描かれた内容が残り続けます
# include <Siv3D.hpp>
void Main()
{
Scene::SetBackground(ColorF{ 0.6, 0.8, 0.7 });
const Texture emoji{ U"🐈"_emoji };
// 200 x 200 のサイズのレンダーテクスチャを作成する。初期状態は白色
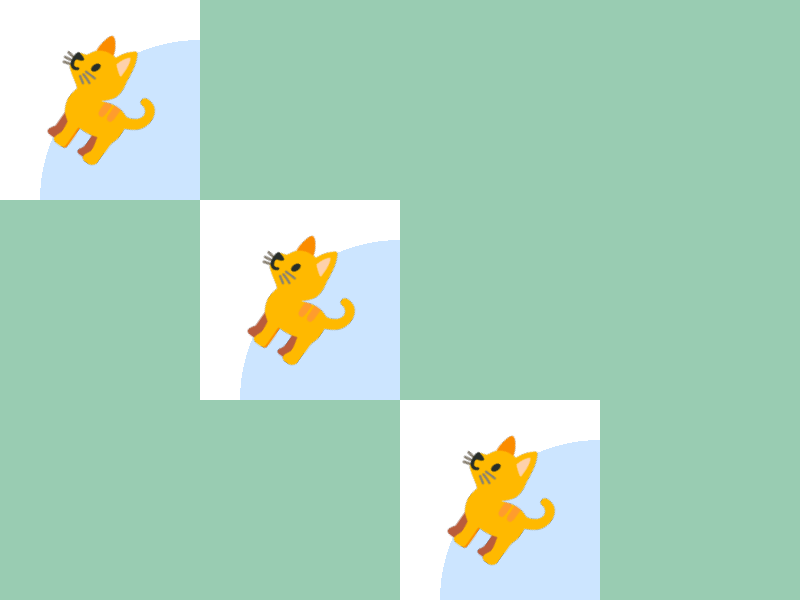
const RenderTexture renderTexture{ Size{ 200, 200 }, Palette::White };
while (System::Update())
{
// レンダーテクスチャを白色でクリアする
renderTexture.clear(Palette::White);
{
// レンダーターゲットを renderTexture に変更する
const ScopedRenderTarget2D target{ renderTexture };
Circle{ 200, 200, 160 }.draw(ColorF{ 0.8, 0.9, 1.0 });
emoji.rotated(Scene::Time() * 30_deg).drawAt(100, 100);
} // ここで target のスコープが終了し、レンダーターゲットがシーンに戻る
// レンダーテクスチャを描画する
renderTexture.draw(0, 0);
renderTexture.draw(200, 200);
renderTexture.draw(400, 400);
}
}
RenderTextureの.clear()は自身の参照を返すため、次のようにクリアとScopedRenderTarget2Dへの設定を 1 行に短くまとめて記述できます
# include <Siv3D.hpp>

void Main()
{
	Scene::SetBackground(ColorF{ 0.6, 0.8, 0.7 });

	const Texture emoji{ U"🐈"_emoji };

	// 200 x 200 のサイズのレンダーテクスチャを作成する。初期状態は白色
	const RenderTexture renderTexture{ 200, 200, Palette::White };

	while (System::Update())
	{
		{
			// renderTexture をクリアし、レンダーターゲットを renderTexture に変更する
			const ScopedRenderTarget2D target{ renderTexture.clear(Palette::White) };

			Circle{ 200, 200, 160 }.draw(ColorF{ 0.8, 0.9, 1.0 });

			emoji.rotated(Scene::Time() * 30_deg).drawAt(100, 100);
		}

		renderTexture.draw(0, 0);
		renderTexture.draw(200, 200);
		renderTexture.draw(400, 400);
	}
}
52.2 クリアをしない使い方
- レンダーテクスチャに描画する内容が変化しない場合、クリアを行わないことで描画コストを削減できます
- 次のサンプルコードでは、最初のフレームでレンダーテクスチャに描画を行い、以降はそれをクリアせずに毎フレーム描画することで、描画コストやクリアのコストを削減しています
# include <Siv3D.hpp>
void Main()
{
Scene::SetBackground(ColorF{ 0.6, 0.8, 0.7 });
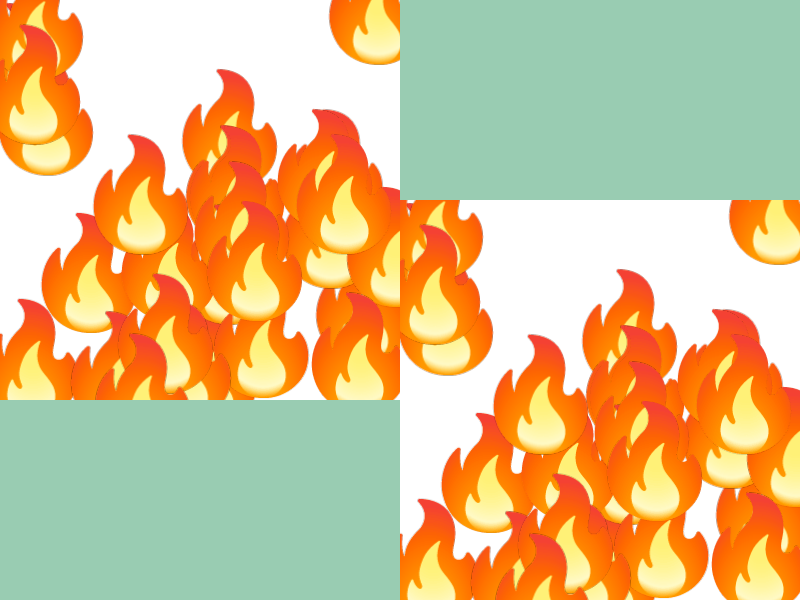
const Texture emoji{ U"🔥"_emoji };
// 200 x 200 のサイズのレンダーテクスチャを作成する。初期状態は白色
const RenderTexture renderTexture{ Size{ 400, 400 }, Palette::White };
{
// レンダーターゲットを renderTexture に変更する
const ScopedRenderTarget2D target{ renderTexture };
for (int32 i = 0; i < 30; ++i)
{
emoji.drawAt(RandomVec2(Rect{ 0, 0, 400, 400 }));
}
}
while (System::Update())
{
// レンダーテクスチャを描画する
renderTexture.draw(0, 0);
renderTexture.draw(400, 200);
}
}
52.3 透過レンダーテクスチャへの書き込み
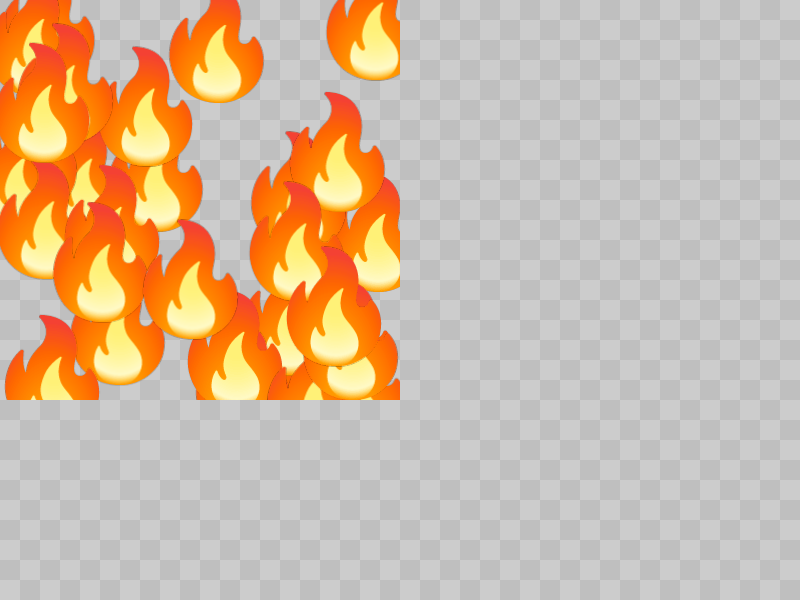
- 初期状態が透過色(アルファ成分が 0.0)のレンダーテクスチャに対して、デフォルトのブレンドステートで描画を行うと、レンダーテクスチャの RGB 成分は更新される一方でアルファ成分は更新されません
- つまり全体が透過状態のままであり、そのレンダーテクスチャを描画しても何も表示されません

# include <Siv3D.hpp>

void Main()
{
	Scene::SetBackground(ColorF{ 0.8 });

	const int32 cellSize = 20;

	const Texture emoji{ U"🔥"_emoji };

	// 400 x 400 のサイズのレンダーテクスチャを作成する。初期状態は ColorF{ 0.5, 0.0 }
	const RenderTexture renderTexture{ Size{ 400, 400 }, ColorF{ 0.5, 0.0 } };
	{
		// レンダーターゲットを renderTexture に変更する
		const ScopedRenderTarget2D target{ renderTexture };

		for (int32 i = 0; i < 30; ++i)
		{
			// この描画はレンダーテクスチャのアルファ成分を更新しない
			emoji.drawAt(RandomVec2(Rect{ 0, 0, 400, 400 }));
		}
	}

	while (System::Update())
	{
		for (int32 y = 0; y < (600 / cellSize); ++y)
		{
			for (int32 x = 0; x < (800 / cellSize); ++x)
			{
				if (IsEven(y + x))
				{
					Rect{ (x * cellSize), (y * cellSize), cellSize }.draw(ColorF{ 0.75 });
				}
			}
		}

		// レンダーテクスチャを描画する
		renderTexture.draw(0, 0);
	}
}
- この問題を解決するには、ブレンドステートを「描画された最大のアルファ成分を保持する」設定に変更します
- レンダーテクスチャへの描画時に、アルファ成分も更新されるようになります
# include <Siv3D.hpp>

// 描画された最大のアルファ成分を保持するブレンドステートを作成する
BlendState MakeBlendState()
{
	BlendState blendState = BlendState::Default2D;
	blendState.srcAlpha = Blend::SrcAlpha;
	blendState.dstAlpha = Blend::DestAlpha;
	blendState.opAlpha = BlendOp::Max;
	return blendState;
}

void Main()
{
	Scene::SetBackground(ColorF{ 0.8 });

	const int32 cellSize = 20;

	const Texture emoji{ U"🔥"_emoji };

	// 400 x 400 のサイズのレンダーテクスチャを作成する。初期状態は ColorF{ 0.5, 0.0 }
	const RenderTexture renderTexture{ Size{ 400, 400 }, ColorF{ 0.5, 0.0 } };
	{
		// レンダーターゲットを renderTexture に変更する
		const ScopedRenderTarget2D target{ renderTexture };

		// 描画された最大のアルファ成分を保持するブレンドステート
		const ScopedRenderStates2D blend{ MakeBlendState() };

		for (int32 i = 0; i < 30; ++i)
		{
			// この描画はレンダーテクスチャのアルファ成分を更新する
			emoji.drawAt(RandomVec2(Rect{ 0, 0, 400, 400 }));
		}
	}

	while (System::Update())
	{
		for (int32 y = 0; y < (600 / cellSize); ++y)
		{
			for (int32 x = 0; x < (800 / cellSize); ++x)
			{
				if (IsEven(y + x))
				{
					Rect{ (x * cellSize), (y * cellSize), cellSize }.draw(ColorF{ 0.75 });
				}
			}
		}

		// レンダーテクスチャを描画する
		renderTexture.draw(0, 0);
	}
}
52.4 マルチサンプル・レンダーテクスチャ
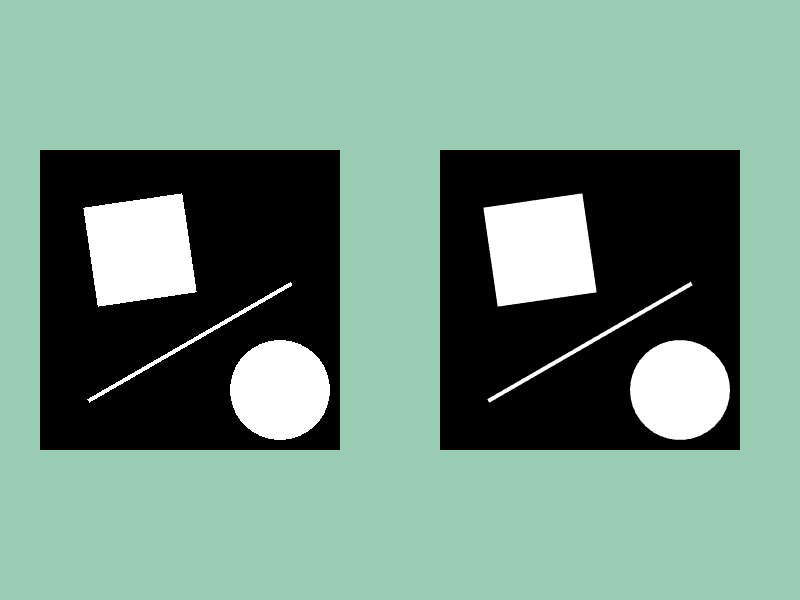
RenderTextureへの描画では、マルチサンプル・アンチエイリアシングが適用されません- 斜めの線を含むような図形を描画した際にジャギーが生じます
- マルチサンプル・アンチエイリアシングを適用したい場合は
MSRenderTextureを使います
| 描画対象 | マルチサンプル・アンチエイリアシング |
|---|---|
| 通常のシーン | 有効 |
RenderTexture |
無効 |
MSRenderTexture |
有効 |
MSRenderTextureをレンダーターゲットに設定する方法はRenderTextureと同様です-
MSRenderTextureへの描画結果を使う際には、次の 2 つの手順が必要になります:- ①
Graphics2D::Flush()を呼び、その時点までの 2D 描画処理をすべて実行(フラッシュ)して、MSRenderTextureのマルチサンプル・テクスチャへの描画を完了する - ②
MSRenderTextureの.resolve()によって、MSRenderTexture内のマルチサンプル・テクスチャを、描画で使用可能な通常のテクスチャに変換(リゾルブ)する
- ①
-
この手順が必要な理由:
- Siv3D における
.draw()は「予約」で、.resolve()は「即時実行」です Graphics2D::Flush()を行わないと、マルチサンプル・テクスチャに何も描かれていない状態でリゾルブが実行されてしまいます
- Siv3D における
レンダーテクスチャとマルチサンプル・レンダーテクスチャの比較
# include <Siv3D.hpp>

void Draw()
{
	Rect{ Arg::center(100, 100), 100 }.rotated(Scene::Time() * 30_deg).draw();
	Circle{ 240, 240, 50 }.draw();
	Line{ 50, 250, 250, (130 + Periodic::Sine0_1(3s) * 20) }.draw(4);
}

void Main()
{
	Scene::SetBackground(ColorF{ 0.6, 0.8, 0.7 });

	// レンダーテクスチャ
	const RenderTexture renderTexture{ 300, 300, Palette::White };

	// マルチサンプル・レンダーテクスチャ
	const MSRenderTexture msRenderTexture{ 300, 300, Palette::White };

	while (System::Update())
	{
		// レンダーテクスチャ
		{
			const ScopedRenderTarget2D target{ renderTexture.clear(Palette::Black) };
			Draw();
		}

		renderTexture.draw(40, 150);

		// マルチサンプル・レンダーテクスチャ
		{
			const ScopedRenderTarget2D target{ msRenderTexture.clear(Palette::Black) };
			Draw();
		}

		// 2D 描画をフラッシュする
		Graphics2D::Flush();

		// マルチサンプル・テクスチャをリゾルブする
		msRenderTexture.resolve();

		msRenderTexture.draw(440, 150);
	}
}
52.5 レンダーテクスチャに対する特別な操作
RenderTextureを利用した次のような画像処理機能が提供されています- いずれも GPU を活用して高速に処理されます
52.5.1 ダウンサンプル
- テクスチャの内容を拡大縮小して別のレンダーテクスチャにコピーします
- 引数:
from: 入力テクスチャto: 出力テクスチャ
fromのテクスチャの内容を拡大縮小してtoに描画しますfromとtoはともに有効なテクスチャで、互いに異なるテクスチャでなければなりません- 52.6 で詳しい使い方を説明します
52.5.2 ガウスぼかし
- テクスチャにガウスぼかしをかけます
void Shader::GaussianBlur(const TextureRegion& from, const RenderTexture& internalBuffer, const RenderTexture& to);
- 引数:
from: 入力テクスチャinternalBuffer: 中間テクスチャto: 出力テクスチャ
fromのテクスチャに縦方向と横方向のガウスブラーをかけてtoに描画しますfrom,internalBuffer,toはいずれも有効なテクスチャで、領域のサイズが同じでなければなりませんfromとtoは同じテクスチャにできます- 52.7 で詳しい使い方を説明します
52.5.3 コピー
- テクスチャの内容を別のレンダーテクスチャにコピーします
- 引数:
from: 入力テクスチャto: 出力テクスチャ
fromのテクスチャの内容をtoに描画しますfromとtoはともに有効なテクスチャで、互いに異なり、領域のサイズが同じでなければなりません- この関数の用途は限られます。例えば大きいテクスチャから一部の領域だけを
Shader::Copy()で切り出し、大きいレンダーテクスチャのほうを破棄することで、消費メモリを節約できます
52.6 ダウンサンプル
- テクスチャの内容を拡大縮小して別のレンダーテクスチャにコピーします
- 通常は、低解像度版のテクスチャを動的に作成するために使用されます
- 動的なダウンサンプルの例は 52.9 に登場します
# include <Siv3D.hpp>

void Main()
{
	Scene::SetBackground(ColorF{ 0.6, 0.8, 0.7 });

	const Texture texture{ U"example/windmill.png" };

	// 縦、横が 4 分の 1 サイズのレンダーテクスチャ
	const RenderTexture renderTexture{ texture.size() / 4 };

	// ダウンサンプルを実行する
	Shader::Downsample(texture, renderTexture);

	while (System::Update())
	{
		renderTexture.draw();
	}
}
(別の方法)CPU 処理
Imageを使ったダウンサンプルも可能です- 高品質な結果を得られますが、CPU で処理するため
RenderTextureを使ったダウンサンプルよりも時間がかかり、毎フレームの実行などリアルタイム処理には向きません
52.7 ガウスぼかし
- テクスチャに縦方向と横方向のガウスブラーをかけた結果を得ます
- 1 回のガウスブラー処理で得られる効果はそれほど大きくありません
- 大きなぼかし効果を得るには、ダウンサンプルと組み合わせます(52.8)
# include <Siv3D.hpp>

void Main()
{
	Scene::SetBackground(ColorF{ 0.6, 0.8, 0.7 });

	const Texture texture{ U"example/windmill.png" };
	const RenderTexture internalTexture{ texture.size() };
	const RenderTexture renderTexture{ texture.size() };

	Shader::GaussianBlur(texture, internalTexture, renderTexture);

	while (System::Update())
	{
		renderTexture.draw();
	}
}
52.8 強いガウスぼかし
- ガウスぼかしを重ねて適用するよりも、ダウンサンプルしたテクスチャにガウスぼかしをかけたあと、それを元のサイズで拡大描画するほうが、より低いコストで大きなぼかし効果を実現できます
- また、ダウンサンプル前にガウスぼかしをかけると、コストは増えますが、ぼかしの品質が向上します
# include <Siv3D.hpp>

void Main()
{
	Scene::SetBackground(ColorF{ 0.6, 0.8, 0.7 });

	// (0) オリジナル
	const Texture original{ U"example/windmill.png" };

	// (1) ガウスぼかし 1 回
	const RenderTexture blur1{ original.size() };
	const RenderTexture internalTexture{ original.size() };
	Shader::GaussianBlur(original, internalTexture, blur1);

	// (2) ガウスぼかし 2 回
	const RenderTexture blur2{ original.size() };
	Shader::GaussianBlur(blur1, internalTexture, blur2);

	// (3) 1/2 ダウンサンプル + ガウスぼかし 1 回
	const RenderTexture downsample2{ original.size() / 2 };
	const RenderTexture internalTexture2{ original.size() / 2 };
	Shader::Downsample(original, downsample2);
	Shader::GaussianBlur(downsample2, internalTexture2, downsample2);

	// (4) 1/4 ダウンサンプル + ガウスぼかし 1 回
	const RenderTexture downsample4{ original.size() / 4 };
	const RenderTexture internalTexture4{ original.size() / 4 };
	Shader::Downsample(original, downsample4);
	Shader::GaussianBlur(downsample4, internalTexture4, downsample4);

	// (5) ガウスぼかし + 1/2 ダウンサンプル + ガウスぼかし + 1/2 ダウンサンプル + ガウスぼかし
	const RenderTexture downsampleB2{ original.size() / 2 };
	const RenderTexture downsampleB4{ original.size() / 4 };
	Shader::Downsample(blur1, downsampleB2);
	Shader::GaussianBlur(downsampleB2, internalTexture2, downsampleB2);
	Shader::Downsample(downsampleB2, downsampleB4);
	Shader::GaussianBlur(downsampleB4, internalTexture4, downsampleB4);

	size_t index = 0;

	while (System::Update())
	{
		if (index == 0)
		{
			original.draw();
		}
		else if (index == 1)
		{
			blur1.draw();
		}
		else if (index == 2)
		{
			blur2.draw();
		}
		else if (index == 3)
		{
			downsample2.scaled(2.0).draw();
		}
		else if (index == 4)
		{
			downsample4.scaled(4.0).draw();
		}
		else if (index == 5)
		{
			downsampleB4.scaled(4.0).draw();
		}

		SimpleGUI::RadioButtons(index, { U"original", U"blur", U"2x blur", U"1/2 scale + blur", U"1/4 scale + blur", U"blur + 1/2 + blur + 1/2 + blur" }, Vec2{ 490, 40 });
	}
}
52.9 指定領域のガウスぼかし
- シーン全体をぼかしたレンダーテクスチャを用意し、その一部を切り出して描画することで、ぼかされた背景が透過する効果を実現できます
- 次のサンプルコードではシーン全体をぼかしていますが、ぼかす領域とサイズが固定である場合、最小限の領域だけにぼかしをかけることで、より低コストで処理できます
# include <Siv3D.hpp>

// シーン全体のテクスチャのうち一部領域の UV を計算する関数
RectF CalculateUVRect(const Size& scenceSize, const RectF& region)
{
	return{ (region.pos / scenceSize), (region.size / scenceSize) };
}

void Main()
{
	// シーンサイズ
	const Size sceneSize{ 1280, 720 };

	// ウィンドウをリサイズする
	Window::Resize(sceneSize);

	// bay.jpg は 2560 x 1440 なのでサイズを小さくしてロードする
	const Texture texture{ Image{ U"example/bay.jpg" }.scale(1280, 720) };
	const Texture emoji1{ U"🚢"_emoji };
	const Texture emoji2{ U"🐟"_emoji };

	// メイン描画用のレンダーテクスチャ
	const MSRenderTexture msRenderTexture{ sceneSize };

	// ガウスぼかし用のテクスチャ
	const RenderTexture internalTexture{ sceneSize };
	const RenderTexture blur1{ sceneSize };
	const RenderTexture blur4{ sceneSize / 4 };
	const RenderTexture internalTexture4{ sceneSize / 4 };

	while (System::Update())
	{
		// レンダーテクスチャにテクスチャや絵文字を描画する
		{
			const ScopedRenderTarget2D target{ msRenderTexture.clear(ColorF{ 0.6, 0.8, 0.7 })};
			texture.draw();
			emoji1.drawAt(Vec2{ (640 + Periodic::Sine1_1(4s) * 300.0), (200.0 + Periodic::Sine1_1(3s) * 100.0) });
			emoji2.drawAt(Vec2{ (640 + Periodic::Sine1_1(5s) * 300.0), (500.0 + Periodic::Sine1_1(2s) * 100.0) });
		}

		// レンダーテクスチャをリゾルブする
		{
			// 2D 描画をフラッシュする
			Graphics2D::Flush();

			// マルチサンプル・テクスチャをリゾルブする
			msRenderTexture.resolve();
		}

		// ぼかしテクスチャを用意する
		{
			Shader::GaussianBlur(msRenderTexture, internalTexture, blur1);
			Shader::Downsample(blur1, blur4);
			Shader::GaussianBlur(blur4, internalTexture4, blur4);
		}

		// レンダーテクスチャをシーンに描画する
		msRenderTexture.draw();

		// ミニウィンドウの描画領域
		const RoundRect miniWindow{ Arg::center = Cursor::Pos(), 480, 360 , 24 };

		// ミニウィンドウにぼかしテクスチャの指定領域を貼り付けて描画する
		miniWindow(blur4.uv(CalculateUVRect(sceneSize, miniWindow.rect))).draw();

		// ミニウィンドウを描画する
		miniWindow.draw(ColorF{ 1.0, 0.7 });
	}
}
52.10 任意形状のシャドウ
- シャドウ用のテクスチャを用意し、それをぼかしたものを影として描画することで、任意形状のシャドウを実現できます
- レンダーテクスチャを
ColorF{ 1.0, 0.0 }でクリアしてから、ブレンドステートBlendState::MaxAlphaを適用して描き込みをすると、RGB 値は無視され、描画された最大のアルファ値を記録できます - テクスチャの RGB 成分を無視しできるため、影のための形状だけを描きたい場合に便利です
- 次のサンプルコードでは、マウスを左クリックしている間は、ぼかし済みの影テクスチャ
blur4のみを可視化します
# include <Siv3D.hpp>
void Draw(double angle, const Texture& emoji)
{
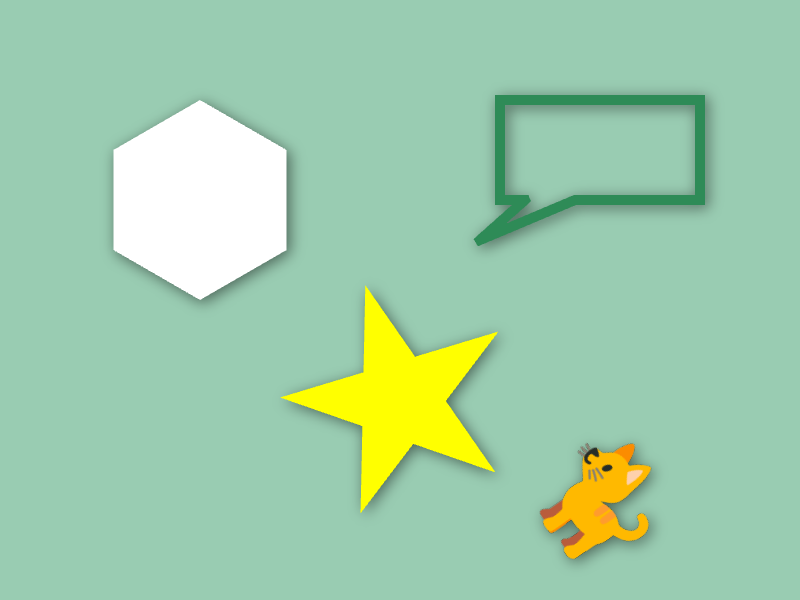
Shape2D::Hexagon(100, Vec2{ 200, 200 }).draw();
Shape2D::Star(120, Vec2{ 400, 400 }, angle).draw(Palette::Yellow);
Shape2D::RectBalloon(Rect{ 500, 100, 200, 100 }, Vec2{ 480, 240 })
.drawFrame(10, Palette::Seagreen);
emoji.rotated(angle).drawAt(600, 500);
}
void Main()
{
Scene::SetBackground(ColorF{ 0.6, 0.8, 0.7 });
const Texture emoji{ U"🐈"_emoji };
// 影用のレンダーテクスチャ
const RenderTexture shadowTexture{ Scene::Size(), ColorF{ 1.0, 0.0 } };
const RenderTexture blur4{ shadowTexture.size() / 4 };
const RenderTexture internal4{ shadowTexture.size() / 4 };
while (System::Update())
{
const double angle = (Scene::Time() * 10_deg);
// 影の形状を描く
{
const ScopedRenderTarget2D target{ shadowTexture.clear(ColorF{ 1.0, 0.0 }) };
// RGB 値は無視して、描画された最大のアルファ値を保持するブレンドステートを適用する
const ScopedRenderStates2D blend{ BlendState::MaxAlpha };
// 影を右下方向に落とすため、描画位置をずらす
const Transformer2D transform{ Mat3x2::Translate(3, 3) };
Draw(angle, emoji);
}
// shadowTexture をダウンサンプリング + ガウスぼかし
{
Shader::Downsample(shadowTexture, blur4);
Shader::GaussianBlur(blur4, internal4, blur4);
}
// ぼかした影を描く
blur4.resized(Scene::Size()).draw(ColorF{ 0.0, 0.5 });
// 通常の形状を描く
if (not MouseL.pressed())
{
Draw(angle, emoji);
}
}
}
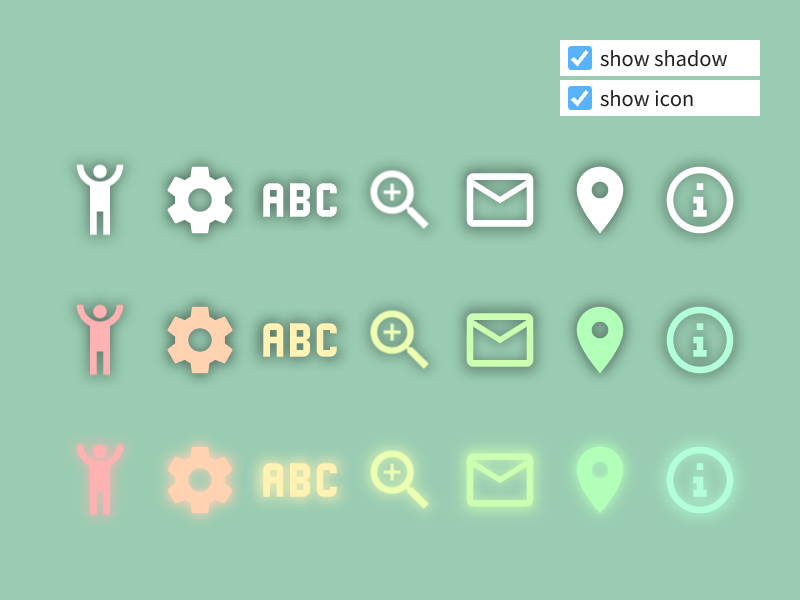
52.11 アイコンのシャドウ
- 52.10 を応用して、シャドウ付きのアイコンテクスチャクラスを作成します
# include <Siv3D.hpp>

class IconWithShadow
{
public:

	IconWithShadow() = default;

	explicit IconWithShadow(const Texture& texture)
		: m_texture{ texture }
		, m_shadowTexture{ m_texture.size()/2, ColorF{ 1.0, 0.0 } }
	{
		RenderTexture m_internalTexture{ m_texture.size() / 2 };

		// 影用テクスチャを用意する
		{
			const ScopedRenderTarget2D target{ m_shadowTexture };

			// RGB 値は無視して、描画された最大のアルファ値を保持するブレンドステートを適用する
			const ScopedRenderStates2D blend{ BlendState::MaxAlpha };

			// ぼかしのはみ出しを防ぐため、縮小して描画する
			m_texture.scaled(0.3).drawAt(m_shadowTexture.size() * 0.5);
		}

		// ガウスぼかしを行う
		Shader::GaussianBlur(m_shadowTexture, m_internalTexture, m_shadowTexture);
	}

	// アイコンを描画する
	void drawIconAt(const Vec2& center, const ColorF& color = ColorF{ 1.0 }) const
	{
		m_texture.drawAt(center, color);
	}

	// 影を描画する
	void drawShadowAt(const Vec2& center, const ColorF& shadowColor = ColorF{ 0.0, 0.5 }) const
	{
		// 縮小分より少し大きめに描画する
		m_shadowTexture.scaled(3.6).drawAt(center, shadowColor);
	}

	// 影とアイコンを描画する
	void drawWithShadowAt(const Vec2& center, const ColorF& color = ColorF{ 1.0 }, const ColorF& shadowColor = ColorF{ 0.0, 0.5 }) const
	{
		drawShadowAt(center, shadowColor);
		drawIconAt(center, color);
	}

private:

	Texture m_texture;

	RenderTexture m_shadowTexture;
};


void Main()
{
	Scene::SetBackground(ColorF{ 0.6, 0.8, 0.7 });

	const Array<IconWithShadow> icons =
	{
		IconWithShadow{ Texture{ 0xF064C_icon, 80 } },
		IconWithShadow{ Texture{ 0xF0493_icon, 80 } },
		IconWithShadow{ Texture{ 0xF100D_icon, 80 } },
		IconWithShadow{ Texture{ 0xF06ED_icon, 80 } },
		IconWithShadow{ Texture{ 0xF01F0_icon, 80 } },
		IconWithShadow{ Texture{ 0xF034E_icon, 80 } },
		IconWithShadow{ Texture{ 0xF1C6A_icon, 80 } },
	};

	bool showShadow = true;
	bool showIcon = true;

	while (System::Update())
	{
		if (showShadow)
		{
			for (size_t i = 0; i < icons.size(); ++i)
			{
				icons[i].drawShadowAt(Vec2{ (100 + i * 100), 200 });
			}

			for (size_t i = 0; i < icons.size(); ++i)
			{
				icons[i].drawShadowAt(Vec2{ (100 + i * 100), 340 });
			}

			for (size_t i = 0; i < icons.size(); ++i)
			{
				icons[i].drawShadowAt(Vec2{ (100 + i * 100), 480 }, HSV{ (i * 25.0), 0.3, 1.0 });
			}
		}

		if (showIcon)
		{
			for (size_t i = 0; i < icons.size(); ++i)
			{
				icons[i].drawIconAt(Vec2{ (100 + i * 100), 200 });
			}

			for (size_t i = 0; i < icons.size(); ++i)
			{
				icons[i].drawIconAt(Vec2{ (100 + i * 100), 340 }, HSV{ (i * 25.0), 0.3, 1.0 });
			}

			for (size_t i = 0; i < icons.size(); ++i)
			{
				icons[i].drawIconAt(Vec2{ (100 + i * 100), 480 }, HSV{ (i * 25.0), 0.3, 1.0 });
			}
		}

		SimpleGUI::CheckBox(showShadow, U"show shadow", Vec2{ 560, 40 }, 200);
		SimpleGUI::CheckBox(showIcon, U"show icon", Vec2{ 560, 80 }, 200);
	}
}
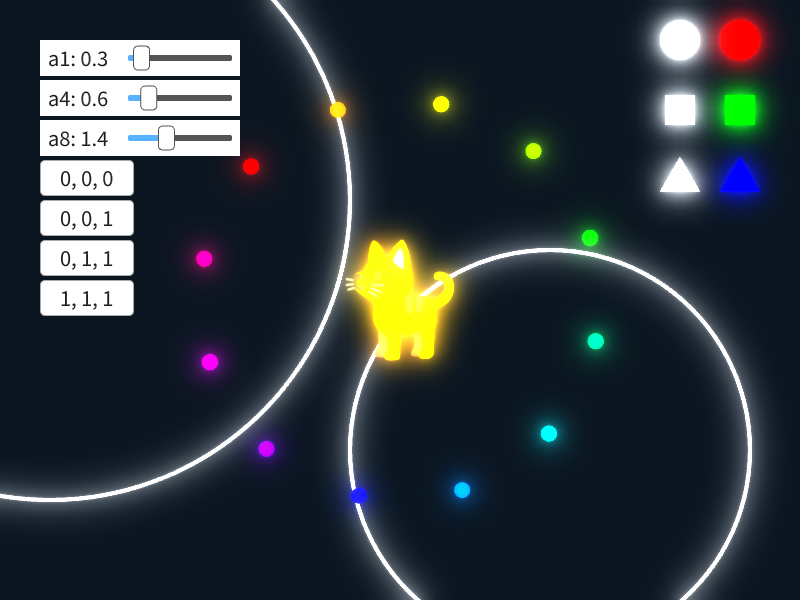
52.12 ライトブルーム
- ガウスぼかしの結果を加算ブレンドで描画することで、ライトブルームの表現を実現できます
# include <Siv3D.hpp>

void DrawScene(const Texture& emoji)
{
	Circle{ 680, 40, 20 }.draw();
	Rect{ Arg::center(680, 110), 30 }.draw();
	Triangle{ 680, 180, 40 }.draw();

	Circle{ 740, 40, 20 }.draw(HSV{ 0 });
	Rect{ Arg::center(740, 110), 30 }.draw(HSV{ 120 });
	Triangle{ 740, 180, 40 }.draw(HSV{ 240 });

	Circle{ 50, 200, 300 }.drawFrame(4);
	Circle{ 550, 450, 200 }.drawFrame(4);

	for (int32 i = 0; i < 12; ++i)
	{
		const double angle = (i * 30_deg + Scene::Time() * 5_deg);
		const Vec2 pos = OffsetCircular{ Vec2{ 400, 300 }, 200, angle };
		Circle{ pos, 8 }.draw(HSV{ i * 30 });
	}

	emoji.drawAt(400, 300);
}

void Main()
{
	const Size sceneSize{ 800, 600 };
	const Texture emoji{ U"🐈"_emoji };

	// ブルーム用のテクスチャ
	const RenderTexture blur1{ sceneSize };
	const RenderTexture internal1{ sceneSize };
	const RenderTexture blur4{ sceneSize / 4 };
	const RenderTexture internal4{ sceneSize / 4 };
	const RenderTexture blur8{ sceneSize / 8 };
	const RenderTexture internal8{ sceneSize / 8 };

	// 3 種類のぼかしテクスチャの寄与度
	double a1 = 0.0, a4 = 0.0, a8 = 0.0;

	while (System::Update())
	{
		// 通常のシーン描画
		{
			DrawScene(emoji);
		}

		// ブルーム用テクスチャを用意する
		{
			// シーンを描く
			{
				// ブルーム用テクスチャをレンダーターゲットにする
				const ScopedRenderTarget2D target{ blur1.clear(ColorF{ 0.0 }) };

				// シーンを描く
				DrawScene(emoji);
			} // blur1 のレンダーターゲットが解除される

			// (1) blur1: 1x blur
			Shader::GaussianBlur(blur1, internal1, blur1);

			// (2) blur4: 1x blur + 1/4 scale + 1x blur
			Shader::Downsample(blur1, blur4);
			Shader::GaussianBlur(blur4, internal4, blur4);

			// (3) blur8: 1x blur + 1/4 scale + 1x blur + 1/2 scale + 1x blur
			Shader::Downsample(blur4, blur8);
			Shader::GaussianBlur(blur8, internal8, blur8);
		}

		{
			const ScopedRenderStates2D blend{ BlendState::Additive };

			if (a1)
			{
				blur1.resized(sceneSize).draw(ColorF{ a1 });
			}

			if (a4)
			{
				blur4.resized(sceneSize).draw(ColorF{ a4 });
			}

			if (a8)
			{
				blur8.resized(sceneSize).draw(ColorF{ a8 });
			}
		}

		SimpleGUI::Slider(U"a1: {:.1f}"_fmt(a1), a1, 0.0, 4.0, Vec2{ 40, 40 });
		SimpleGUI::Slider(U"a4: {:.1f}"_fmt(a4), a4, 0.0, 4.0, Vec2{ 40, 80 });
		SimpleGUI::Slider(U"a8: {:.1f}"_fmt(a8), a8, 0.0, 4.0, Vec2{ 40, 120 });

		if (SimpleGUI::Button(U"0, 0, 0", Vec2{ 40, 160 }))
		{
			a1 = a4 = a8 = 0.0;
		}

		if (SimpleGUI::Button(U"0, 0, 1", Vec2{ 40, 200 }))
		{
			a1 = a4 = 0.0;
			a8 = 1.0;
		}

		if (SimpleGUI::Button(U"0, 1, 1", Vec2{ 40, 240 }))
		{
			a1 = 0.0;
			a8 = a4 = 1.0;
		}

		if (SimpleGUI::Button(U"1, 1, 1", Vec2{ 40, 280 }))
		{
			a1 = a4 = a8 = 1.0;
		}
	}
}
52.13 内容の取得
.readAsImage()を使うと、レンダーテクスチャの画像データをImage(チュートリアル 63)として取得できますImageは C++ コードで加工したり、各ピクセルにアクセスしたり、ファイルに保存したりすることができます
- レンダーテクスチャから
Imageを取得する操作はコストが非常に大きいため、毎フレーム実行することは避けるべきです - レンダーテクスチャの内容を
Imageとして取得するのは最終手段です。レンダーテクスチャのまま目的の処理が実現できないか検討してください - 次のサンプルコードでは、レンダーテクスチャに描画された内容を画像ファイルに保存します:
# include <Siv3D.hpp>

void Main()
{
	const Texture emoji{ U"🔥"_emoji };

	const RenderTexture renderTexture{ Size{ 400, 400 }, Palette::White };
	{
		const ScopedRenderTarget2D target{ renderTexture };

		for (int32 i = 0; i < 30; ++i)
		{
			emoji.drawAt(RandomVec2(Rect{ 0, 0, 400, 400 }));
		}
	}

	{
		// 2D 描画処理をすべて実行(フラッシュ)し、レンダーテクスチャへの描画を完了する
		Graphics2D::Flush();

		// レンダーテクスチャの内容を画像として取得する
		Image image;
		renderTexture.readAsImage(image);

		// 画像を保存する
		image.save(U"fire.png");
	}

	while (System::Update())
	{

	}
}