奥行き型 UI の作成
| 難易度 | 中級 | 時間 | 60 分~ |
1. レンダーテクスチャに UI を描画する
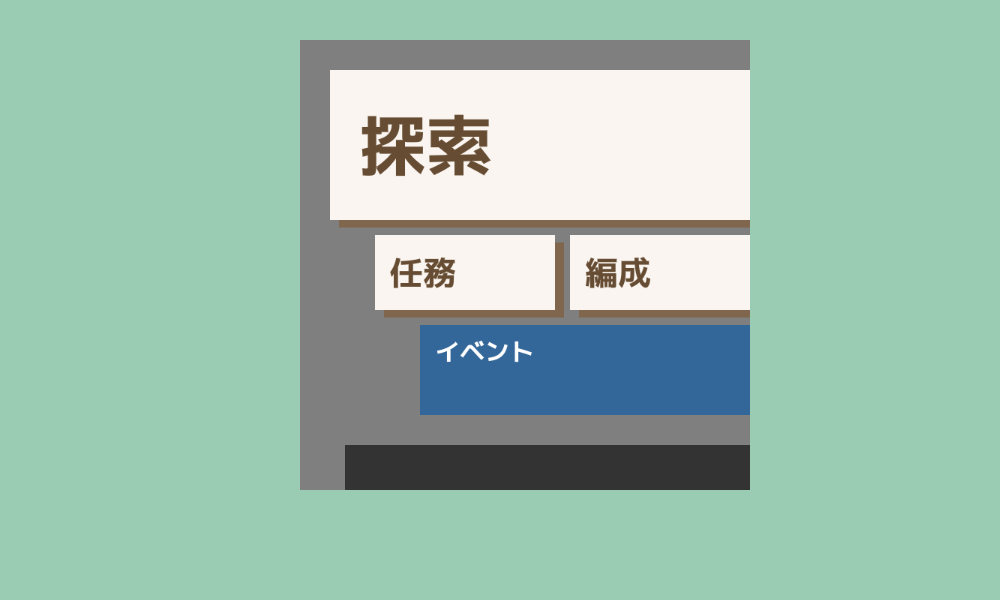
- QuadWarp を使うために、まずはレンダーテクスチャに UI を描画します。
コード
# include <Siv3D.hpp>

void Main()
{
	// ウィンドウのサイズを 1000x600 に変更する
	Window::Resize(1000, 600);

	// 背景色を設定する
	Scene::SetBackground(ColorF{ 0.6, 0.8, 0.7 });

	// UI に使うフォント
	const Font font{ FontMethod::MSDF, 48, Typeface::Bold };

	// テーマカラー
	const ColorF PrimaryColor{ 0.98, 0.96, 0.94 };

	// 各 UI の長方形
	const Rect BaseRect{ 0, 0, 600, 600 };
	const Rect Button1{ 40, 40, 560, 200 };
	const Rect Button2{ 100, 260, 240, 100 };
	const Rect Button3{ 360, 260, 240, 100 };
	const Rect Button4{ 160, 380, 440, 120 };

	// UI の描画先のレンダーテクスチャ
	const MSRenderTexture renderTexture{ BaseRect.size };

	while (System::Update())
	{
		// レンダーテクスチャに UI を描く
		{
			// renderTexture を ColorF{ 0.5 } でクリアし,
			// renderTexture をレンダーターゲットにする
			const ScopedRenderTarget2D renderTarget{ renderTexture.clear(ColorF{ 0.5 }) };

			// UI を描画する
			{
				// 探索ボタン
				Button1.movedBy(12, 10).draw(ColorF{ 0.5, 0.4, 0.3 });
				Button1.draw(PrimaryColor);
				font(U"探索").draw(88, Arg::leftCenter(80, 140), ColorF{ 0.4, 0.3, 0.2 });

				// 任務ボタン
				Button2.movedBy(12, 10).draw(ColorF{ 0.5, 0.4, 0.3 });
				Button2.draw(PrimaryColor);
				font(U"任務").draw(44, Arg::leftCenter(120, 310), ColorF{ 0.4, 0.3, 0.2 });

				// 編成ボタン
				Button3.movedBy(12, 10).draw(ColorF{ 0.5, 0.4, 0.3 });
				Button3.draw(PrimaryColor);
				font(U"編成").draw(44, Arg::leftCenter(380, 310), ColorF{ 0.4, 0.3, 0.2 });

				// イベントエリア
				Button4.draw(ColorF{ 0.2, 0.4, 0.6 });
				font(U"イベント").draw(33, Arg::leftCenter(180, 415));

				// フッター
				Rect{ 60, 540, 540, 60 }.draw(ColorF{ 0.0, 0.6 });
			}

			// 2D 描画命令の発行 (Flush) と MSAA の解決 (Resolve) で
			// レンダーテクスチャの中身を完成させる
			Graphics2D::Flush();
			renderTexture.resolve();
		}

		// レンダーテクスチャを画面に描く
		renderTexture.scaled(0.75).draw(Vec2{ 300, 40 });
	}
}
2. 透過するレンダーテクスチャに描画する
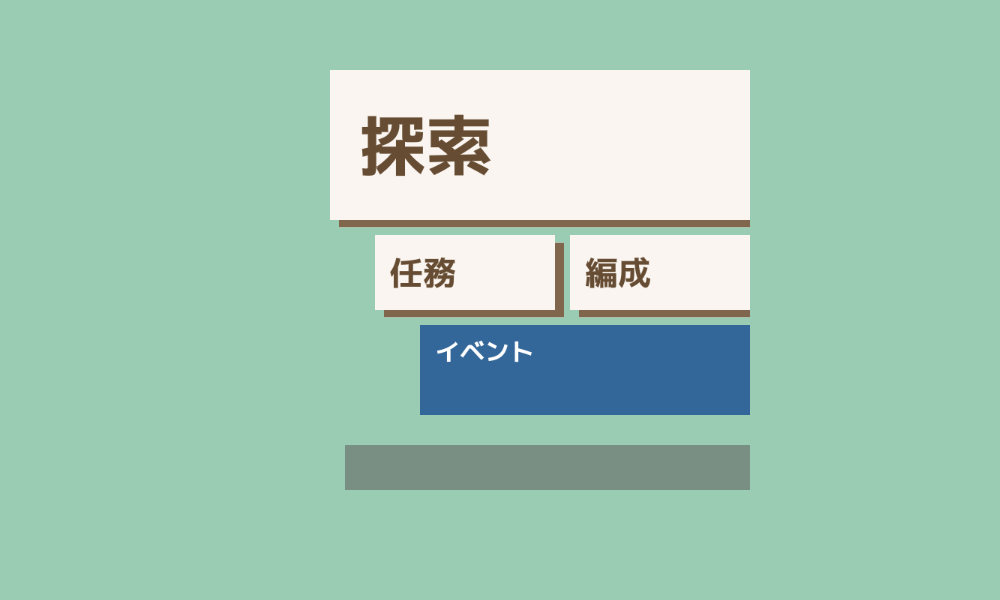
- UI 以外の部分を透過させたい場合、
ColorF{ 1.0, 0.0 }のような透過色でクリアしたレンダーテクスチャに UI を描きます。 - ただし、そのままではレンダーテクスチャのアルファ値がすべて 0 なので、最大のアルファ値を書き込むブレンドステートを適用します。
コード
# include <Siv3D.hpp>

/// @brief 最大のアルファ値を書き込むブレンドステートを返します。
BlendState MaxAlphaBlend()
{
	BlendState blend = BlendState::Default2D;
	blend.opAlpha = BlendOp::Max;
	blend.dstAlpha = Blend::DestAlpha;
	blend.srcAlpha = Blend::SrcAlpha;
	return blend;
}

void Main()
{
	// ウィンドウのサイズを 1000x600 に変更する
	Window::Resize(1000, 600);

	// 背景色を設定する
	Scene::SetBackground(ColorF{ 0.6, 0.8, 0.7 });

	// UI に使うフォント
	const Font font{ FontMethod::MSDF, 48, Typeface::Bold };

	// テーマカラー
	const ColorF PrimaryColor{ 0.98, 0.96, 0.94 };

	// 各 UI の長方形
	const Rect BaseRect{ 0, 0, 600, 600 };
	const Rect Button1{ 40, 40, 560, 200 };
	const Rect Button2{ 100, 260, 240, 100 };
	const Rect Button3{ 360, 260, 240, 100 };
	const Rect Button4{ 160, 380, 440, 120 };

	// UI の描画先のレンダーテクスチャ
	const MSRenderTexture renderTexture{ BaseRect.size };

	while (System::Update())
	{
		// レンダーテクスチャに UI を描く
		{
			// renderTexture を ColorF{ 1.0, 0.0 } でクリアし,
			// renderTexture をレンダーターゲットにする
			const ScopedRenderTarget2D renderTarget{ renderTexture.clear(ColorF{ 1.0, 0.0 }) };

			// 最大のアルファ値を書き込むブレンドステートを適用する
			const ScopedRenderStates2D renderState{ MaxAlphaBlend() };

			// UI を描画する
			{
				// 探索ボタン
				Button1.movedBy(12, 10).draw(ColorF{ 0.5, 0.4, 0.3 });
				Button1.draw(PrimaryColor);
				font(U"探索").draw(88, Arg::leftCenter(80, 140), ColorF{ 0.4, 0.3, 0.2 });

				// 任務ボタン
				Button2.movedBy(12, 10).draw(ColorF{ 0.5, 0.4, 0.3 });
				Button2.draw(PrimaryColor);
				font(U"任務").draw(44, Arg::leftCenter(120, 310), ColorF{ 0.4, 0.3, 0.2 });

				// 編成ボタン
				Button3.movedBy(12, 10).draw(ColorF{ 0.5, 0.4, 0.3 });
				Button3.draw(PrimaryColor);
				font(U"編成").draw(44, Arg::leftCenter(380, 310), ColorF{ 0.4, 0.3, 0.2 });

				// イベントエリア
				Button4.draw(ColorF{ 0.2, 0.4, 0.6 });
				font(U"イベント").draw(33, Arg::leftCenter(180, 415));

				// フッター
				Rect{ 60, 540, 540, 60 }.draw(ColorF{ 0.0, 0.6 });
			}

			// 2D 描画命令の発行 (Flush) と MSAA の解決 (Resolve) で
			// レンダーテクスチャの中身を完成させる
			Graphics2D::Flush();
			renderTexture.resolve();
		}

		// レンダーテクスチャを画面に描く
		renderTexture.scaled(0.75).draw(Vec2{ 300, 40 });
	}
}
3. 射影先の Quad を用意する
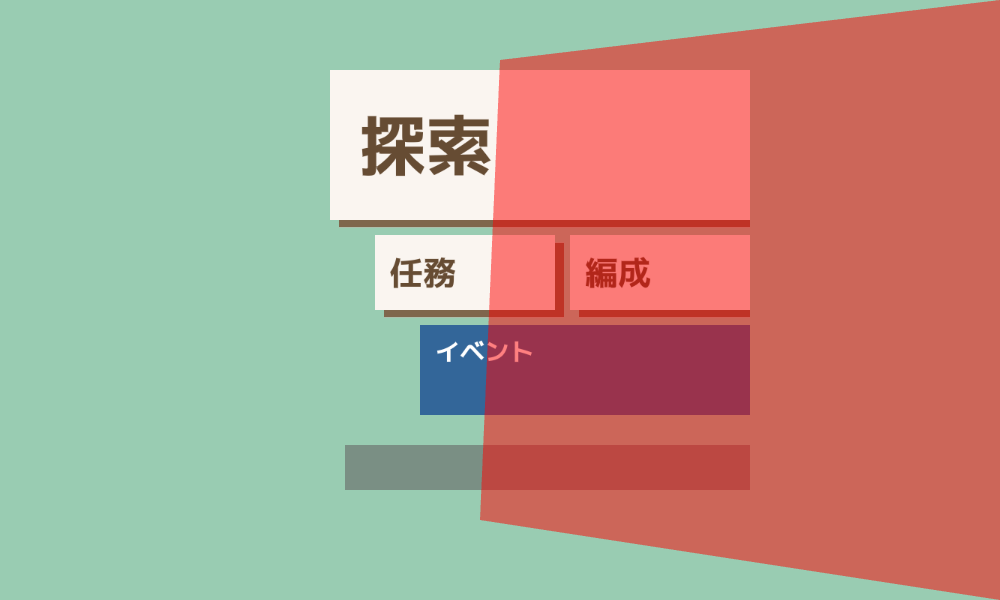
- レンダーテクスチャをどのような形で射影して描画するかを指定する Quad を用意します。
コード
# include <Siv3D.hpp>

/// @brief 最大のアルファ値を書き込むブレンドステートを返します。
BlendState MaxAlphaBlend()
{
	BlendState blend = BlendState::Default2D;
	blend.opAlpha = BlendOp::Max;
	blend.dstAlpha = Blend::DestAlpha;
	blend.srcAlpha = Blend::SrcAlpha;
	return blend;
}

void Main()
{
	// ウィンドウのサイズを 1000x600 に変更する
	Window::Resize(1000, 600);

	// 背景色を設定する
	Scene::SetBackground(ColorF{ 0.6, 0.8, 0.7 });

	// UI に使うフォント
	const Font font{ FontMethod::MSDF, 48, Typeface::Bold };

	// テーマカラー
	const ColorF PrimaryColor{ 0.98, 0.96, 0.94 };

	// 各 UI の長方形
	const Rect BaseRect{ 0, 0, 600, 600 };
	const Rect Button1{ 40, 40, 560, 200 };
	const Rect Button2{ 100, 260, 240, 100 };
	const Rect Button3{ 360, 260, 240, 100 };
	const Rect Button4{ 160, 380, 440, 120 };

	// UI の描画先のレンダーテクスチャ
	const MSRenderTexture renderTexture{ BaseRect.size };

	// 射影先の四角形
	const Quad TargetQuad{ 500, 60, 1000, 0, 1000, 600, 480, 520 };

	while (System::Update())
	{
		// レンダーテクスチャに UI を描く
		{
			// renderTexture を ColorF{ 1.0, 0.0 } でクリアし,
			// renderTexture をレンダーターゲットにする
			const ScopedRenderTarget2D renderTarget{ renderTexture.clear(ColorF{ 1.0, 0.0 }) };

			// 最大のアルファ値を書き込むブレンドステートを適用する
			const ScopedRenderStates2D renderState{ MaxAlphaBlend() };

			// UI を描画する
			{
				// 探索ボタン
				Button1.movedBy(12, 10).draw(ColorF{ 0.5, 0.4, 0.3 });
				Button1.draw(PrimaryColor);
				font(U"探索").draw(88, Arg::leftCenter(80, 140), ColorF{ 0.4, 0.3, 0.2 });

				// 任務ボタン
				Button2.movedBy(12, 10).draw(ColorF{ 0.5, 0.4, 0.3 });
				Button2.draw(PrimaryColor);
				font(U"任務").draw(44, Arg::leftCenter(120, 310), ColorF{ 0.4, 0.3, 0.2 });

				// 編成ボタン
				Button3.movedBy(12, 10).draw(ColorF{ 0.5, 0.4, 0.3 });
				Button3.draw(PrimaryColor);
				font(U"編成").draw(44, Arg::leftCenter(380, 310), ColorF{ 0.4, 0.3, 0.2 });

				// イベントエリア
				Button4.draw(ColorF{ 0.2, 0.4, 0.6 });
				font(U"イベント").draw(33, Arg::leftCenter(180, 415));

				// フッター
				Rect{ 60, 540, 540, 60 }.draw(ColorF{ 0.0, 0.6 });
			}

			// 2D 描画命令の発行 (Flush) と MSAA の解決 (Resolve) で
			// レンダーテクスチャの中身を完成させる
			Graphics2D::Flush();
			renderTexture.resolve();
		}

		// レンダーテクスチャを画面に描く
		renderTexture.scaled(0.75).draw(Vec2{ 300, 40 });

		// 射影先の四角形を描く
		TargetQuad.draw(ColorF{ 1.0, 0.0, 0.0, 0.5 });
	}
}
4. QuadWarp を使う
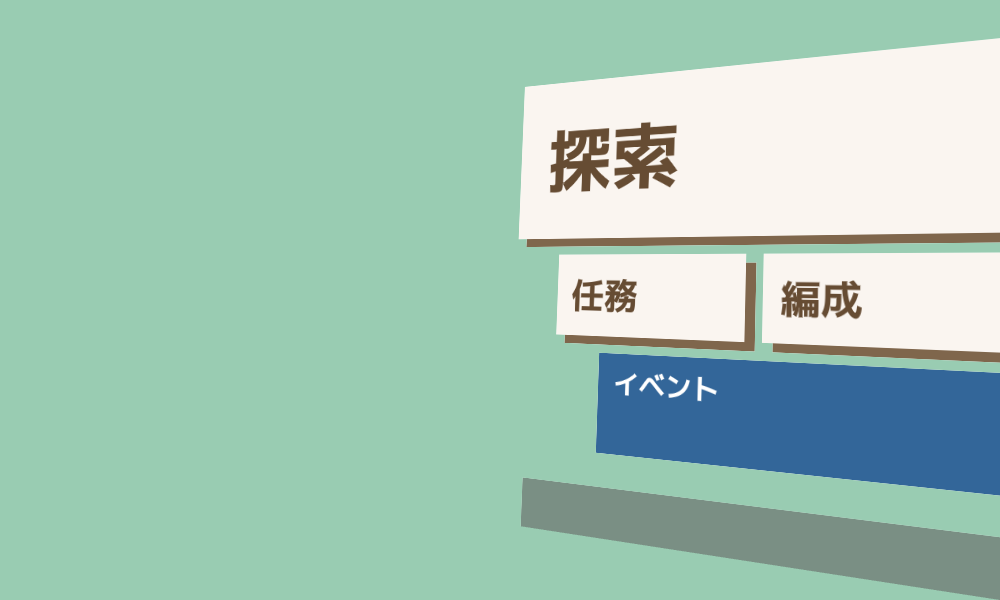
- QuadWarp を使うと、
Quadで指定した領域にテクスチャを射影して描画できます。
コード
# include <Siv3D.hpp>

/// @brief 最大のアルファ値を書き込むブレンドステートを返します。
BlendState MaxAlphaBlend()
{
	BlendState blend = BlendState::Default2D;
	blend.opAlpha = BlendOp::Max;
	blend.dstAlpha = Blend::DestAlpha;
	blend.srcAlpha = Blend::SrcAlpha;
	return blend;
}

void Main()
{
	// ウィンドウのサイズを 1000x600 に変更する
	Window::Resize(1000, 600);

	// 背景色を設定する
	Scene::SetBackground(ColorF{ 0.6, 0.8, 0.7 });

	// UI に使うフォント
	const Font font{ FontMethod::MSDF, 48, Typeface::Bold };

	// テーマカラー
	const ColorF PrimaryColor{ 0.98, 0.96, 0.94 };

	// 各 UI の長方形
	const Rect BaseRect{ 0, 0, 600, 600 };
	const Rect Button1{ 40, 40, 560, 200 };
	const Rect Button2{ 100, 260, 240, 100 };
	const Rect Button3{ 360, 260, 240, 100 };
	const Rect Button4{ 160, 380, 440, 120 };

	// UI の描画先のレンダーテクスチャ
	const MSRenderTexture renderTexture{ BaseRect.size };

	// 射影先の四角形
	const Quad TargetQuad{ 500, 60, 1000, 0, 1000, 600, 480, 520 };

	while (System::Update())
	{
		// レンダーテクスチャに UI を描く
		{
			// renderTexture を ColorF{ 1.0, 0.0 } でクリアし,
			// renderTexture をレンダーターゲットにする
			const ScopedRenderTarget2D renderTarget{ renderTexture.clear(ColorF{ 1.0, 0.0 }) };

			// 最大のアルファ値を書き込むブレンドステートを適用する
			const ScopedRenderStates2D renderState{ MaxAlphaBlend() };

			// UI を描画する
			{
				// 探索ボタン
				Button1.movedBy(12, 10).draw(ColorF{ 0.5, 0.4, 0.3 });
				Button1.draw(PrimaryColor);
				font(U"探索").draw(88, Arg::leftCenter(80, 140), ColorF{ 0.4, 0.3, 0.2 });

				// 任務ボタン
				Button2.movedBy(12, 10).draw(ColorF{ 0.5, 0.4, 0.3 });
				Button2.draw(PrimaryColor);
				font(U"任務").draw(44, Arg::leftCenter(120, 310), ColorF{ 0.4, 0.3, 0.2 });

				// 編成ボタン
				Button3.movedBy(12, 10).draw(ColorF{ 0.5, 0.4, 0.3 });
				Button3.draw(PrimaryColor);
				font(U"編成").draw(44, Arg::leftCenter(380, 310), ColorF{ 0.4, 0.3, 0.2 });

				// イベントエリア
				Button4.draw(ColorF{ 0.2, 0.4, 0.6 });
				font(U"イベント").draw(33, Arg::leftCenter(180, 415));

				// フッター
				Rect{ 60, 540, 540, 60 }.draw(ColorF{ 0.0, 0.6 });
			}

			// 2D 描画命令の発行 (Flush) と MSAA の解決 (Resolve) で
			// レンダーテクスチャの中身を完成させる
			Graphics2D::Flush();
			renderTexture.resolve();
		}

		// 奥行き型の UI を描く
		{
			// QuadWarp に適したサンプラーステートを適用する(縮小部分が粗くなるのを防ぐ)
			const ScopedRenderStates2D sampler{ SamplerState::ClampAniso };

			// TargetQuad にレンダーテクスチャを射影して描く
			Shader::QuadWarp(TargetQuad, renderTexture);
		}
	}
}
5. 変形後のボタンのあたり判定
Mat3x3の.transformRect()を使い、Rectを座標変換後のQuadに変換します。
コード
# include <Siv3D.hpp>

/// @brief 最大のアルファ値を書き込むブレンドステートを返します。
BlendState MaxAlphaBlend()
{
	BlendState blend = BlendState::Default2D;
	blend.opAlpha = BlendOp::Max;
	blend.dstAlpha = Blend::DestAlpha;
	blend.srcAlpha = Blend::SrcAlpha;
	return blend;
}

void Main()
{
	// ウィンドウのサイズを 1000x600 に変更する
	Window::Resize(1000, 600);

	// 背景色を設定する
	Scene::SetBackground(ColorF{ 0.6, 0.8, 0.7 });

	// UI に使うフォント
	const Font font{ FontMethod::MSDF, 48, Typeface::Bold };

	// テーマカラー
	const ColorF PrimaryColor{ 0.98, 0.96, 0.94 };

	// ホバー時の色
	const ColorF HoverColor{ 1.0, 0.96, 0.8 };

	// 各 UI の長方形
	const Rect BaseRect{ 0, 0, 600, 600 };
	const Rect Button1{ 40, 40, 560, 200 };
	const Rect Button2{ 100, 260, 240, 100 };
	const Rect Button3{ 360, 260, 240, 100 };
	const Rect Button4{ 160, 380, 440, 120 };

	// UI の描画先のレンダーテクスチャ
	const MSRenderTexture renderTexture{ BaseRect.size };

	// 射影先の四角形
	const Quad TargetQuad{ 500, 60, 1000, 0, 1000, 600, 480, 520 };

	// QuadWarp 変換の行列(BaseRect → TargetQuad)を得る
	const Mat3x3 projection = Mat3x3::Homography(BaseRect, TargetQuad);

	// 射影後の各ボタンの四角形
	const Quad Button1Quad = projection.transformRect(Button1);
	const Quad Button2Quad = projection.transformRect(Button2);
	const Quad Button3Quad = projection.transformRect(Button3);
	const Quad Button4Quad = projection.transformRect(Button4);

	while (System::Update())
	{
		// レンダーテクスチャに UI を描く
		{
			// renderTexture を ColorF{ 1.0, 0.0 } でクリアし,
			// renderTexture をレンダーターゲットにする
			const ScopedRenderTarget2D renderTarget{ renderTexture.clear(ColorF{ 1.0, 0.0 }) };

			// 最大のアルファ値を書き込むブレンドステートを適用する
			const ScopedRenderStates2D renderState{ MaxAlphaBlend() };

			// UI を描画する
			{
				// 探索ボタン
				{
					Button1.movedBy(12, 10).draw(ColorF{ 0.5, 0.4, 0.3 });
					Button1.draw(Button1Quad.mouseOver() ? HoverColor : PrimaryColor);
					font(U"探索").draw(88, Arg::leftCenter(80, 140), ColorF{ 0.4, 0.3, 0.2 });
					if (Button1Quad.mouseOver())
					{
						Cursor::RequestStyle(CursorStyle::Hand);
					}
				}

				// 任務ボタン
				{
					Button2.movedBy(12, 10).draw(ColorF{ 0.5, 0.4, 0.3 });
					Button2.draw(Button2Quad.mouseOver() ? HoverColor : PrimaryColor);
					font(U"任務").draw(44, Arg::leftCenter(120, 310), ColorF{ 0.4, 0.3, 0.2 });
					if (Button2Quad.mouseOver())
					{
						Cursor::RequestStyle(CursorStyle::Hand);
					}
				}

				// 編成ボタン
				{
					Button3.movedBy(12, 10).draw(ColorF{ 0.5, 0.4, 0.3 });
					Button3.draw(Button3Quad.mouseOver() ? HoverColor : PrimaryColor);
					font(U"編成").draw(44, Arg::leftCenter(380, 310), ColorF{ 0.4, 0.3, 0.2 });
					if (Button3Quad.mouseOver())
					{
						Cursor::RequestStyle(CursorStyle::Hand);
					}
				}

				// イベントエリア
				{
					Button4.draw(ColorF{ 0.2, 0.4, 0.6 });
					font(U"イベント").draw(33, Arg::leftCenter(180, 415));
					if (Button4Quad.mouseOver())
					{
						Cursor::RequestStyle(CursorStyle::Hand);
					}
				}

				// フッター
				{
					Rect{ 60, 540, 540, 60 }.draw(ColorF{ 0.0, 0.6 });
				}
			}

			// 2D 描画命令の発行 (Flush) と MSAA の解決 (Resolve) で
			// レンダーテクスチャの中身を完成させる
			Graphics2D::Flush();
			renderTexture.resolve();
		}

		// 奥行き型の UI を描く
		{
			// QuadWarp に適したサンプラーステートを適用する(縮小部分が粗くなるのを防ぐ)
			const ScopedRenderStates2D sampler{ SamplerState::ClampAniso };

			// TargetQuad にレンダーテクスチャを射影して描く
			Shader::QuadWarp(TargetQuad, renderTexture);
		}
	}
}
6. 完成
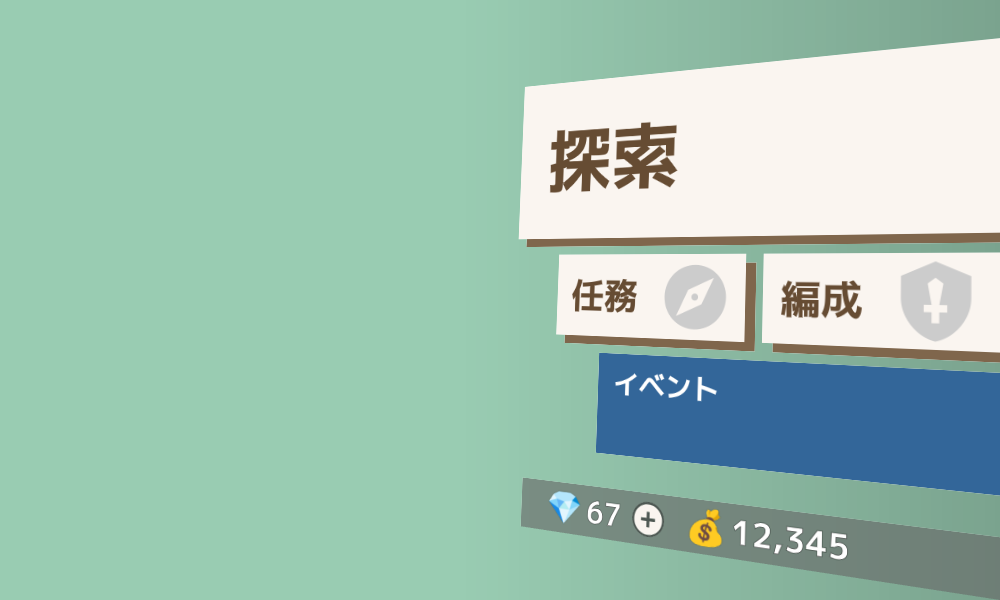
- UI をにぎやかにします。
コード
# include <Siv3D.hpp>

/// @brief 最大のアルファ値を書き込むブレンドステートを返します。
BlendState MaxAlphaBlend()
{
	BlendState blend = BlendState::Default2D;
	blend.opAlpha = BlendOp::Max;
	blend.dstAlpha = Blend::DestAlpha;
	blend.srcAlpha = Blend::SrcAlpha;
	return blend;
}

void Main()
{
	// ウィンドウのサイズを 1000x600 に変更する
	Window::Resize(1000, 600);

	// 背景色を設定する
	Scene::SetBackground(ColorF{ 0.6, 0.8, 0.7 });

	// UI に使うフォント
	const Font font{ FontMethod::MSDF, 48, Typeface::Bold };

	// テーマカラー
	const ColorF PrimaryColor{ 0.98, 0.96, 0.94 };

	// ホバー時の色
	const ColorF HoverColor{ 1.0, 0.96, 0.8 };

	// 各 UI の長方形
	const Rect BaseRect{ 0, 0, 600, 600 };
	const Rect Button1{ 40, 40, 560, 200 };
	const Rect Button2{ 100, 260, 240, 100 };
	const Rect Button3{ 360, 260, 240, 100 };
	const Rect Button4{ 160, 380, 440, 120 };
	const Rect Button5{ Arg::center(230, 570), 40 };

	// アイコンや絵文字
	const Texture compassIcon{ 0xF018B_icon, 90 };
	const Texture swordIcon{ 0xF18BE_icon, 90 };
	const Texture plusIcon{ 0xF0417_icon, 42 };
	const Texture moneyEmoji{ U"💰"_emoji };
	const Texture gemEmoji{ U"💎"_emoji };

	// UI の描画先のレンダーテクスチャ
	const MSRenderTexture renderTexture{ BaseRect.size };

	// 射影先の四角形
	const Quad TargetQuad{ 500, 60, 1000, 0, 1000, 600, 480, 520 };

	// QuadWarp 変換の行列(BaseRect → TargetQuad)を得る
	const Mat3x3 projection = Mat3x3::Homography(BaseRect, TargetQuad);

	// 射影後の各ボタンの四角形
	const Quad Button1Quad = projection.transformRect(Button1);
	const Quad Button2Quad = projection.transformRect(Button2);
	const Quad Button3Quad = projection.transformRect(Button3);
	const Quad Button4Quad = projection.transformRect(Button4);
	const Quad Button5Quad = projection.transformRect(Button5);

	while (System::Update())
	{
		// レンダーテクスチャに UI を描く
		{
			// renderTexture を ColorF{ 1.0, 0.0 } でクリアし,
			// renderTexture をレンダーターゲットにする
			const ScopedRenderTarget2D renderTarget{ renderTexture.clear(ColorF{ 1.0, 0.0 }) };

			// 最大のアルファ値を書き込むブレンドステートを適用する
			const ScopedRenderStates2D renderState{ MaxAlphaBlend() };

			// UI を描画する
			{
				// 探索ボタン
				{
					Button1.movedBy(12, 10).draw(ColorF{ 0.5, 0.4, 0.3 });
					Button1.draw(Button1Quad.mouseOver() ? HoverColor : PrimaryColor);
					font(U"探索").draw(88, Arg::leftCenter(80, 140), ColorF{ 0.4, 0.3, 0.2 });
					if (Button1Quad.mouseOver())
					{
						Cursor::RequestStyle(CursorStyle::Hand);
					}
				}

				// 任務ボタン
				{
					Button2.movedBy(12, 10).draw(ColorF{ 0.5, 0.4, 0.3 });
					Button2.draw(Button2Quad.mouseOver() ? HoverColor : PrimaryColor);
					font(U"任務").draw(44, Arg::leftCenter(120, 310), ColorF{ 0.4, 0.3, 0.2 });
					compassIcon.drawAt(280, 310, ColorF{ 0.8 });
					if (Button2Quad.mouseOver())
					{
						Cursor::RequestStyle(CursorStyle::Hand);
					}
				}

				// 編成ボタン
				{
					Button3.movedBy(12, 10).draw(ColorF{ 0.5, 0.4, 0.3 });
					Button3.draw(Button3Quad.mouseOver() ? HoverColor : PrimaryColor);
					font(U"編成").draw(44, Arg::leftCenter(380, 310), ColorF{ 0.4, 0.3, 0.2 });
					swordIcon.drawAt(540, 310, ColorF{ 0.8 });
					if (Button3Quad.mouseOver())
					{
						Cursor::RequestStyle(CursorStyle::Hand);
					}
				}

				// イベントエリア
				{
					Button4.draw(ColorF{ 0.2, 0.4, 0.6 });
					font(U"イベント").draw(33, Arg::leftCenter(180, 415));
					if (Button4Quad.mouseOver())
					{
						Cursor::RequestStyle(CursorStyle::Hand);
					}
				}

				// フッター
				{
					Rect{ 60, 540, 540, 60 }.draw(ColorF{ 0.0, 0.6 });
					gemEmoji.scaled(0.36).drawAt(120, 570);
					font(U"67").draw(TextStyle::Outline(0.0, 0.2, ColorF{ 0.1 }), 36, Arg::leftCenter(150, 570));

					Circle{ Button5.center(), 20 }.draw(ColorF{ 0.2, 0.8 });
					plusIcon.drawAt(Button5.center(), Button5Quad.mouseOver() ? HoverColor : PrimaryColor);
					if (Button5Quad.mouseOver())
					{
						Cursor::RequestStyle(CursorStyle::Hand);
					}

					moneyEmoji.scaled(0.36).drawAt(300, 570);
					font(ThousandsSeparate(12345)).draw(TextStyle::Outline(0.0, 0.2, ColorF{ 0.1 }), 36, Arg::leftCenter(330, 570));
				}
			}

			// 2D 描画命令の発行 (Flush) と MSAA の解決 (Resolve) で
			// レンダーテクスチャの中身を完成させる
			Graphics2D::Flush();
			renderTexture.resolve();
		}

		// 奥行き型の UI を描く
		{
			// 右端に向かって影の効果
			Rect{ 460, 0, 540, 600 }.draw(Arg::left = ColorF{ 0.0, 0.0 }, Arg::right = ColorF{ 0.0, 0.2 });

			// QuadWarp に適したサンプラーステートを適用する(縮小部分が粗くなるのを防ぐ)
			const ScopedRenderStates2D sampler{ SamplerState::ClampAniso };

			// TargetQuad にレンダーテクスチャを射影して描く
			Shader::QuadWarp(TargetQuad, renderTexture);
		}
	}
}