ゲーム開発のヒント集
この記事では、Siv3D ゲームジャム の参加者に向けて、Siv3D でゲームを制作する際のヒントを紹介します。高品質でユニークなゲーム開発に役立つヒントが見つかるかもしれません。ゲームジャムの参加人数と同じ数のヒントを用意する予定です。
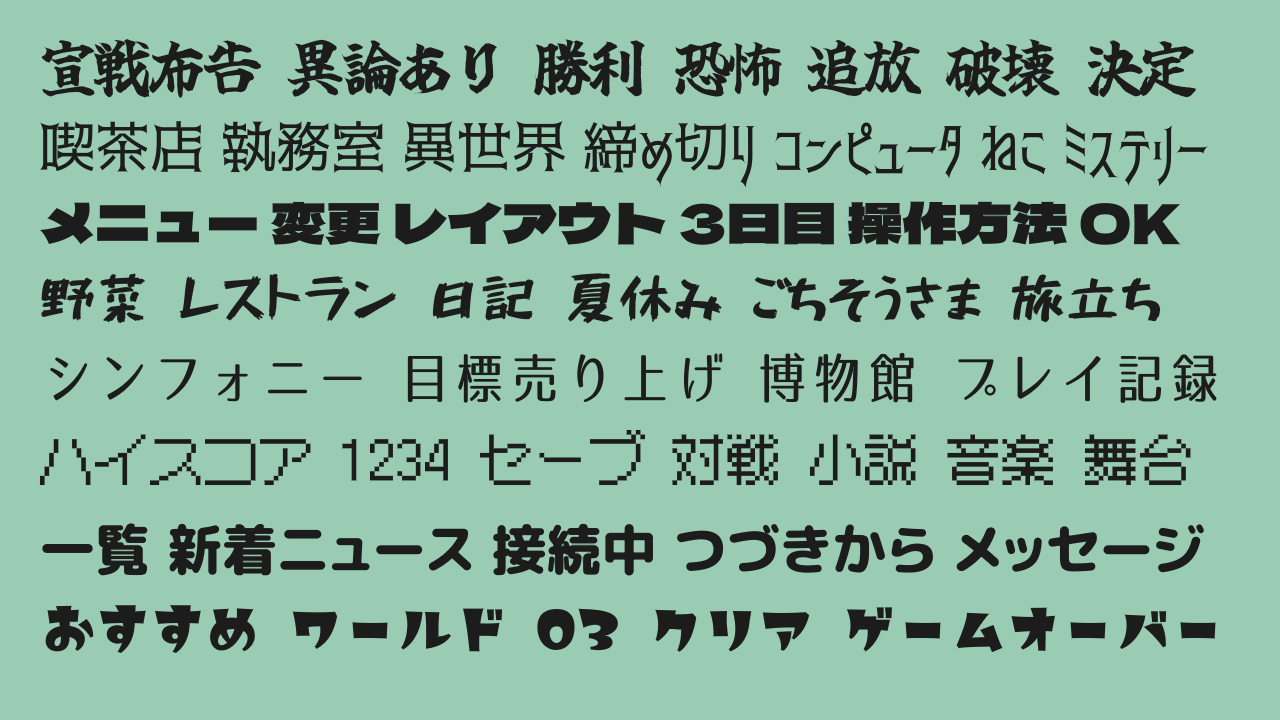
1. ゲームのイメージにあったフォントを選ぼう
Siv3D v0.6.12 から、MSDF 形式の Font についても、複雑な字形を美しく描画できるようになりました。ここでは、ゲーム開発に使えそうないくつかのユニークなフォントを紹介します。
| フォント名 | ライセンス |
|---|---|
| 玉ねぎ楷書激無料版v7改 | 独自ライセンス |
| 赤薔薇シンデレラ | 独自ライセンス |
| Dela Gothic One | SIL Open Font License |
| 851チカラヅヨク-かなA | 独自ライセンス |
| 07ロゴたいぷゴシックCondense | M+ FONT LICENSE |
| x12y12pxMaruMinya | 独自ライセンス |
| Rounded-X Mgen+ 1pp heavy | SIL Open Font License |
| めもわーる-しかく | 独自ライセンス |
コード
# include <Siv3D.hpp>

void Main()
{
	Window::Resize(1280, 720);
	Scene::SetBackground(ColorF{ 0.6, 0.8, 0.7 });

	// 玉ねぎ楷書激無料版v7改
	const Font font01{ FontMethod::MSDF, 48, U"fonts/玉ねぎ楷書激無料版v7改.ttf" };

	// 赤薔薇シンデレラ
	const Font font02{ FontMethod::MSDF, 48, U"fonts/akabara-cinderella.ttf" };

	// Dela Gothic One
	const Font font03{ FontMethod::MSDF, 48, U"fonts/DelaGothicOne-Regular.ttf" };

	// 851チカラヅヨク-かなA
	const Font font04{ FontMethod::MSDF, 48, U"fonts/851CHIKARA-DZUYOKU_kanaA_004.ttf" };

	// 07ロゴたいぷゴシックCondense
	const Font font05{ FontMethod::MSDF, 48, U"fonts/ロゴたいぷゴシックCondense.otf" };

	// x12y12pxMaruMinya
	const Font font06{ FontMethod::MSDF, 48, U"fonts/x12y12pxMaruMinya.ttf" };

	// Rounded-X Mgen+ 1pp heavy
	const Font font07{ FontMethod::MSDF, 48, U"fonts/rounded-x-mgenplus-1pp-heavy.ttf" };

	// めもわーる-しかく
	const Font font08{ FontMethod::MSDF, 48, U"fonts/memoir-square.otf" };

	while (System::Update())
	{
		font01(U"宣戦布告 異論あり 勝利 恐怖 追放 破壊 決定").draw(55, Vec2{ 40, 40 }, ColorF{ 0.11 });
		font02(U"喫茶店 執務室 異世界 締め切り コンピュータ ねこ ミステリー").draw(55, Vec2{ 40, 120 }, ColorF{ 0.11 });
		font03(U"メニュー 変更 レイアウト 3日目 操作方法 OK").draw(55, Vec2{ 40, 180 }, ColorF{ 0.11 });
		font04(U"野菜 レストラン 日記 夏休み ごちそうさま 旅立ち").draw(55, Vec2{ 40, 270 }, ColorF{ 0.11 });
		font05(U"シンフォニー 目標売り上げ 博物館 プレイ記録").draw(55, Vec2{ 40, 350 }, ColorF{ 0.11 });
		font06(U"ハイスコア 1234 セーブ 対戦 小説 音楽 舞台").draw(55, Vec2{ 40, 430 }, ColorF{ 0.11 });
		font07(U"一覧 新着ニュース 接続中 つづきから メッセージ").draw(55, Vec2{ 40, 510 }, ColorF{ 0.11 });
		font08(U"おすすめ ワールド 03 クリア ゲームオーバー").draw(55, Vec2{ 40, 600 }, ColorF{ 0.11 });
	}
}
2. ウィンドウのサイズを変更しよう
Siv3D のデフォルトのウィンドウサイズは 800 x 600 ですが、特殊なサイズに変更することでユニークな制約がうまれ、斬新なゲームを作れるかもしれません。
| 例 | ウィンドウサイズ |
|---|---|
 |
800 x 160 |
 |
400 x 600 |
 |
600 x 600 |
3. 背景にひと手間加えよう
単色の背景ではなく、グラデーションや模様を加えることで、ゲームの雰囲気をより引き立たせることができます。
グラデーション

コード
# include <Siv3D.hpp>

/// @brief 上下方向のグラデーションの背景を描画します。
/// @param topColor 上部の色
/// @param bottomColor 下部の色
void DrawVerticalGradientBackground(const ColorF& topColor, const ColorF& bottomColor)
{
	Scene::Rect()
		.draw(Arg::top = topColor, Arg::bottom = bottomColor);
}

void Main()
{
	while (System::Update())
	{
		DrawVerticalGradientBackground(ColorF{ 0.2, 0.5, 1.0 }, ColorF{ 0.5, 0.8, 1.0 });
	}
}
放射状のグラデーション

コード
# include <Siv3D.hpp>

/// @brief 放射状のグラデーションの背景を描画します。
/// @param centerColor 中心の色
/// @param outerColor 外周の色
void DrawRadialGradientBackground(const ColorF& centerColor, const ColorF& outerColor)
{
	Circle{ Scene::Center(), (Scene::Size().length() * 0.5) }
		.draw(centerColor, outerColor);
}

void Main()
{
	while (System::Update())
	{
		DrawRadialGradientBackground(ColorF{ 0.98, 0.95, 0.92 }, ColorF{ 0.8, 0.77, 0.74 });
	}
}
市松模様
コード
# include <Siv3D.hpp>

// @brief 市松模様の背景を描画します。
// @param cellSize セルのサイズ
// @param cellColor セルの色
void DrawCheckerboardBackground(int32 cellSize, const ColorF& cellColor)
{
	for (int32 y = 0; y < (Scene::Height() / cellSize); ++y)
	{
		for (int32 x = 0; x < (Scene::Width() / cellSize); ++x)
		{
			if (IsEven(x + y))
			{
				Rect{ (Point{ x, y } *cellSize), cellSize }.draw(cellColor);
			}
		}
	}
}

void Main()
{
	Scene::SetBackground(ColorF{ 0.4 });

	while (System::Update())
	{
		DrawCheckerboardBackground(40, ColorF{ 0.45 });
	}
}
水玉模様

コード
# include <Siv3D.hpp>

/// @brief 水玉模様の背景を描画します。
/// @param cellSize セルのサイズ
/// @param circleScale 円のスケール
/// @param color 色
void DrawPolkaDotBackground(int32 cellSize, double circleScale, const ColorF& color)
{
	for (int32 y = 0; y < (Scene::Height() / cellSize); ++y)
	{
		for (int32 x = 0; x < (Scene::Width() / cellSize); ++x)
		{
			if (IsEven(x + y))
			{
				Circle{ (Vec2{ (x + 0.5), (y + 0.5) } *cellSize), (cellSize * circleScale) }.draw(color);
			}
		}
	}
}

void Main()
{
	Scene::SetBackground(ColorF{ 0.82, 0.9, 0.98 });

	while (System::Update())
	{
		DrawPolkaDotBackground(40, 0.2, ColorF{ 0.98 });
	}
}
斜めのストライプ

コード
# include <Siv3D.hpp>

/// @brief 斜めのストライプの背景を描画します。
/// @param width ストライプの幅
/// @param angle ストライプの角度
/// @param color ストライプの色
void DrawStripedBackground(int32 width, double angle, const ColorF& color)
{
	for (int32 x = -Scene::Height(); x < (Scene::Width() + Scene::Height()); x += (width * 2))
	{
		Rect{ x, 0, width, Scene::Height() }.skewedX(angle).draw(color);
	}
}

void Main()
{
	Scene::SetBackground(ColorF{ 0.88 });

	while (System::Update())
	{
		DrawStripedBackground(40, 45_deg, ColorF{ 0.84 });
	}
}
4. 大きい数字を桁区切りで表示しよう
桁数の多い数字を表示するときは、桁区切りを入れると読みやすくなります。ThousandsSeparate(x) は数値 x を桁区切りした文字列を返します。
コード
# include <Siv3D.hpp>

void Main()
{
	Scene::SetBackground(ColorF{ 0.6, 0.8, 0.7 });

	const Font font1{ FontMethod::MSDF, 48, Typeface::Bold };
	const Font font2{ FontMethod::MSDF, 48, U"example/font/RocknRoll/RocknRollOne-Regular.ttf"};

	int32 money = 886644;
	int32 highScore = 123456789;

	while (System::Update())
	{
		font1(U"所持金: {} 円"_fmt(money)).draw(30, Vec2{ 40, 40 }, ColorF{ 0.11 });
		font1(U"所持金: {} 円"_fmt(ThousandsSeparate(money))).draw(30, Vec2{ 40, 100 }, ColorF{ 0.11 });

		font2(U"ハイスコア").draw(40, Vec2{ 160, 200 }, ColorF{ 0.11 });
		font2(highScore).draw(40, Arg::topRight(720, 200), ColorF{ 0.11 });

		font2(U"ハイスコア").draw(40, Vec2{ 160, 280 }, ColorF{ 0.11 });
		font2(ThousandsSeparate(highScore)).draw(40, Arg::topRight(720, 280), ColorF{ 0.11 });
	}
}
5. 小数点以下の桁数を制御しよう
_fmt() の変換指定子で {:.Nf} とすると、double 型など浮動小数点数型の値の小数点以下の桁数を N に設定できます。
コード
# include <Siv3D.hpp>

void Main()
{
	Scene::SetBackground(ColorF{ 0.6, 0.8, 0.7 });

	const Font font1{ FontMethod::MSDF, 48, Typeface::Bold };
	const Font font2{ FontMethod::MSDF, 48, U"example/font/RocknRoll/RocknRollOne-Regular.ttf" };

	double distance = 142.76542;
	double similarity = 0.9876543;

	while (System::Update())
	{
		font1(U"飛距離: {} m"_fmt(distance)).draw(30, Vec2{ 40, 40 }, ColorF{ 0.11 });
		font1(U"飛距離: {:.2f} m"_fmt(distance)).draw(30, Vec2{ 40, 100 }, ColorF{ 0.11 });

		font2(U"一致度").draw(40, Vec2{ 260, 200 }, ColorF{ 0.11 });
		font2(U"{}%"_fmt(similarity * 100)).draw(40, Arg::topRight(720, 200), ColorF{0.11});

		font2(U"一致度").draw(40, Vec2{ 260, 280 }, ColorF{ 0.11 });
		font2(U"{:.1f}%"_fmt(similarity * 100)).draw(40, Arg::topRight(720, 280), ColorF{ 0.11 });
	}
}
6. テキストの周りに適度な余白を確保しよう
ゲーム内のテキストは大きければよいというわけではありません。読みやすく、洗練された印象を与えるためには、テキストの周りに適度な余白を確保することが重要です。

コード
# include <Siv3D.hpp>

void Main()
{
	Scene::SetBackground(ColorF{ 0.6, 0.8, 0.7 });
	const Font font{ FontMethod::MSDF, 48, Typeface::Bold };

	const String s1 = U"はじめる";
	const String s2 = U"Siv3D は、音や画像、AI を使ったゲームやアプリを、モダンな C++ コードで楽しく簡単にプログラミングできるオープンソースのフレームワークです。";

	const Rect rect1{ 40, 60, 200, 50 };
	const Rect rect2{ 40, 160, 350, 250 };

	const Rect rect3{ 420, 60, 200, 50 };
	const Rect rect4{ 420, 160, 350, 250 };

	while (System::Update())
	{
		rect1.rounded(10).draw(ColorF{ 0.8, 0.9, 1.0 }).drawFrame(1, 0, ColorF{ 0.98 });
		font(s1).drawAt(45, rect1.center(), ColorF{ 0.11 });

		rect2.rounded(10).draw(ColorF{ 0.8, 0.9, 1.0 }).drawFrame(1, 0, ColorF{ 0.98 });
		font(s2).draw(24, rect2, ColorF{ 0.11 });

		rect3.rounded(10).draw(ColorF{ 0.8, 0.9, 1.0 }).drawFrame(1, 0, ColorF{ 0.98 });
		font(s1).drawAt(30, rect3.center(), ColorF{ 0.11 });

		rect4.rounded(10).draw(ColorF{ 0.8, 0.9, 1.0 }).drawFrame(1, 0, ColorF{ 0.98 });
		font(s2).draw(21, rect4.stretched(-20), ColorF{ 0.11 });
	}
}
7. 視覚エフェクトを時間差で展開しよう
爆発やダメージなど、複数の要素からなる視覚エフェクトを時間差で展開することで、ダイナミックな演出になります。
次の動画において、左の攻撃は同じタイミングでエフェクトが展開し、右の攻撃は時間差でエフェクトが展開しています。右のほうが多段ヒットしている様子がより強調されています。
コード
# include <Siv3D.hpp>

// @brief 市松模様の背景を描画します。
// @param cellSize セルのサイズ
// @param cellColor セルの色
void DrawCheckerboardBackground(int32 cellSize, const ColorF& cellColor)
{
	for (int32 y = 0; y < (Scene::Height() / cellSize); ++y)
	{
		for (int32 x = 0; x < (Scene::Width() / cellSize); ++x)
		{
			if (IsEven(x + y))
			{
				Rect{ (Point{ x, y } *cellSize), cellSize }.draw(cellColor);
			}
		}
	}
}

struct DamageNumbers : IEffect
{
	struct Number
	{
		int32 damage;
		Vec2 offset;
		double startTime;
		ColorF color;
	};

	Vec2 m_pos;

	Font m_font;

	Array<Number> m_numbers;

	static constexpr double MaxDelayTime = 0.25;

	DamageNumbers(const Font& font, const Vec2& pos, const Array<int32>& damages, double hue, bool delay = true)
		: m_pos{ pos }
		, m_font{ font }
	{
		double angle = 0_deg;

		for (const auto& damage : damages)
		{
			Number number{
				.damage = damage,
				.offset = Vec2{ Random(30.0, 80.0), 0.0 }.rotate(angle),
				.startTime = (delay ? Random(-MaxDelayTime, 0.0) : 0.0), // 登場の時間差
				.color = HSV{ hue, 0.4, 1.0 }
			};

			m_numbers << number;

			angle += (360_deg / damages.size());
		}
	}

	bool update(double t) override
	{
		constexpr double EffectFadeInDuration = 0.3;
		constexpr double EffectFadeOutDuration = 0.25;
		constexpr double EffectDuration = (EffectFadeInDuration + EffectFadeOutDuration);

		for (const auto& number : m_numbers)
		{
			const double t2 = (number.startTime + t);

			if (t2 < 0.0)
			{
				continue;
			}
			else if (t2 < EffectFadeInDuration)
			{
				const double e = EaseOutExpo(t2 / EffectFadeInDuration);
				const Vec2 pos = (m_pos + number.offset + (Vec2{ 0, (40 - 60 * e) }));
				const double alpha = e;
				const double fontSize = (10 + 50 * e);
				m_font(number.damage).drawAt(TextStyle::Outline(0.1, ColorF{ 0.11, alpha }), fontSize, pos, ColorF{ number.color, alpha });
			}
			else if (t2 < EffectDuration)
			{
				const double t3 = (t2 - (EffectDuration - EffectFadeInDuration));
				const double e = EaseInExpo(t3 / EffectFadeOutDuration);
				const Vec2 pos = (m_pos + number.offset + (Vec2{ 0, (40 - 60 - 24 * e) }));
				const double alpha = (1.0 - e);
				m_font(number.damage).drawAt(TextStyle::Outline(0.1, ColorF{ 0.11, alpha }), 60, pos, ColorF{ number.color, alpha });
			}
			else
			{
				continue;
			}
		}

		return (t < (EffectDuration + MaxDelayTime));
	}
};

struct BubbleEffect : IEffect
{
	struct Bubble
	{
		Vec2 offset;
		double startTime;
		double scale;
		ColorF color;
	};

	Vec2 m_pos;

	Array<Bubble> m_bubbles;

	static constexpr double MaxDelayTime = 0.25;

	BubbleEffect(const Vec2& pos, double baseHue, bool delay = true)
		: m_pos{ pos }
	{
		for (int32 i = 0; i < 8; ++i)
		{
			Bubble bubble{
				.offset = RandomVec2(Circle{ 60 }),
				.startTime = (delay ? Random(-MaxDelayTime, 0.0) : 0.0), // 登場の時間差
				.scale = Random(0.1, 1.2),
				.color = HSV{ baseHue + Random(-30.0, 30.0) }
			};
			m_bubbles << bubble;
		}
	}

	bool update(double t) override
	{
		constexpr double EffectDuration = 0.5;

		for (const auto& bubble : m_bubbles)
		{
			const double t2 = (bubble.startTime + t);

			if (not InRange(t2, 0.0, EffectDuration))
			{
				continue;
			}

			const double e = EaseOutExpo(t2 / EffectDuration);

			Circle{ (m_pos + bubble.offset), (e * 40 * bubble.scale) }
				.draw(ColorF{ bubble.color, 0.15 })
				.drawFrame((30.0 * (1.0 - e) * bubble.scale), bubble.color);
		}

		return (t < (EffectDuration + MaxDelayTime));
	}
};

void Main()
{
	Scene::SetBackground(ColorF{ 0.4 });

	const Texture texture{ U"🦖"_emoji };
	const Font font{ FontMethod::MSDF, 48, Typeface::Heavy, FontStyle::Italic };

	const Vec2 enemy1Pos{ 250, 250 };
	const Vec2 enemy2Pos{ 550, 250 };

	Effect effect1;
	Effect effect2;

	// 敵の揺れのための変数
	double shake = 0.0, shakeVelocity = 0.0;

	while (System::Update())
	{
		DrawCheckerboardBackground(40, ColorF{ 0.45 });

		shake = Math::SmoothDamp(shake, 0.0, shakeVelocity, 0.2);
		const Vec2 offset = (InRange(shake, 0.0, 1.0) ? RandomVec2(Circle{ shake * 12.0 }) : Vec2::Zero());

		texture.scaled(1.2).drawAt(enemy1Pos + offset);
		texture.scaled(1.2).drawAt(enemy2Pos + offset);

		if (SimpleGUI::Button(U"Attack", Vec2{ 350, 440 }, 100))
		{
			const Array<int32> damages{ 15, 12, 13, 15, 14 };
			effect1.add<BubbleEffect>(enemy1Pos, 40, false);
			effect1.add<BubbleEffect>(enemy2Pos, 40);
			effect2.add<DamageNumbers>(font, enemy1Pos, damages, 40, false);
			effect2.add<DamageNumbers>(font, enemy2Pos, damages, 40);
			shake = 1.3;
		}

		{
			const ScopedRenderStates2D blend{ BlendState::Additive };
			effect1.update();
		}

		effect2.update();
	}
}
8. ウィンドウタイトルを設定しよう
Siv3D のデフォルトのウィンドウタイトルは Siv3D App ですが、Window::SetTitle() でゲームのタイトルなどに変更できます。バージョン番号も合わせて表示すると、開発者やユーザーがバージョンを確認しやすくなります。
なお、Windows では Alt+Enter を押すと簡単にフルスクリーンに切り替えられます。フルスクリーンモードではウィンドウタイトルの内容を確認できないため、ゲームの進行に関わる情報をタイトルに表示することは避けましょう。

コード
9. アイコンだけのボタンは避けよう
アイコンだけのボタンは、プレイヤーに意味が伝わりにくく、意図しない操作の原因となります。ボタンの機能を明確にするために、アイコンに加えてテキストを表示するとよいでしょう。
デザインの都合上どうしてもテキストを表示できない場合は、マウスオーバー時にツールチップを表示するとよいでしょう。
コード
# include <Siv3D.hpp>

void CircleButtonWithTooltip(const Circle& circle, const Texture& icon, const String& text, const ColorF& color)
{
	circle.drawShadow(Vec2{ 2, 2 }, 12).draw(color).drawFrame(1.5, 0.5, ColorF{ 1.0, 0.5 });
	icon.drawAt(circle.center);

	if (circle.mouseOver())
	{
		Cursor::RequestStyle(CursorStyle::Hand);

		constexpr double FontSize = 18;
		const Font& font = SimpleGUI::GetFont();
		const SizeF size = (font(text).region(FontSize).size + SizeF{ 20, 10 });

		const RoundRect rect{ Arg::center = circle.center.movedBy(0, -circle.r - size.y * 0.6), size, 8 };
		rect.drawShadow(Vec2{ 2, 2 }, 8).draw(ColorF{ 0.99 }).drawFrame(1, 0, ColorF{ 0.11 });
		font(text).drawAt(FontSize, rect.center().movedBy(0, -1), ColorF{ 0.11 });
	}
}

void Main()
{
	Scene::SetBackground(ColorF{ 0.6, 0.8, 0.7 });
	const Texture icon1{ 0xF1130_icon, 60 };
	const Texture icon2{ 0xF0A70_icon, 60 };

	const Circle circle1{ 300, 400, 50 };
	const Circle circle2{ 450, 400, 50 };

	while (System::Update())
	{
		SimpleGUI::Button(U"\U000F0982", Vec2{ 60, 60 }, 60);
		SimpleGUI::Button(U"\U000F0349", Vec2{ 60, 100 }, 60);
		SimpleGUI::Button(U"\U000F0A7A", Vec2{ 60, 140 }, 60);
		SimpleGUI::Button(U"\U000F05B7", Vec2{ 60, 180 }, 60);
		SimpleGUI::Button(U"\U000F034E", Vec2{ 60, 220 }, 60);

		SimpleGUI::Button(U"\U000F0982 マップ", Vec2{ 320, 60 }, 140);
		SimpleGUI::Button(U"\U000F0349 検索", Vec2{ 320, 100 }, 140);
		SimpleGUI::Button(U"\U000F0A7A 選択中のアイテムを削除", Vec2{ 320, 140 }, 300);
		SimpleGUI::Button(U"\U000F05B7 この建物を修繕", Vec2{ 320, 180 }, 300);
		SimpleGUI::Button(U"\U000F034E 現在地へ移動", Vec2{ 320, 220 }, 300);

		CircleButtonWithTooltip(circle1, icon1, U"回復薬を使う", ColorF{ 0.2, 0.6, 0.9 });
		CircleButtonWithTooltip(circle2, icon2, U"料理を作る", ColorF{ 0.7, 0.5, 0.1 });
	}
}
10. 複数の操作方法に対応しよう
Siv3D では、キーボード、マウス、ゲームパッドなどの様々な入力方法を InputGroup にまとめることができます。
例えば次のコードでは、マウスの左ボタン、W、Up、Space、XInput 対応コントローラの B ボタンのいずれかが押されたときに jumpInput.down() が true になり、簡単に複数の入力手段に対応できることがわかります。
コード
11. 斜め方向の移動量を調整しよう
Up を押すと上に 1, Right を押すと右に 1 移動する単純なコードで、Up と Right を同時に押すと、右上に √2 (約 1.41) 移動することになり、移動量が大きくなります。ゲームによってはこの挙動が望ましくない場合があります。次のようなコードで、斜め方向の移動量を調整することができます。
コード
# include <Siv3D.hpp>

Vec2 GetMove(bool adjust)
{
	Vec2 move{ 0, 0 };

	if (KeyUp.pressed())
	{
		move.y -= 1;
	}
	else if (KeyDown.pressed())
	{
		move.y += 1;
	}

	if (KeyLeft.pressed())
	{
		move.x -= 1;
	}
	else if (KeyRight.pressed())
	{
		move.x += 1;
	}

	if (adjust)
	{
		// ベクトルの長さを 1 にする。ゼロベクトルの場合は何もしない
		move.setLength(1.0);
	}

	return move;
}

void Main()
{
	Scene::SetBackground(ColorF{ 0.6, 0.8, 0.7 });

	const Font font{ FontMethod::MSDF, 48, Typeface::Bold };

	// 斜め方向の移動量を調整するか
	bool adjust = true;

	Circle circle{ 400, 300, 20 };

	while (System::Update())
	{
		const double deltaTime = Scene::DeltaTime();

		const Vec2 baseMove = GetMove(adjust);

		circle.moveBy(baseMove * 200 * deltaTime);

		circle.draw(ColorF{ 0.25 });

		SimpleGUI::CheckBox(adjust, U"斜め方向の移動量を調整する", Vec2{ 40, 40 });

		font(U"ベースの移動ベクトルの長さ: {:.2f}"_fmt(baseMove.length())).draw(24, Vec2{ 360, 40 });
	}
}
12. 重ねずにランダムに配置する方法を知ろう
画面に何らかの要素をランダムに配置したい場合、RandomVec2(sceneRect) を使うと要素同士が重なったり、分布の偏りが生じたりすることがあります。
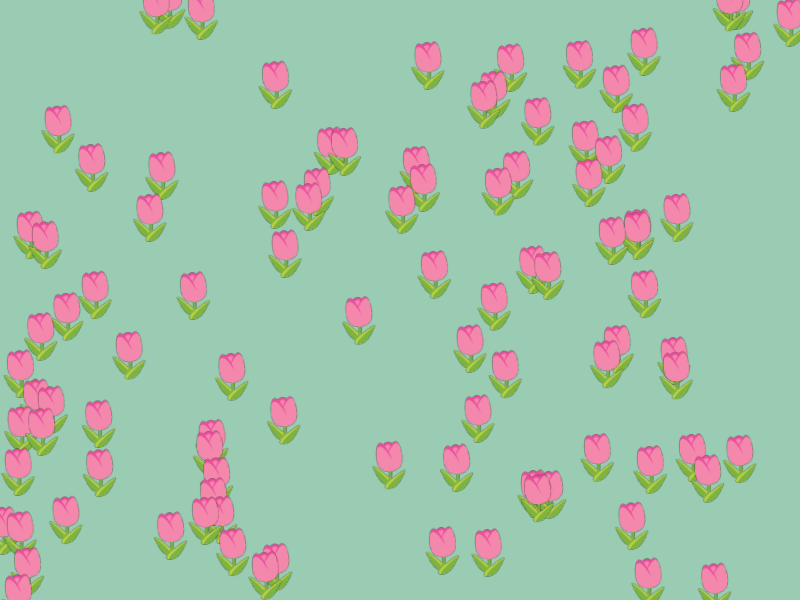
コード
# include <Siv3D.hpp>

Array<Vec2> GenerateRandomPoints(const Rect& rect, int32 count)
{
	Array<Vec2> points;

	for (int32 i = 0; i < count; ++i)
	{
		points.push_back(RandomVec2(rect));
	}

	return points;
}

bool SortByY(const Vec2& a, const Vec2& b)
{
	return (a.y < b.y);
}

void Main()
{
	Scene::SetBackground(ColorF{ 0.6, 0.8, 0.7 });
	constexpr Rect SceneRect{ 0, 0, 800, 600 };
	const Texture texture{ U"🌷"_emoji };

	Array<Vec2> positions = GenerateRandomPoints(SceneRect, 100)
		.sorted_by(SortByY); // 手前の絵文字のほうが奥の絵文字よりあとに描画されるようにソートする

	while (System::Update())
	{
		if (MouseL.down())
		{
			positions = GenerateRandomPoints(SceneRect, 100).sorted_by(SortByY);
		}

		for (const auto& pos : positions)
		{
			texture.scaled(0.4).drawAt(pos);
		}
	}
}
PoissonDisk2D クラスを使うと、ほどよい距離で重ならない点群を生成することができます。
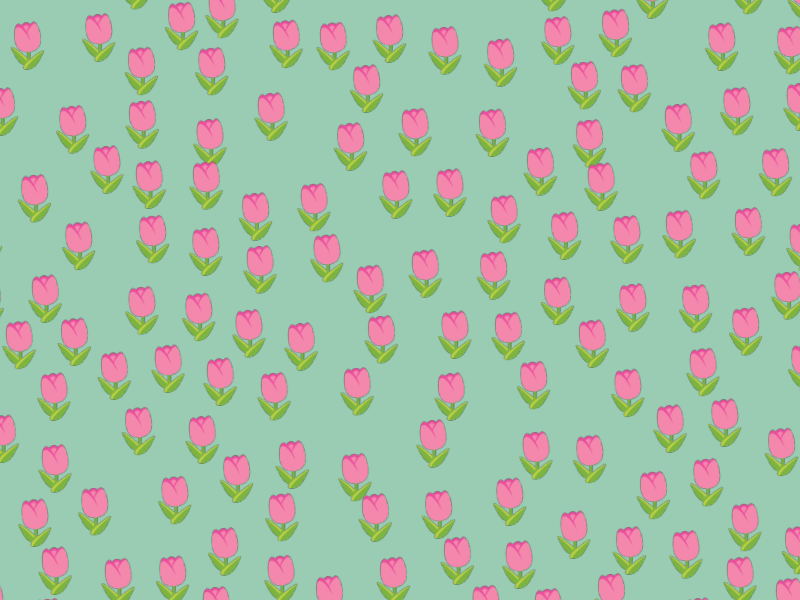
コード
# include <Siv3D.hpp>

/// @brief ほどよい距離で重ならない点群を生成します。
/// @param rect 点群を生成する範囲
/// @param radius 点群の点の間の最小距離(目安)
/// @param clip true の場合、範囲外の点を切り取ります。
/// @return 生成された点群
Array<Vec2> GenerateRandomPoints(const Rect& rect, double radius, bool clip = false)
{
	Array<Vec2> points;
	PoissonDisk2D pd{ rect.size, radius };

	for (const auto& point : pd.getPoints())
	{
		const Vec2 pos = (point + rect.pos);

		if (clip && (not rect.contains(pos)))
		{
			continue;
		}

		points << pos;
	}

	return points;
}

bool SortByY(const Vec2& a, const Vec2& b)
{
	return (a.y < b.y);
}

void Main()
{
	Scene::SetBackground(ColorF{ 0.6, 0.8, 0.7 });
	constexpr Rect SceneRect{ 0, 0, 800, 600 };
	const Texture texture{ U"🌷"_emoji };

	Array<Vec2> positions = GenerateRandomPoints(SceneRect, 52.0)
		.sorted_by(SortByY); // 手前の絵文字のほうが奥の絵文字よりあとに描画されるようにソートする

	while (System::Update())
	{
		if (MouseL.down())
		{
			positions = GenerateRandomPoints(SceneRect, 52.0).sorted_by(SortByY);
		}

		for (const auto& pos : positions)
		{
			texture.scaled(0.4).drawAt(pos);
		}
	}
}
13. マウスを使わないゲームではマウスカーソルを非表示にしよう
キーボードで操作することをプレイヤーに伝える最も簡単な方法は、マウスカーソルを非表示にすることです。マウスカーソルが表示されていると、プレイヤーはマウスを使って操作しようとしてしまいます。マウスを一切使わないゲームではマウスカーソルを非表示にすることを検討しましょう。
毎フレーム Cursor::RequestStyle(CursorStyle::Hidden) を呼び出すことで、マウスカーソルを非表示にすることができます。
コード
14. 色のみで区別する UI は避けよう
色のみで区別する UI は、色の組み合わせによっては P 型や D 型の 色覚特性 を持つ人にとって操作が困難になります。色以外の要素(例えば形状やテキスト)でも区別できるようにするか、色の組み合わせを変えることで、色覚特性を持つ人にも操作しやすい UI にすることができます。
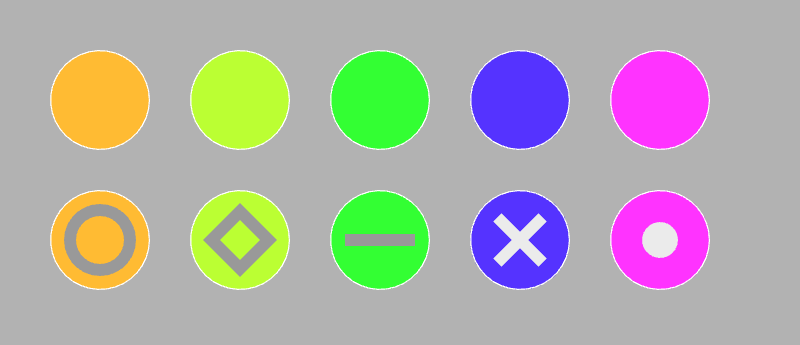
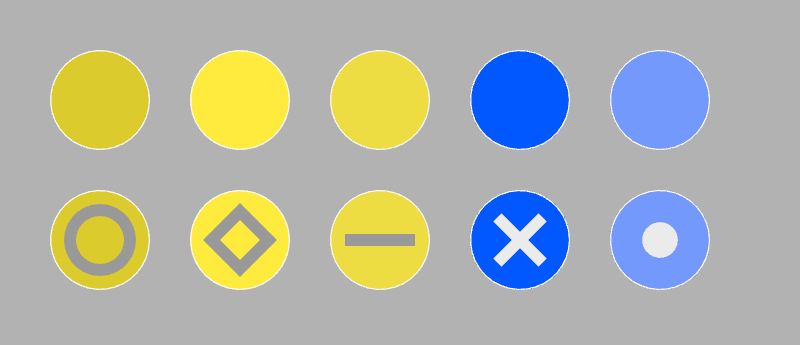
# include <Siv3D.hpp>

void DrawItem(const Vec2& pos, const ColorF& color)
{
	Circle{ pos, 50 }.draw(color)
		.drawFrame(1.2, 0, ColorF{ 1.0 });
}

void Main()
{
	Scene::SetBackground(ColorF{ 0.7 });

	while (System::Update())
	{
		DrawItem(Vec2{ 100, 100 }, HSV{ 40, 0.8, 1.0 });
		DrawItem(Vec2{ 240, 100 }, HSV{ 80, 0.8, 1.0 });
		DrawItem(Vec2{ 380, 100 }, HSV{ 120, 0.8, 1.0 });
		DrawItem(Vec2{ 520, 100 }, HSV{ 250, 0.8, 1.0 });
		DrawItem(Vec2{ 660, 100 }, HSV{ 300, 0.8, 1.0 });

		DrawItem(Vec2{ 100, 240 }, HSV{ 40, 0.8, 1.0 });
		Circle{ 100, 240, 30 }.drawFrame(12, ColorF{ 0.6 });

		DrawItem(Vec2{ 240, 240 }, HSV{ 80, 0.8, 1.0 });
		RectF{ Arg::center(240, 240), 40 }.rotated(45_deg).drawFrame(12, ColorF{ 0.6 });

		DrawItem(Vec2{ 380, 240 }, HSV{ 120, 0.8, 1.0 });
		RectF{ Arg::center(380, 240), 70, 12 }.draw(ColorF{ 0.6 });

		DrawItem(Vec2{ 520, 240 }, HSV{ 250, 0.8, 1.0 });
		Shape2D::Cross(32, 12, Vec2{ 520, 240 }).draw(ColorF{ 0.92 });

		DrawItem(Vec2{ 660, 240 }, HSV{ 300, 0.8, 1.0 });
		Circle{ 660, 240, 18 }.draw(ColorF{ 0.92 });
	}
}
15. 二次元配列には Grid を使おう
Siv3D には二次元配列専用の Grid<Type> クラスがあります。Array<Array<Type>> に比べて、Grid<Type> はメモリの使用量が少なく、アクセスも高速です。また、Grid は Array と同様に for 文で簡単に走査できます。
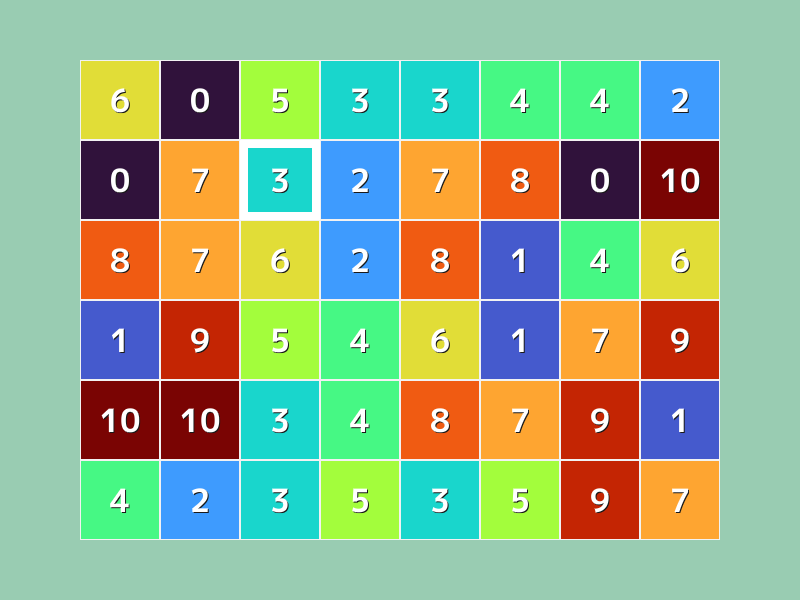
コード
# include <Siv3D.hpp>

void Main()
{
	Scene::SetBackground(ColorF{ 0.6, 0.8, 0.7 });
	const Font font{ FontMethod::MSDF, 48, Typeface::Bold };
	constexpr Point Offset{ 80, 60 };

	// 幅 8, 高さ 6 の二次元配列
	Grid<int32> grid(Size{ 8, 6 });

	for (auto& element : grid)
	{
		element = Random(10);
	}

	while (System::Update())
	{
		for (int32 y = 0; y < grid.height(); ++y)
		{
			for (int32 x = 0; x < grid.width(); ++x)
			{
				const Rect rect{ (Point{ (x * 80), (y * 80) } + Offset), 80 };
				const int32 value = grid[y][x];
				rect.draw(Colormap01F(value / 10.0));
				rect.drawFrame(1, 0, ColorF{ 0.95 });
				font(value).drawAt(TextStyle::Shadow(Vec2{ 1.5, 1.5 }, ColorF{ 0.1 }), 32, rect.center());
			}
		}

		for (int32 y = 0; y < grid.height(); ++y)
		{
			for (int32 x = 0; x < grid.width(); ++x)
			{
				const Rect rect{ (Point{ (x * 80), (y * 80) } + Offset), 80 };

				if (rect.mouseOver())
				{
					rect.drawFrame(8, 0);
				}
			}
		}
	}
}