Siv3D で Hello world する 21 の方法
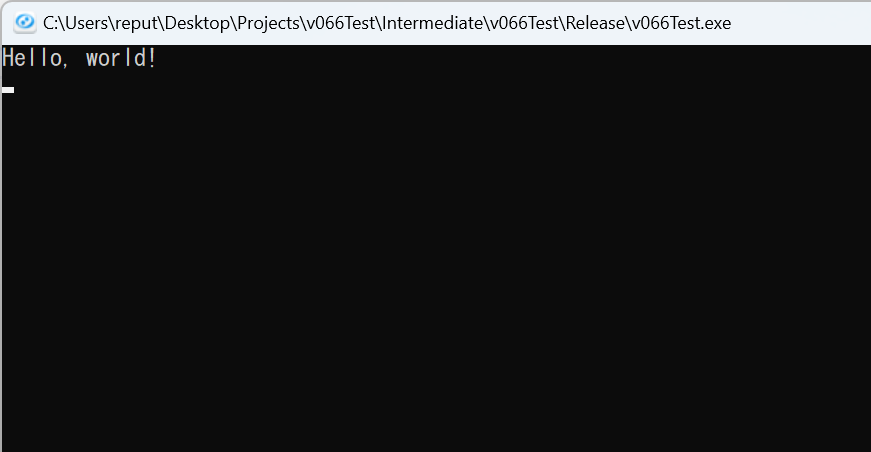
1. Print

# include <Siv3D.hpp>

void Main()
{
	Print << U"Hello, world!";

	while (System::Update())
	{

	}
}
2. Console
# include <Siv3D.hpp>

void Main()
{
	Console << U"Hello, world!";

	while (System::Update())
	{

	}
}
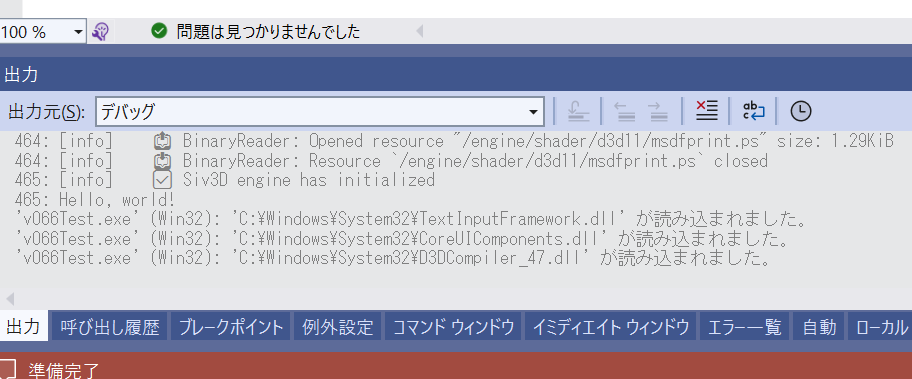
3. Logger
- ログ出力機能
Logger を使います
- Visual Studio の場合、デバッグ実行することで「出力」ウィンドウ内に出力されます
# include <Siv3D.hpp>

void Main()
{
	Logger << U"Hello, world!";

	while (System::Update())
	{

	}
}
4. Say
- 音声読み上げ機能
Say を使います
- 読み上げ話者の言語は
TextToSpeech::SetDefaultLanguage() で変更できます
- OS の設定によっては特定の言語がデフォルトでインストールされていない場合があります
- Linux 版では動作しません
# include <Siv3D.hpp>

void Main()
{
	//TextToSpeech::SetDefaultLanguage(LanguageCode::EnglishUS);

	Say << U"Hello, world!";

	while (System::Update())
	{

	}
}
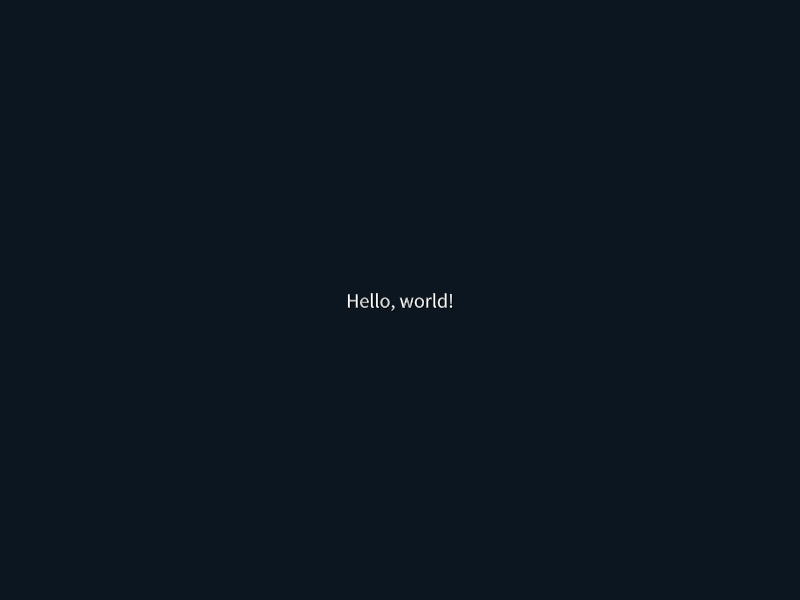
5. PutText
- 座標を指定できるデバッグ表示
PutText を使います
# include <Siv3D.hpp>

void Main()
{
	while (System::Update())
	{
		PutText(U"Hello, world!", Scene::Center());
	}
}
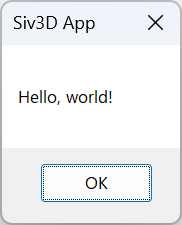
6. メッセージボックス
System::MessageBoxOK() でメッセージボックスを表示します
# include <Siv3D.hpp>

void Main()
{
	System::MessageBoxOK(U"Hello, world!");

	while (System::Update())
	{

	}
}
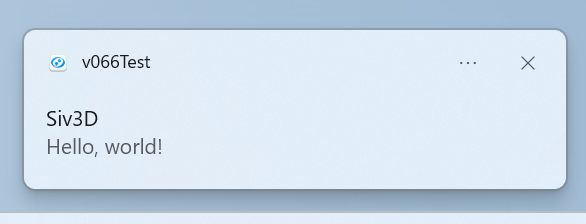
7. トースト通知
- トースト通知でメッセージを表示します
- Windows 版のみ利用できる機能です
# include <Siv3D.hpp>

void Main()
{
	ToastNotificationItem item{ .title = U"Siv3D", .message = U"Hello, world!"};

	Platform::Windows::ToastNotification::Show(item);

	while (System::Update())
	{

	}
}
8. ウィンドウタイトル
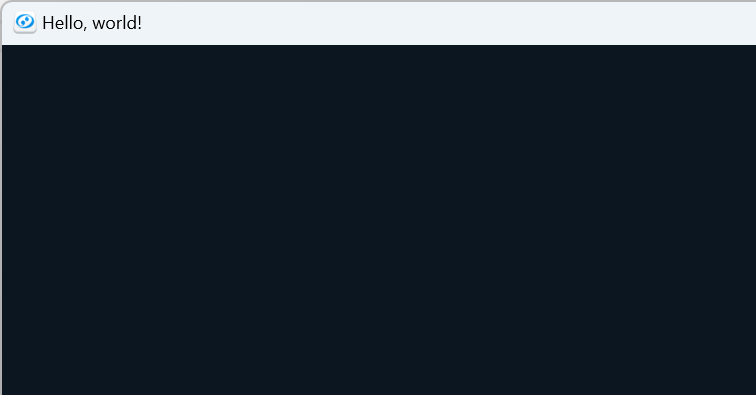
# include <Siv3D.hpp>

void Main()
{
	Window::SetTitle(U"Hello, world!");

	while (System::Update())
	{

	}
}
9. ボタン
SimpleGUI::Button() でボタンを表示します

# include <Siv3D.hpp>

void Main()
{
	Scene::SetBackground(ColorF{ 0.6, 0.8, 0.7 });

	while (System::Update())
	{
		if (SimpleGUI::Button(U"Hello, world!", Vec2{ 20, 20 }))
		{
			System::Exit();
		}
	}
}
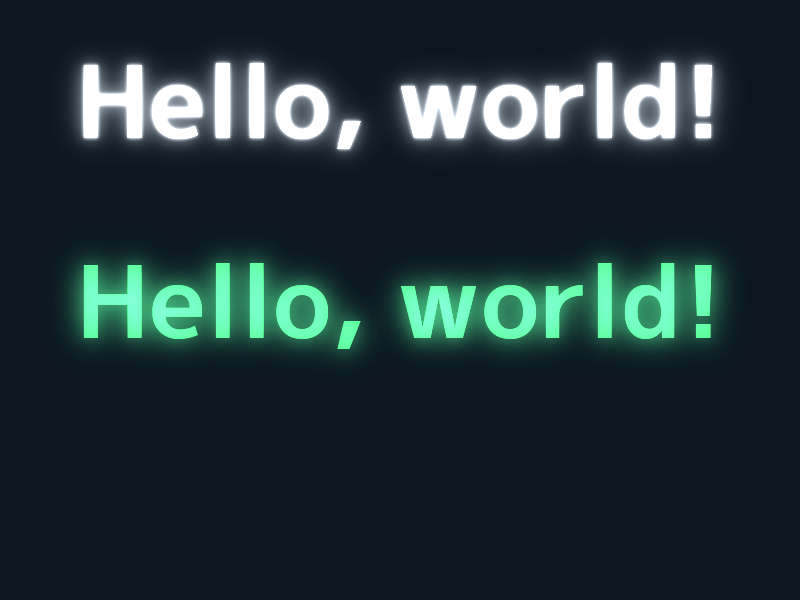
10. Font
FontMethod::MSDF 設定の Font を作成すると、大きさ、位置、色を指定してテキストを描画できます

# include <Siv3D.hpp>

void Main()
{
	Scene::SetBackground(ColorF{ 0.6, 0.8, 0.7 });

	const Font font{ FontMethod::MSDF, 48, Typeface::Bold };

	while (System::Update())
	{
		font(U"Hello, world!").drawAt(100, Scene::Center(), ColorF{ 0.1, 0.4, 0.7 });
	}
}
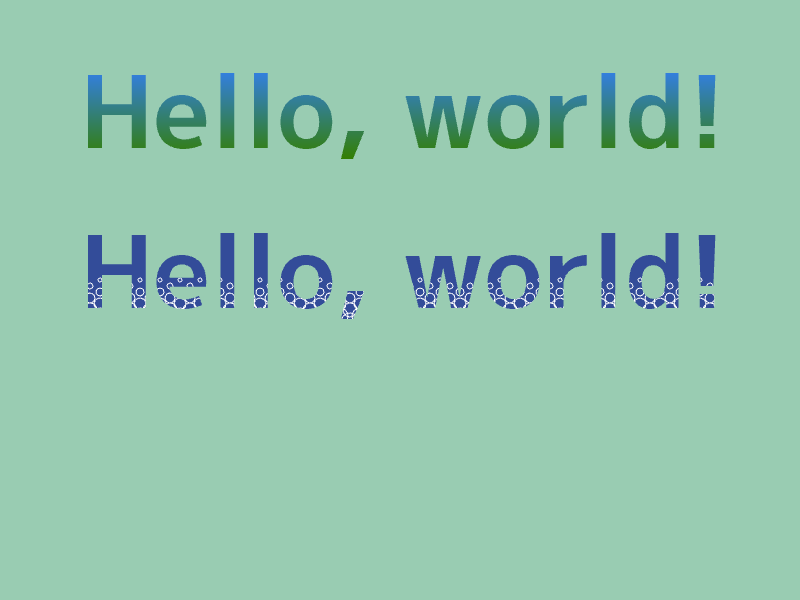
11. Glyph
Font::getGlyphs() で取得できる各文字の Glyph を使うと、文字単位で色や位置を制御できます
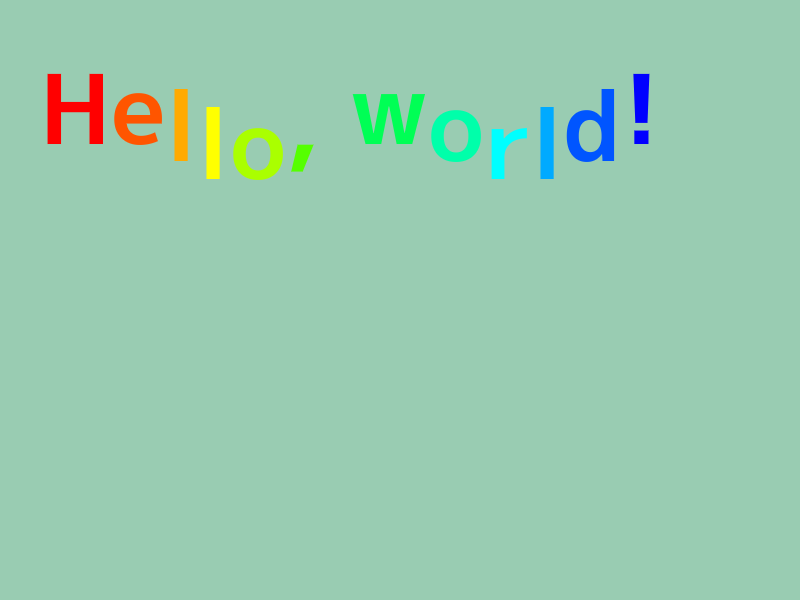
# include <Siv3D.hpp>

void Main()
{
	Scene::SetBackground(ColorF{ 0.6, 0.8, 0.7 });

	const Font font{ FontMethod::MSDF, 48, Typeface::Bold };

	const double scale = 2.0;

	while (System::Update())
	{
		Vec2 penPos{ 40, 40 };

		{
			const ScopedCustomShader2D shader{ Font::GetPixelShader(font.method(), TextStyle::Type::Default) };

			Graphics2D::SetMSDFParameters(TextStyle::Default());

			int32 i = 0;

			for (const auto& glyph : font.getGlyphs(U"Hello, world!"))
			{
				const ColorF color = HSV{ i * 20 };

				glyph.texture.scaled(scale).draw(Math::Round(penPos + glyph.getOffset() * scale), color);

				penPos.x += (glyph.xAdvance * scale);

				penPos.y += Math::Sin(i * 60_deg) * 20;

				++i;
			}
		}
	}
}
12. OutlineGlyph
Font::renderOutlines() で取得できる各文字の OutlineGlyph は、各文字の輪郭を LineString として扱えます
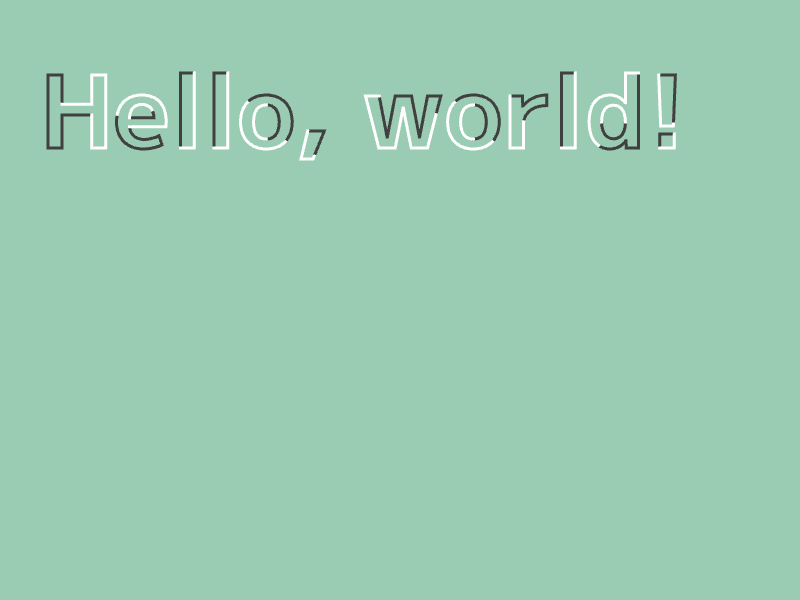
# include <Siv3D.hpp>

void Main()
{
	Scene::SetBackground(ColorF{ 0.6, 0.8, 0.7 });

	const Font font{ 100, Typeface::Bold };

	const Array<OutlineGlyph> glyphs = font.renderOutlines(U"Hello, world!");

	while (System::Update())
	{
		Vec2 penPos{ 40, 40 };

		for (const auto& glyph : glyphs)
		{
			const Transformer2D transform{ Mat3x2::Translate(penPos + glyph.getOffset()) };

			for (const auto& ring : glyph.rings)
			{
				const double halfLength = ring.calculateLength(CloseRing::Yes) * 0.5;

				ring.extractLineString(0.0, halfLength, CloseRing::Yes).draw(3, ColorF{ 0.25 });

				ring.extractLineString(halfLength, halfLength, CloseRing::Yes).draw(3, ColorF{ 1.0 });
			}

			penPos.x += glyph.xAdvance;
		}
	}
}
13. Buffer2D
Font::renderPolygons() で取得できる各文字の PolygonGlyph を Buffer2D に変換することで、文字にテクスチャを貼り付けて描画できます
# include <Siv3D.hpp>

// 背景テクスチャ 1 を作成する
Texture CreateTexture1()
{
	RenderTexture renderTexture{ Size{ 1, 128 } };
	{
		const ScopedRenderTarget2D renderTarget{ renderTexture };

		Rect{ 0, 0, 1, 128 }.draw(Arg::top(0.2, 0.5, 1.0), Arg::bottom(0.2, 0.5, 0.0));
	}

	Graphics2D::Flush();

	return renderTexture;
}

// 背景テクスチャ 2 を作成する
Texture CreateTexture2()
{
	MSRenderTexture renderTexture{ Size{ 800, 100 }, ColorF{ 0.2, 0.3, 0.6 } };
	{
		const ScopedRenderTarget2D renderTarget{ renderTexture };

		const ColorF PatternColor{ 1.0 };

		for (int32 y = 0; y < 8; ++y)
		{
			for (int32 x = 0; x <= 40; ++x)
			{
				if (IsEven(y))
				{
					Circle{ (x * 20), (60 + y * 6), (2 + y) }.drawFrame(1, PatternColor);
				}
				else
				{
					Circle{ (10 + x * 20), (60 + y * 6), (2 + y) }.drawFrame(1, PatternColor);
				}
			}
		}
	}

	// MSRenderTexture の完成には
	// 2D 描画命令の発行 (Flush) + MSAA の解決 (Resolve) が必要
	Graphics2D::Flush();
	renderTexture.resolve();

	// 完成したテクスチャを返す
	return renderTexture;
}

void Main()
{
	Scene::SetBackground(ColorF{ 0.6, 0.8, 0.7 });

	const Font font{ 100, Typeface::Bold };

	const Texture texture1 = CreateTexture1();

	const Texture texture2 = CreateTexture2();

	Array<Buffer2D> polygons;
	{
		Vec2 penPos{ 0, 0 };

		for (const auto& glyph : font.renderPolygons(U"Hello, world!"))
		{
			for (const auto& polygon : glyph.polygons)
			{
				polygons << polygon.movedBy(penPos + glyph.getOffset()).toBuffer2D(Vec2{ 0, 20 }, Vec2{ 800, 100 });
			}

			penPos.x += glyph.xAdvance;
		}
	}

	while (System::Update())
	{
		{
			const Transformer2D transform{ Mat3x2::Translate(80, 40) };

			for (const auto& polygon : polygons)
			{
				polygon.draw(texture1);
			}
		}

		{
			const Transformer2D transform{ Mat3x2::Translate(80, 200) };

			for (const auto& polygon : polygons)
			{
				polygon.draw(texture2);
			}
		}
	}
}
14. Image
Image にテキストを書き込むことで、柔軟な画像加工ができるようになります
# include <Siv3D.hpp>

void Main()
{
	Scene::SetBackground(ColorF{ 0.6, 0.8, 0.7 });

	const Font font{ 100, Typeface::Bold };

	Image image{ 800, 160, Palette::White };

	font(U"Hello, world!").paintAt(image, 400, 80, ColorF{ 0.25 });

	image.spread(8);

	const Texture texture{ image };

	while (System::Update())
	{
		texture.draw();
	}
}
15. RenderTexture
RenderTexture にテキストを描画することで、ガウスぼかしやダウンサンプリングを GPU で高速に処理できます
# include <Siv3D.hpp>

constexpr Size BaseSize{ 800, 256 };

// テクスチャを作成する
RenderTexture CreateTexture(const Font& font, StringView text)
{
	RenderTexture renderTexture{ Size{ 800, 256 }, ColorF{ 0.0 } };
	{
		const ScopedRenderTarget2D renderTarget{ renderTexture };

		font(text).drawAt(400, 100);
	}

	Graphics2D::Flush();

	return renderTexture;
}

void Main()
{
	const Font font{ 100, Typeface::Bold };
	const String text = U"Hello, world!";

	RenderTexture gaussianA1{ CreateTexture(font, text) }, gaussianB1{ BaseSize };
	RenderTexture gaussianA4{ BaseSize / 4 }, gaussianB4{ BaseSize / 4 };
	RenderTexture gaussianA8{ BaseSize / 8 }, gaussianB8{ BaseSize / 8 };
	{
		Shader::GaussianBlur(gaussianA1, gaussianB1, gaussianA1);
		Shader::Downsample(gaussianA1, gaussianA4);
		Shader::GaussianBlur(gaussianA4, gaussianB4, gaussianA4);
		Shader::Downsample(gaussianA4, gaussianA8);
		Shader::GaussianBlur(gaussianA8, gaussianB8, gaussianA8);
	}

	while (System::Update())
	{
		font(text).drawAt(400, 100);
		font(text).drawAt(400, 300, ColorF{ 0.3, 0.9, 0.5 });
		{
			const ScopedRenderStates2D blend{ BlendState::Additive };
			gaussianA1.draw(ColorF{ 1.0 });
			gaussianA4.resized(BaseSize).draw(ColorF{ 0.5 });
			gaussianA8.resized(BaseSize).draw(ColorF{ 0.5 });

			gaussianA4.resized(BaseSize).draw(0, 200, ColorF{ 0.3, 0.9, 0.5 } * 0.25);
			gaussianA8.resized(BaseSize).draw(0, 200, ColorF{ 0.3, 0.9, 0.5 });
		}
	}
}
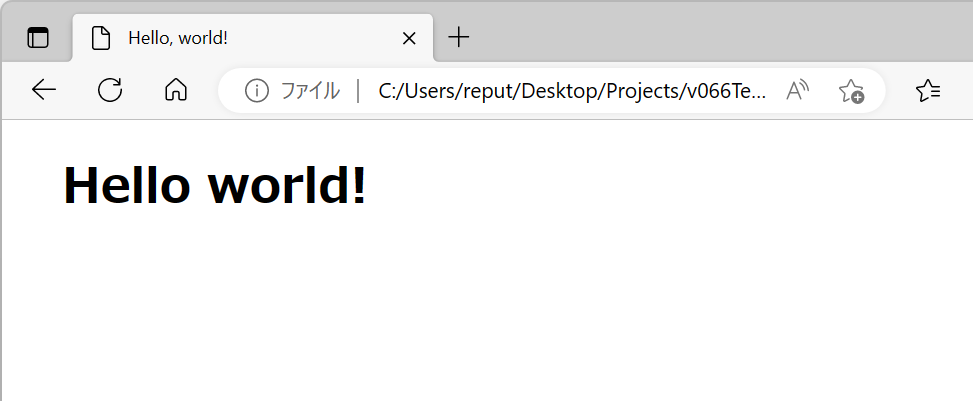
16. HTML
HTMLWriter を使って作成した HTML 文書を、System::LaunchBrowser() を使って Web ブラウザで開くことができます
# include <Siv3D.hpp>

void Main()
{
	{
		HTMLWriter html{ U"hello.html", U"Hello, world!" };

		// <h1>Hello world!</h1>
		html.writeHeader(U"Hello world!");
	}

	System::LaunchBrowser(U"hello.html");

	while (System::Update())
	{

	}
}
17. ライセンス
- ライセンス文書には追加のライセンス文を出力できます
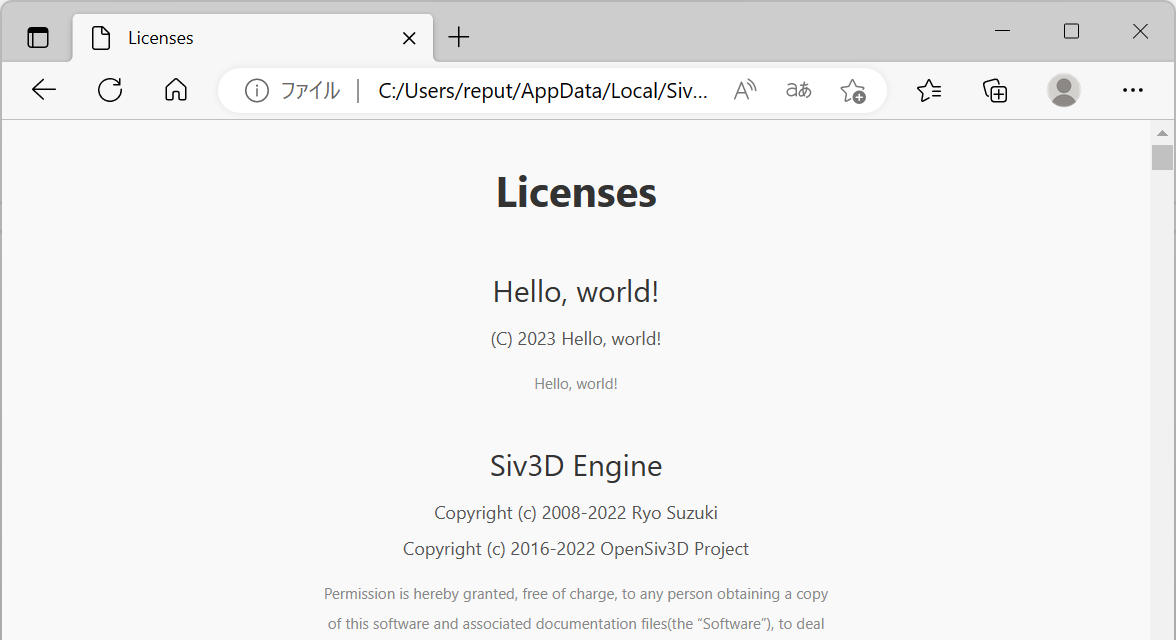
# include <Siv3D.hpp>

void Main()
{
	LicenseInfo info{ .title = U"Hello, world!", .copyright = U"(C) 2023 Hello, world!", .text = U"Hello, world!" };

	LicenseManager::AddLicense(info);

	LicenseManager::ShowInBrowser();

	while (System::Update())
	{

	}
}
18. クリップボード
Clipboard::SetText() でクリップボードの内容を変更できます
# include <Siv3D.hpp>

void Main()
{
	Clipboard::SetText(U"Hello, world!");

	while (System::Update())
	{

	}
}
19. ツイート
Twitter::OpenTweetWindow() によって、特定のメッセージをツイートする画面を Web ブラウザに表示できます
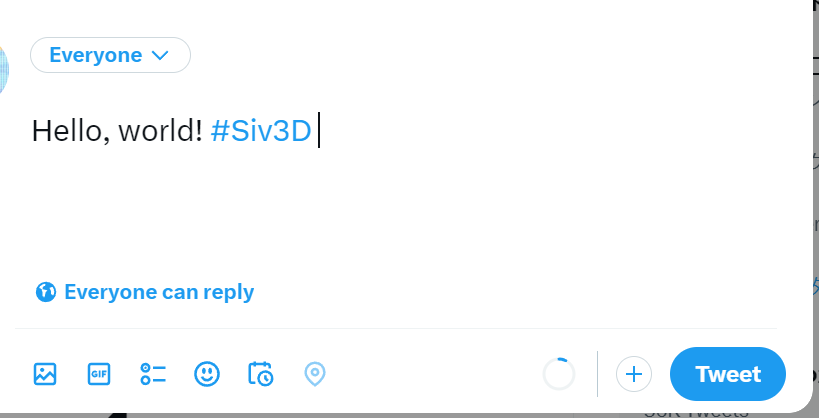
# include <Siv3D.hpp>

void Main()
{
	Twitter::OpenTweetWindow(U"Hello, world! #Siv3D");

	while (System::Update())
	{

	}
}
20. KlattTTS
- 古典的な音声合成モデルを用いた音声読み上げ機能
KlattTTS::Speak() を使います
# include <Siv3D.hpp>

void Main()
{
	KlattTTS::Speak(U"Hello, world!");

	while (System::Update())
	{

	}
}
21. QR
- 指定したテキストを QR コードに変換して表示します

# include <Siv3D.hpp>

void Main()
{
	Scene::SetBackground(ColorF{ 0.6, 0.8, 0.7 });

	const Texture texture{ QR::MakeImage(QR::EncodeText(U"Hello, world!")) };

	while (System::Update())
	{
		texture.draw(40, 40);
	}
}