勉強会 1 コマ目(体験)
1. プログラムのビルドと実行
Siv3D の開発に必要な環境を整え、最初のプログラムをビルドして実行してみましょう。
Siv3D の最新版は 2024 年 7 月 3 日にリリースされた v0.6.15 です。後半では v0.6.15 の最新機能を使ったプログラムを体験するため、未インストールの場合はインストールしてください。
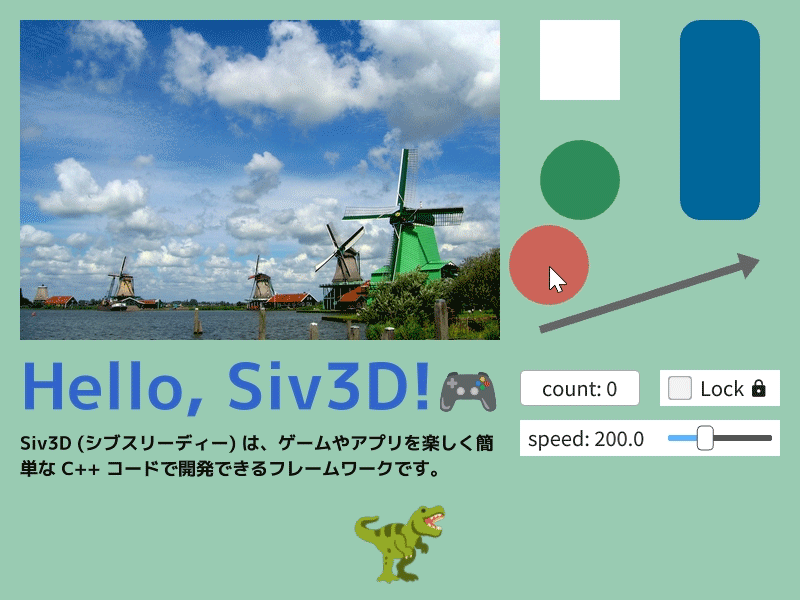
最初から用意されているサンプルプログラムは次のようになっています。ウィンドウを閉じるか、Esc キーを押すことでプログラムは終了します。
サンプルコードのカスタマイズ
サンプルコードの 8 箇所に (+) マークがあります。(+) をクリックするとカスタマイズのヒントが現れます。
# include <Siv3D.hpp>

void Main()
{
	// 背景の色を設定する | Set the background color
	Scene::SetBackground(ColorF{ 0.6, 0.8, 0.7 }); // (1)!

	// 画像ファイルからテクスチャを作成する | Create a texture from an image file
	const Texture texture{ U"example/windmill.png" };

	// 絵文字からテクスチャを作成する | Create a texture from an emoji
	const Texture emoji{ U"🦖"_emoji }; // (2)!

	// 太文字のフォントを作成する | Create a bold font with MSDF method
	const Font font{ FontMethod::MSDF, 48, Typeface::Bold };

	// テキストに含まれる絵文字のためのフォントを作成し、font に追加する | Create a font for emojis in text and add it to font as a fallback
	const Font emojiFont{ 48, Typeface::ColorEmoji };
	font.addFallback(emojiFont);

	// ボタンを押した回数 | Number of button presses
	int32 count = 0;

	// チェックボックスの状態 | Checkbox state
	bool checked = false;

	// プレイヤーの移動スピード | Player's movement speed
	double speed = 200.0;

	// プレイヤーの X 座標 | Player's X position
	double playerPosX = 400;

	// プレイヤーが右を向いているか | Whether player is facing right
	bool isPlayerFacingRight = true;

	while (System::Update())
	{
		// テクスチャを描く | Draw the texture
		texture.draw(20, 20); // (3)!

		// テキストを描く | Draw text
		font(U"Hello, Siv3D!🎮").draw(64, Vec2{ 20, 340 }, ColorF{ 0.2, 0.4, 0.8 }); // (4)!

		// 指定した範囲内にテキストを描く | Draw text within a specified area
		font(U"Siv3D (シブスリーディー) は、ゲームやアプリを楽しく簡単な C++ コードで開発できるフレームワークです。")
			.draw(18, Rect{ 20, 430, 480, 200 }, Palette::Black);

		// 長方形を描く | Draw a rectangle
		Rect{ 540, 20, 80, 80 }.draw();

		// 角丸長方形を描く | Draw a rounded rectangle
		RoundRect{ 680, 20, 80, 200, 20 }.draw(ColorF{ 0.0, 0.4, 0.6 });

		// 円を描く | Draw a circle
		Circle{ 580, 180, 40 }.draw(Palette::Seagreen);

		// 矢印を描く | Draw an arrow
		Line{ 540, 330, 760, 260 }.drawArrow(8, SizeF{ 20, 20 }, ColorF{ 0.4 });

		// 半透明の円を描く | Draw a semi-transparent circle
		Circle{ Cursor::Pos(), 40 }.draw(ColorF{ 1.0, 0.0, 0.0, 0.5 }); // (5)!

		// ボタン | Button
		if (SimpleGUI::Button(U"count: {}"_fmt(count), Vec2{ 520, 370 }, 120, (checked == false)))
		{
			// カウントを増やす | Increase the count
			++count;
		}

		// チェックボックス | Checkbox
		SimpleGUI::CheckBox(checked, U"Lock \U000F033E", Vec2{ 660, 370 }, 120);

		// スライダー | Slider
		SimpleGUI::Slider(U"speed: {:.1f}"_fmt(speed), speed, 100, 400, Vec2{ 520, 420 }, 140, 120);

		// 左キーが押されていたら | If left key is pressed
		if (KeyLeft.pressed()) // (6)!
		{
			// プレイヤーが左に移動する | Player moves left
			playerPosX = Max((playerPosX - speed * Scene::DeltaTime()), 60.0);
			isPlayerFacingRight = false;
		}

		// 右キーが押されていたら | If right key is pressed
		if (KeyRight.pressed()) // (7)!
		{
			// プレイヤーが右に移動する | Player moves right
			playerPosX = Min((playerPosX + speed * Scene::DeltaTime()), 740.0);
			isPlayerFacingRight = true;
		}

		// プレイヤーを描く | Draw the player
		emoji.scaled(0.75).mirrored(isPlayerFacingRight).drawAt(playerPosX, 540); // (8)!
	}
}
- (R, G, B) = (0.6, 0.8, 0.7) でシーンの背景色を設定しています。数字を 0.0~1.0 の範囲で変更して、背景色を変えてみましょう。
- 絵文字データをロードしています。🦖 を 🐕 や 🐧, 🍔 に変えてみましょう。絵文字の前後に余分な空白を挿入しないよう気を付けてください。
- 画像ファイルから作成したテクスチャを、画面上の位置 (x, y) = (20, 20) に描画しています。数字を変えて、描かれる位置を変更してみましょう。
- 「Hello, Siv3D!🎮」という文章を画面に表示しています。文章を書き換えてみましょう。
.draw()の中の64は文字の大きさです。小さくしたり大きくしたりしてみましょう。 - マウスカーソルに追随する円を、半径 40 ピクセル、色 (R, G, B, 不透明度) = (1.0, 0.0, 0.0, 0.5) で描いています。円の半径や色、不透明度を変更してみましょう。
- Left が押されていたらプレイヤーが左に移動するようにしています。
KeyLeftをKeyAに変えて、A キーでプレイヤーを動かしてみましょう。 - Right が押されていたらプレイヤーが右に移動するようにしています。
KeyRightをKeyDに変えて、D キーでプレイヤーを動かしてみましょう。 -
.scaled(0.75)で絵文字のサイズを 75% に縮小しています。数字を変えて、絵文字のサイズを変更してみましょう。 -
Visual Studio や Xcode で変更したコードをビルドするとき、以前のプログラムが実行中のままだと、ビルドに失敗します。実行中の Siv3D プログラムを終了するには、ウィンドウを閉じるか、Esc を押します。
- 絵文字は emojipedia で探すと便利です。
- Windows の場合は、Win+. で出てくる絵文字入力メニューも使えます。
- Windows では、Alt+Enter でウィンドウを全画面表示にすることができます。
2. サンプルを体験する
この Web サイトには、ゲーム、アプリ、図形、物理演算など、テーマに分かれた 100 以上のサンプルが用意されています。その一部を紹介します。Siv3D を使うと、どれぐらいの行数でどのようなプログラムが書けるのか、体験してみましょう。
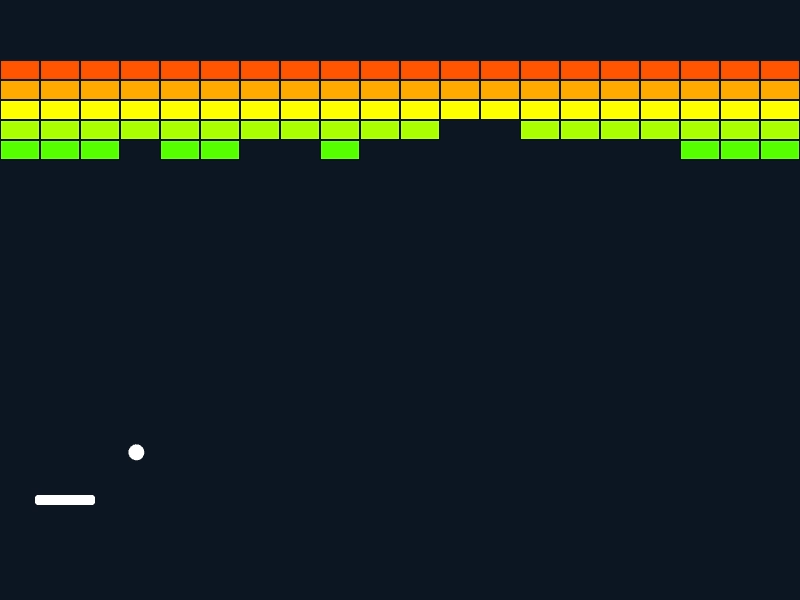
2.1 ブロックくずし
単純なブロックくずしゲームです。マウスでパドルを操作して、ボールを跳ね返してブロックを壊しましょう。ボールが画面下に落ちるとゲームオーバーです。
コードのコピーは右上のボタンで
サンプルコードをコピーするには、サンプルコードの右上にある「クリップボードへコピー」ボタンをクリックしてください。
コード
# include <Siv3D.hpp>

void Main()
{
	// 1 つのブロックのサイズ
	constexpr Size BrickSize{ 40, 20 };

	// ボールの速さ(ピクセル / 秒)
	constexpr double BallSpeedPerSec = 480.0;

	// ボールの速度
	Vec2 ballVelocity{ 0, -BallSpeedPerSec };

	// ボール
	Circle ball{ 400, 400, 8 };

	// ブロックの配列
	Array<Rect> bricks;

	for (int32 y = 0; y < 5; ++y)
	{
		for (int32 x = 0; x < (Scene::Width() / BrickSize.x); ++x)
		{
			bricks << Rect{ (x * BrickSize.x), (60 + y * BrickSize.y), BrickSize };
		}
	}

	while (System::Update())
	{
		// パドル
		const Rect paddle{ Arg::center(Cursor::Pos().x, 500), 60, 10 };

		// ボールを移動させる
		ball.moveBy(ballVelocity * Scene::DeltaTime());

		// ブロックを順にチェックする
		for (auto it = bricks.begin(); it != bricks.end(); ++it)
		{
			// ブロックとボールが交差していたら
			if (it->intersects(ball))
			{
				// ブロックの上辺、または底辺と交差していたら
				if (it->bottom().intersects(ball) || it->top().intersects(ball))
				{
					// ボールの速度の Y 成分の符号を反転する
					ballVelocity.y *= -1;
				}
				else // ブロックの左辺または右辺と交差していたら
				{
					// ボールの速度の X 成分の符号を反転する
					ballVelocity.x *= -1;
				}

				// ブロックを配列から削除する(イテレータは無効になる)
				bricks.erase(it);

				// これ以上チェックしない
				break;
			}
		}

		// 天井にぶつかったら
		if ((ball.y < 0) && (ballVelocity.y < 0))
		{
			// ボールの速度の Y 成分の符号を反転する
			ballVelocity.y *= -1;
		}

		// 左右の壁にぶつかったら
		if (((ball.x < 0) && (ballVelocity.x < 0))
			|| ((Scene::Width() < ball.x) && (0 < ballVelocity.x)))
		{
			// ボールの速度の X 成分の符号を反転する
			ballVelocity.x *= -1;
		}

		// パドルにあたったら
		if ((0 < ballVelocity.y) && paddle.intersects(ball))
		{
			// パドルの中心からの距離に応じてはね返る方向(速度ベクトル)を変える
			ballVelocity = Vec2{ (ball.x - paddle.center().x) * 10, -ballVelocity.y }.setLength(BallSpeedPerSec);
		}

		// すべてのブロックを描画する
		for (const auto& brick : bricks)
		{
			// ブロックの Y 座標に応じて色を変える
			brick.stretched(-1).draw(HSV{ brick.y - 40 });
		}

		// マウスカーソルを非表示にする
		Cursor::RequestStyle(CursorStyle::Hidden);

		// ボールを描く
		ball.draw();

		// パドルを描く
		paddle.rounded(3).draw();
	}
}
2.2 Text to P2Body
キーボードで入力した文字を物理演算の世界に落とし込むサンプルです。文字を入力して、Enter キーを押すと、文字が物理演算の世界に落ちていきます。Clear ボタンを押すと、物理演算の世界にある文字が消えます。
重い処理は Release ビルドで
このサンプルは重い計算を行うため、Release ビルドで実行することを推奨します。

コード
# include <Siv3D.hpp>

void Main()
{
	Window::Resize(1280, 720);

	Scene::SetBackground(ColorF{ 0.94, 0.91, 0.86 });

	const Font font{ 100, Typeface::Bold };

	// 2D 物理演算のシミュレーションステップ(秒)
	constexpr double StepTime = (1.0 / 200.0);

	// 2D 物理演算のシミュレーション蓄積時間(秒)
	double accumulatedTime = 0.0;

	// 物理演算のワールド
	P2World world;

	// 床
	const P2Body line = world.createLine(P2Static, Vec2{ 0, 0 }, Line{ -1600, 0, 1600, 0 }, OneSided::Yes, P2Material{ 1.0, 0.1, 1.0 });

	// 文字のパーツ
	Array<P2Body> bodies;

	String text;
	int32 generation = 0;
	HashTable<P2BodyID, int32> table;

	// 2D カメラ
	Camera2D camera{ Vec2{ 0, -500 }, 0.38, Camera2DParameters::MouseOnly() };

	constexpr Vec2 textPos{ -400, -500 };

	while (System::Update())
	{
		for (accumulatedTime += Scene::DeltaTime(); StepTime <= accumulatedTime; accumulatedTime -= StepTime)
		{
			// 2D 物理演算のワールドを更新する
			world.update(StepTime);
		}

		// テキストの入力を行う
		TextInput::UpdateText(text);

		// 2D カメラを更新する
		camera.update();
		{
			// 2D カメラを適用する Transformer2D を作成する
			const auto t = camera.createTransformer();

			// 世代に応じた色で Body を描画する
			for (const auto& body : bodies)
			{
				body.draw(HSV{ (table[body.id()] * 45 + 30), 0.8, 0.8 });
			}

			// 床を描画する
			line.draw(Palette::Green);

			const String currentText = (text + TextInput::GetEditingText());

			// 入力文字を描画する
			{
				const Transformer2D scaling{ Mat3x2::Scale(2.5) };

				font(currentText).draw(textPos, ColorF{ 0.5 });
			}

			// 改行文字が入力されたらテキストを P2Body にする
			if (currentText.includes(U'\n'))
			{
				// 入力文字を PolygonGlyph 化する
				const Array<PolygonGlyph> glyphs = font.renderPolygons(currentText.removed(U'\n'));

				// P2Body にする Polygon を得る
				Array<Polygon> polygons;
				{
					Vec2 penPos{ textPos };

					for (const auto& glyph : glyphs)
					{
						for (const auto& polygon : glyph.polygons)
						{
							polygons << polygon
								.movedBy(penPos + glyph.getOffset())
								.scaled(2.5)
								.simplified(2.0);
						}

						penPos.x += glyph.xAdvance;
					}
				}

				for (const auto& polygon : polygons)
				{
					bodies << world.createPolygon(P2Dynamic, Vec2{ 0, 0 }, polygon, P2Material{ 1, 0.0, 0.4 });

					// 現在の世代を保存する
					table[bodies.back().id()] = generation;
				}

				text.clear();

				// 世代を進める
				++generation;
			}

			// 2D カメラ、右クリック時の UI を表示する
			camera.draw(Palette::Orange);
		}

		// 消去ボタン
		if (SimpleGUI::Button(U"Clear", Vec2{ 1100, 40 }))
		{
			bodies.clear();
		}
	}
}
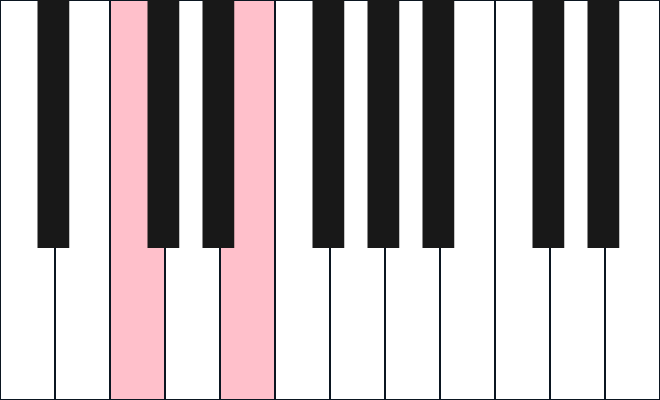
2.3 ピアノ
キーボードでピアノを演奏するサンプルです。Tab, 1, Q, W, 3, E, 4, R, T, 6, Y, 7, U, 8, I, O, 0, P, -, Enter キーで演奏します。
コード
# include <Siv3D.hpp>

void Main()
{
	// 白鍵の大きさ
	constexpr Size KeySize{ 55, 400 };

	// ウインドウをリサイズする
	Window::Resize((12 * KeySize.x), KeySize.y);

	// 楽器の種類
	constexpr GMInstrument Instrument = GMInstrument::Piano1;

	// 鍵盤の数
	constexpr int32 NumKeys = 20;

	// 音を作成
	std::array<Audio, NumKeys> sounds;
	for (int32 i = 0; i < NumKeys; ++i)
	{
		sounds[i] = Audio{ Instrument, static_cast<uint8>(PianoKey::A3 + i), 0.5s };
	}

	// 対応するキー
	constexpr std::array<Input, NumKeys> Keys =
	{
		KeyTab, Key1, KeyQ,
		KeyW, Key3, KeyE, Key4, KeyR, KeyT, Key6, KeyY, Key7, KeyU, Key8, KeyI,
		KeyO, Key0, KeyP, KeyMinus, KeyEnter,
	};

	// 描画位置計算用のオフセット値(白鍵は偶数、黒鍵は奇数)
	constexpr std::array<int32, NumKeys> KeyPositions =
	{
		0, 1, 2, 4, 5, 6, 7, 8, 10, 11, 12, 13, 14, 15, 16, 18, 19, 20, 21, 22
	};

	while (System::Update())
	{
		// キーが押されたら対応する音を再生
		for (int32 i = 0; i < NumKeys; ++i)
		{
			if (Keys[i].down())
			{
				sounds[i].playOneShot(0.5);
			}
		}

		// 白鍵を描画する
		for (int32 i = 0; i < NumKeys; ++i)
		{
			// オフセット値が偶数であるものが白鍵
			if (IsEven(KeyPositions[i]))
			{
				RectF{ (KeyPositions[i] / 2 * KeySize.x), 0, KeySize.x, KeySize.y }
					.stretched(-1).draw(Keys[i].pressed() ? Palette::Pink : Palette::White);
			}
		}

		// 黒鍵を描画する
		for (int32 i = 0; i < NumKeys; ++i)
		{
			// オフセット値が奇数であるものが黒鍵
			if (IsOdd(KeyPositions[i]))
			{
				RectF{ (KeySize.x * 0.68 + KeyPositions[i] / 2 * KeySize.x), 0, (KeySize.x * 0.58), (KeySize.y * 0.62) }
					.draw(Keys[i].pressed() ? Palette::Pink : Color{ 24 });
			}
		}
	}
}
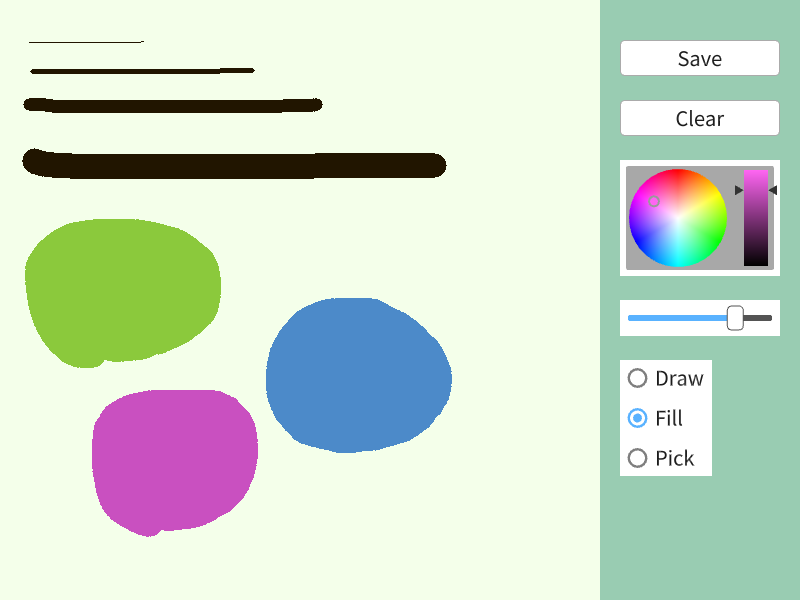
2.4 ペイント
マウスで描画するペイントアプリです。ペン、塗りつぶし、ピッカーの 3 つのモードを切り替えて使うことができます。ペンの太さや色を変えることもできます。
コード
# include <Siv3D.hpp>

void Main()
{
	Scene::SetBackground(ColorF{ 0.6, 0.8, 0.7 });

	// キャンバスのサイズ
	constexpr Size CanvasSize{ 600, 600 };

	// ペンの太さ
	double penThickness = 8;

	// ペンの色
	HSV penColor = Palette::Orange;

	// 書き込み用の画像データを用意する
	Image image{ CanvasSize, Palette::White };

	// 表示用のテクスチャ(内容を更新するので DynamicTexture)
	DynamicTexture texture{ image };

	const Array<String> modes = { U"Draw", U"Fill", U"Pick" };

	size_t modeIndex = 0;

	while (System::Update())
	{
		if (modeIndex == 0) // ペン
		{
			if (MouseL.pressed())
			{
				// 書き込む線の始点は直前のフレームのマウスカーソル座標
				// (初回はタッチ操作時の座標のジャンプを防ぐため、現在のマウスカーソル座標にする)
				const Point from = (MouseL.down() ? Cursor::Pos() : Cursor::PreviousPos());

				// 書き込む線の終点は現在のマウスカーソル座標
				const Point to = Cursor::Pos();

				// image に線を書き込む
				Line{ from, to }.overwrite(image, static_cast<int32>(penThickness), penColor, Antialiased::No);

				// 書き込み終わった image でテクスチャを更新
				texture.fill(image);
			}
			else if (MouseR.pressed())
			{
				const Point from = (MouseL.down() ? Cursor::Pos() : Cursor::PreviousPos());
				const Point to = Cursor::Pos();
				Line{ from, to }.overwrite(image, static_cast<int32>(penThickness), Palette::White, Antialiased::No);
				texture.fill(image);
			}
		}
		else if (modeIndex == 1) // 塗りつぶし
		{
			if (MouseL.down())
			{
				image.floodFill(Cursor::Pos(), penColor);
				texture.fill(image);
			}
			else if (MouseR.down())
			{
				image.floodFill(Cursor::Pos(), Palette::White);
				texture.fill(image);
			}
		}
		else // ピッカー
		{
			if (MouseL.down())
			{
				const Point cursorPos = Cursor::Pos();

				if (InRange(cursorPos.x, 0, (image.width() - 1))
					&& InRange(cursorPos.y, 0, (image.height() - 1)))
				{
					penColor = image[cursorPos];
				}
			}
		}

		if (SimpleGUI::Button(U"Save", Vec2{ 620, 40 }, 160))
		{
			image.saveWithDialog();
		}

		// 描いたものを消去するボタンが押されたら
		if (SimpleGUI::Button(U"Clear", Vec2{ 620, 100 }, 160))
		{
			// 画像を白で塗りつぶす
			image.fill(Palette::White);

			// 塗りつぶし終わった image でテクスチャを更新する
			texture.fill(image);
		}

		// 色の選択
		SimpleGUI::ColorPicker(penColor, Vec2{ 620, 160 });

		// ペンの太さ
		SimpleGUI::Slider(penThickness, 1.0, 30.0, Vec2{ 620, 300 }, 160);

		// モードの選択
		SimpleGUI::RadioButtons(modeIndex, modes, Vec2{ 620, 360 });

		// テクスチャを表示
		texture.draw();
	}
}
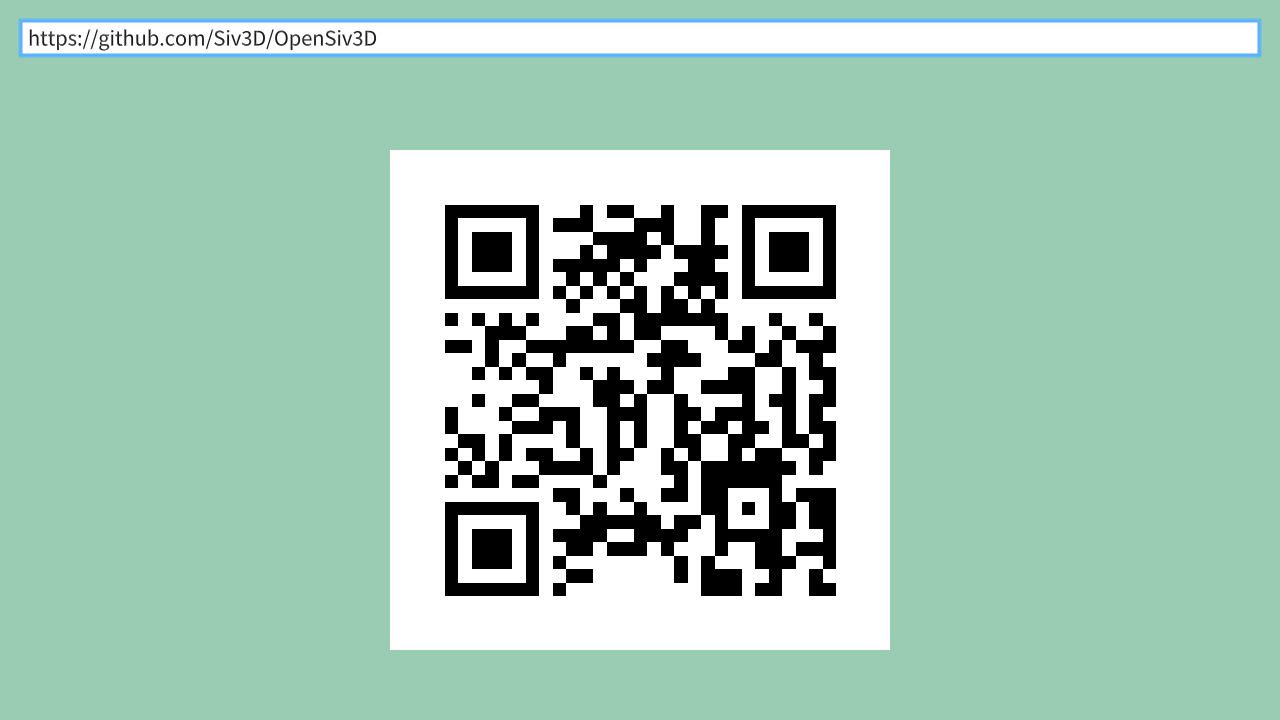
2.5 QR コード作成
テキストを入力すると、そのテキストの QR コードが表示されます。スマートフォンのカメラで読み取ると、テキストが表示されます。
コード
# include <Siv3D.hpp>

void Main()
{
	Window::Resize(1280, 720);

	Scene::SetBackground(ColorF{ 0.6, 0.8, 0.7 });

	// 変換するテキスト
	TextEditState textEdit{ U"Abc" };

	String previous;

	// QR コードを表示するための動的テクスチャ
	DynamicTexture texture;

	while (System::Update())
	{
		// テキスト入力
		SimpleGUI::TextBox(textEdit, Vec2{ 20,20 }, 1240);

		// テキストの更新があれば QR コードを再作成する
		if (const String current = textEdit.text;
			current != previous)
		{
			// 入力したテキストを QR コードに変換する
			if (const auto qr = QR::EncodeText(current))
			{
				// 枠を付けて拡大した画像で動的テクスチャを更新する
				texture.fill(QR::MakeImage(qr).scaled(500, 500, InterpolationAlgorithm::Nearest));
			}

			previous = current;
		}

		texture.drawAt(640, 400);
	}
}